Are you frustrated with the rigid styling limitations of default WooCommerce fields? Struggling to create a seamless brand experience throughout your customer account pages?
You’re not alone! Thousands of store owners face the same challenge when trying to customize the Bricks Builder for WooCommerce fields.
Default WooCommerce fields are notoriously rigid and offer limited styling control. Customizing them inside Bricks Builder feels restricted without extensive coding knowledge or expensive third-party solutions.
Most store owners find themselves with generic-looking account pages that don’t align with their brand aesthetic.
Follow this comprehensive step-by-step guide to learn how to customize Bricks Builder for WooCommerce fields and transform your customer experience from generic to extraordinary.
Why Customize WooCommerce Fields in Bricks Builder?
Almost 88% of customers trust user reviews as much as personal recommendations, making the visual presentation of your store crucial for building trust.
When customers interact with poorly designed account pages, it directly impacts their perception of your brand’s professionalism.
According to a StrangeLoop case study, a 1-second delay in page load time can lead to a 7% loss in conversions, 11% fewer page views, and a 16% decrease in customer satisfaction. This highlights why optimizing every aspect of your WooCommerce store, including account pages, is essential.
Here’s why customizing WooCommerce product fields with Bricks Builder is a game-changer:
Better UX for Logged-in Customers
When you customize WooCommerce checkout fields and account pages, you create a cohesive user journey that keeps customers engaged. Research shows that 69.57% of online shopping carts are abandoned, often due to poor user experience during the checkout and account management process.
Visual Flexibility with Page Builder Tools
Bricks Builder WooCommerce integration provides unlimited design possibilities. Unlike traditional methods that require PHP knowledge, you can now style every element visually, from billing forms to order history displays.
Boost Branding, Retention, and Trust
Consistent branding across all customer touchpoints increases trust and loyalty. When your account pages match your homepage design, customers feel more confident about their purchase decisions.
Avoid Complex PHP Overrides and Coding
Traditional WooCommerce field customization requires diving into theme files and writing custom PHP code. With Bricks Builder custom fields WooCommerce approach, you can achieve professional results without touching a single line of code.
Prerequisites
Before diving into how to customize WooCommerce fields with Bricks Builder, ensure you have these essential components installed:
Required Plugins:
- WooCommerce plugin – Installed and properly configured with your products
- Bricks Builder – Installed and active on your WordPress site
- Ultimate Store Kit Pro – The secret weapon for advanced WooCommerce field editor plugin functionality
Why Ultimate Store Kit?

Ultimate Store Kit is specifically designed to bridge the gap between Bricks Builder and WooCommerce customization. It provides specialized widgets and tools that make it effortless and professional to customize the WooCommerce product form in Bricks Builder.
The plugin offers:
- Pre-built My Account Page widgets
- Advanced form field customization options
- Seamless integration with Bricks Builder’s visual editor
- Mobile-responsive designs out of the box
Tutorial Guide: Install and activate Ultimate Store Kit
Now comes the exciting part – transforming your WooCommerce account pages into branded masterpieces. This method allows you to add custom checkout fields with WooCommerce functionality while maintaining full visual control.
Step 1: Create Theme Builder Pages
The foundation of customizing WooCommerce product fields starts with setting up proper theme builder pages. You’ll need to create individual pages for each section of the My Account area.
Pages to create:
- Dashboard
- Orders
- Downloads
- Account Details
- Wishlist
- Logout
How to create them:
- Navigate to your WordPress Dashboard
- Go to Bricks → Template
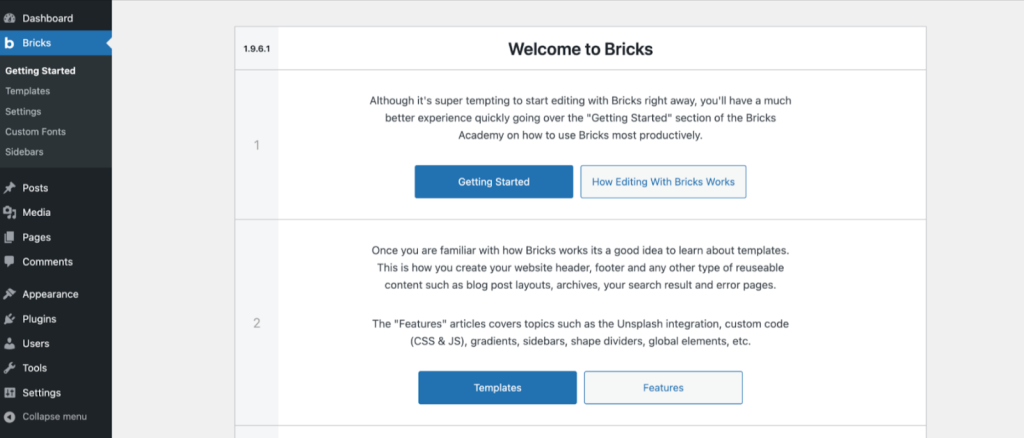
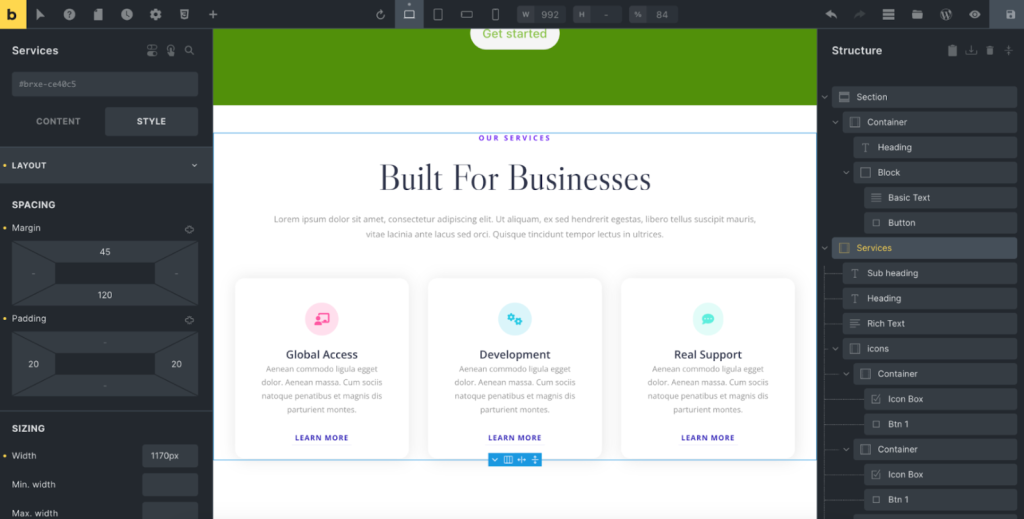
- Click “Edit With Bricks” for each page type.
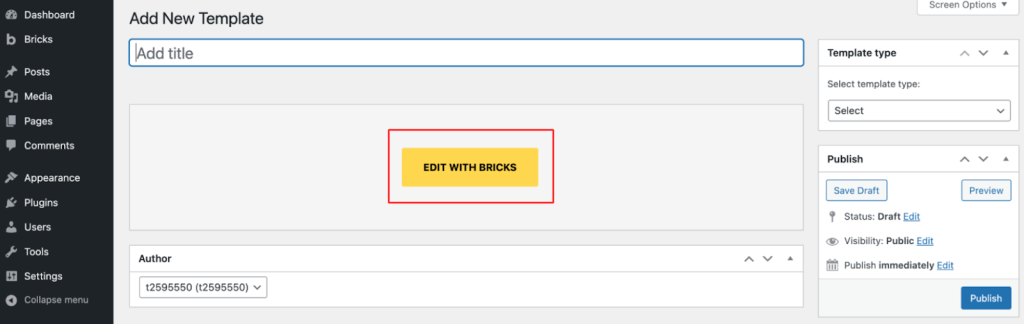
- Set the desired template to target the appropriate WooCommerce page

- Select template for each page from the Theme Builder interface
This approach ensures that when customers visit different sections of their account, they’ll see your custom-designed pages instead of the default WooCommerce templates.
Step 2: Add New Templates via Template Builder
The Ultimate Store Kit Template Builder is where the magic happens for Bricks Builder, allowing for customization of billing and shipping fields.
Access the Template Builder:
- Go to the Ultimate Store Kit → Template Builder section from your WordPress Dashboard
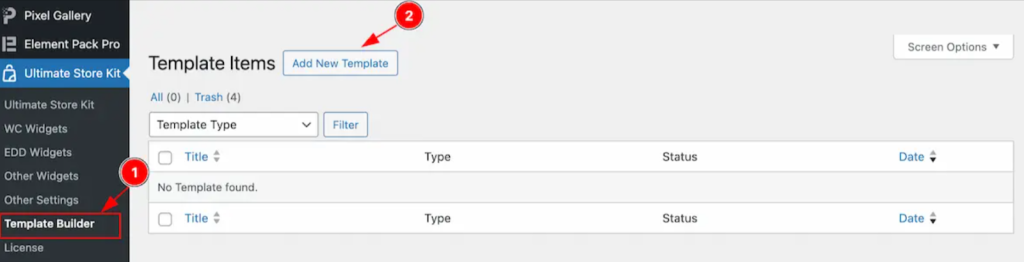
- Look for the “Add New Template” button
- Click it to open the template creation popup
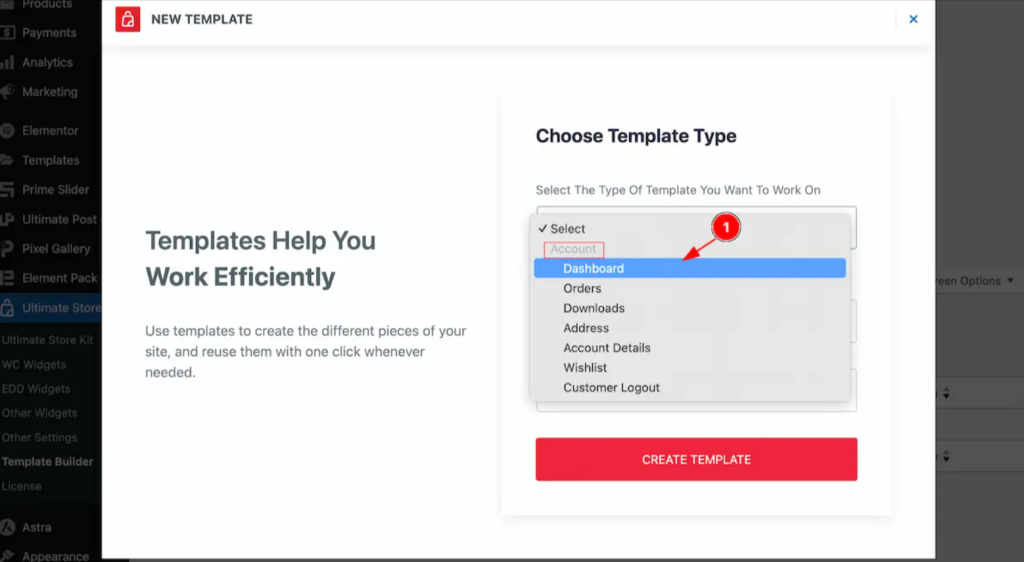
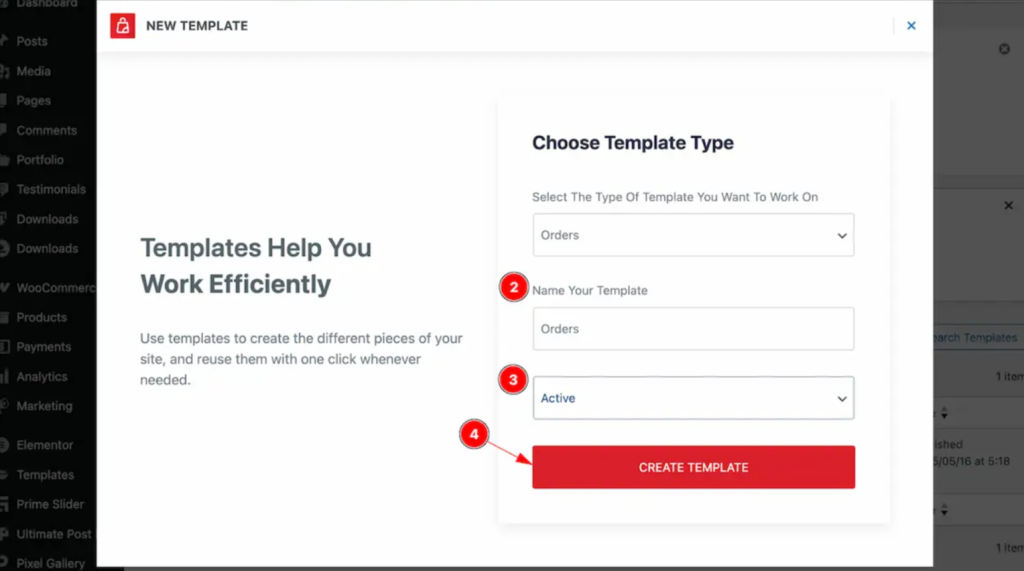
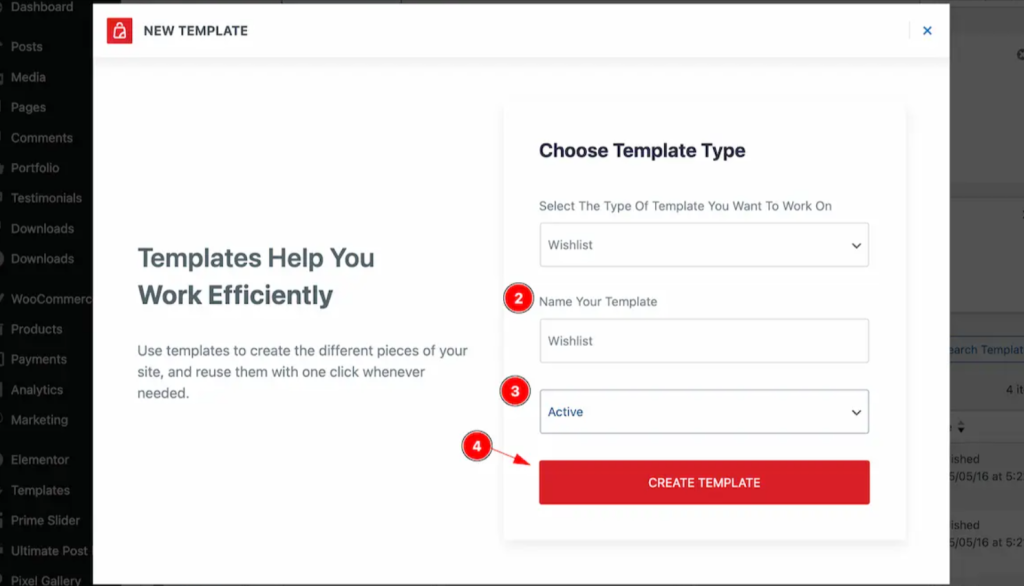
For Dashboard Page:

- Select “Dashboard” from the dropdown options
- Set a descriptive name like “Custom WooCommerce Dashboard”
- Change status to “Active”
- Click the “Create Template” button
Repeat this process for each page:
- Orders Page: Select “Orders” → Set name → Status “Active” → Create
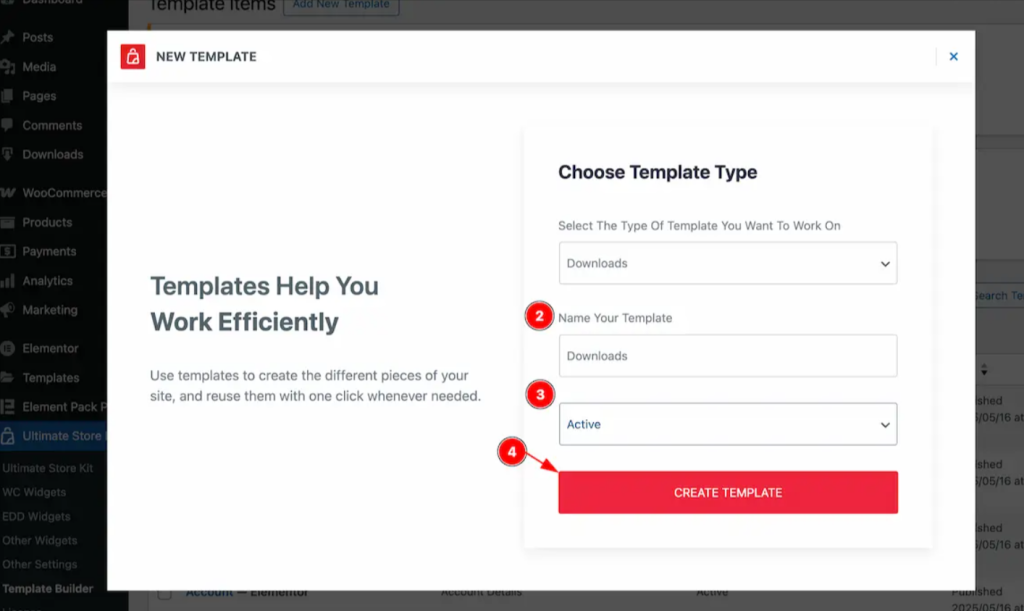
- Downloads Page: Select “Downloads” → Set name → Status “Active” → Create
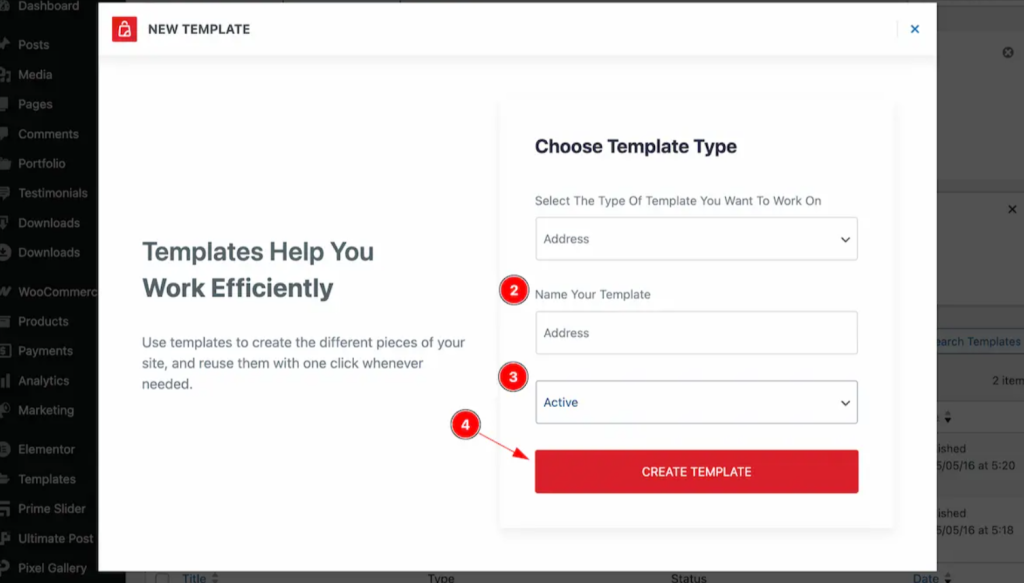
- Address Page: Select “Address” → Set name → Status “Active” → Create
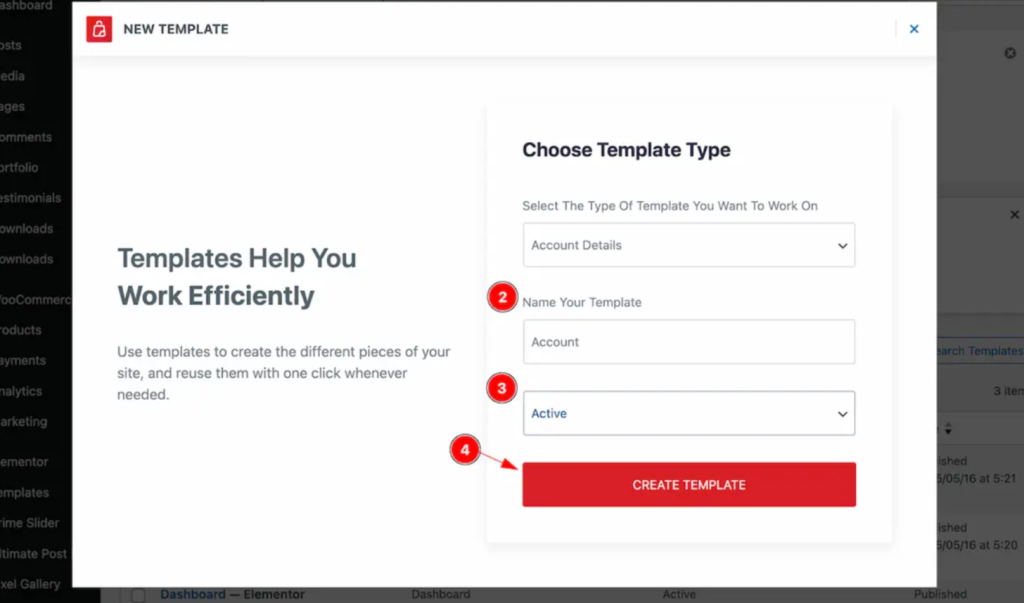
- Account Details Page: Select “Account Details” → Set name → Status “Active” → Create
- Wishlist Page: Select “Wishlist” → Set name → Status “Active” → Create
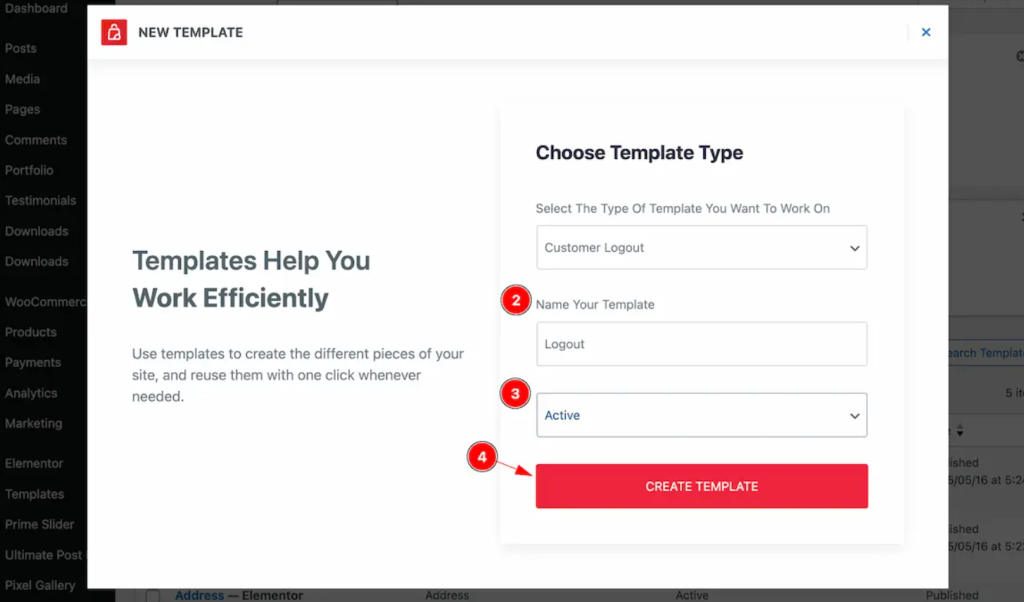
- Customer Logout Page: Select “Customer Logout” → Set name → Status “Active” → Create
This systematic approach ensures you have complete control over every aspect of the customer account experience.
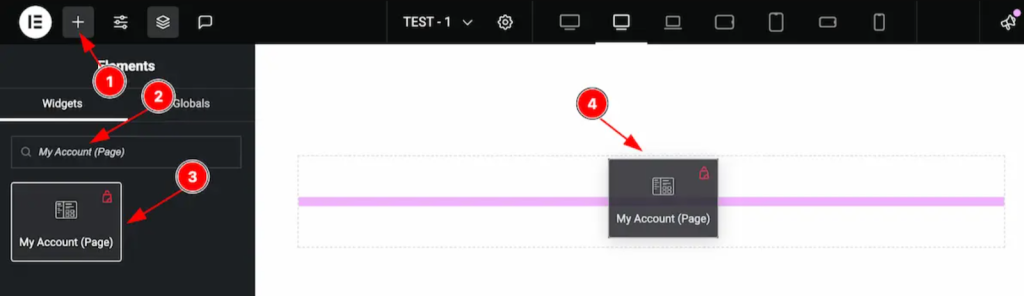
Step 3: Insert the My Account Page Widget
This is where dynamic WooCommerce product fields in Bricks Builder come to life. The My Account Page widget is the cornerstone of your customization.
Widget insertion process:
- Open any of your newly created templates in the Elementor Editor
- Click the “Add Element +” icon in the editor
- Search for “My Account Page” widget
- Look for the Ultimate Store Kit logo in the top-right corner to confirm it’s the correct widget.
- Drag and drop the widget onto your editor page.
Important: After inserting the widget, don’t make any manual edits yet
- Click the “Publish” button to save your changes
The beauty of this approach is that the widget handles most of the complex WooCommerce customization automatically, while still giving you full styling control.
Step 4: Enable the Widget from Plugin Settings
Before you use custom field values in Bricks Builder WooCommerce templates, you need to activate the widget in the plugin settings.
Activation steps:
- Navigate to WordPress Dashboard → Ultimate Store Kit Plugin
- Click on the “WC Widgets Tab”
- Search for “My Account Page Widget” in the widget list
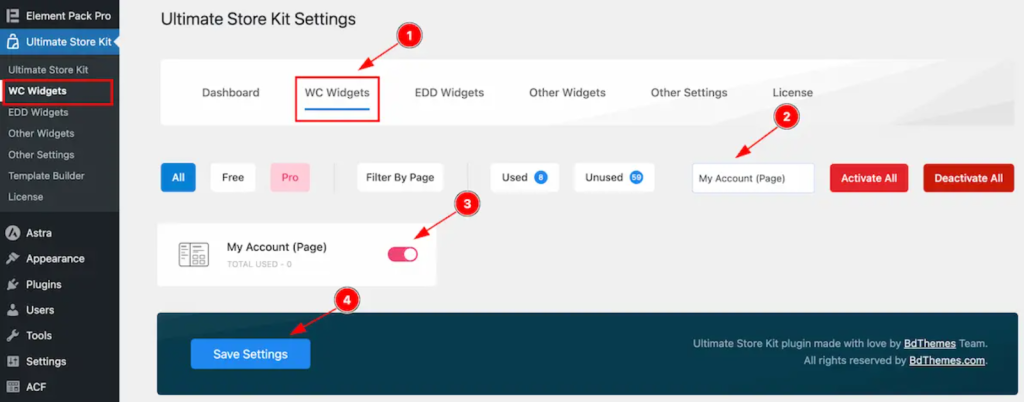
- Enable the My Account Page Widget by toggling it on
- Click the “Save Settings” button to apply changes
This step is crucial because it tells Ultimate Store Kit to load the necessary scripts and styles for your WooCommerce field editor plugin functionality.
Configure Layout and Structure (Content Tab)
The Content Tab is your control center for customizing the WooCommerce product form in Bricks Builder using Ultimate Store Kit. Here’s where you define how your account pages will look and function.
My Account Section Configuration
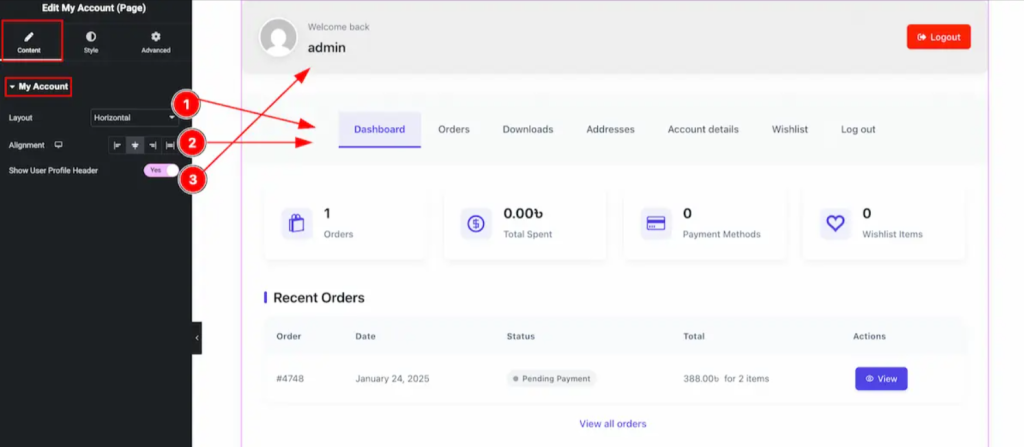
Layout Options: Navigate to Content → My Account to access these settings:
Horizontal Layout:
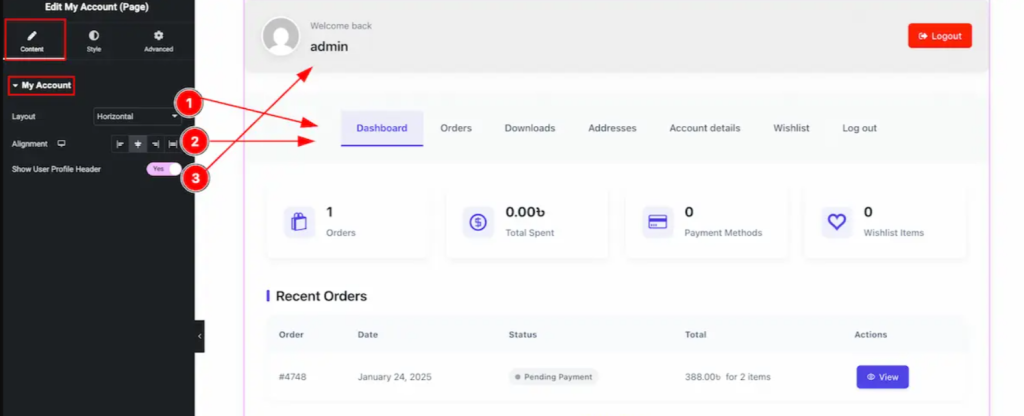
- Layout: Choose “Horizontal” to display the navigation menu horizontally at the top
- Alignment: Set content alignment (Left, Right, Center)
- Show User Profile Header: Enable this to display customer avatar and basic info
Vertical Layout:
- Layout: Select “Vertical” for a sidebar-style navigation
- Alignment: Position the navigation (Left, Center, Right)
- Show User Profile Header: Toggle on/off based on your design preferences
The layout choice has a significant impact on user experience. Horizontal layouts are well-suited for stores with fewer account sections, while vertical layouts offer improved navigation for comprehensive account areas.
Style Each Section (Style Tab Overview)
The Style Tab is where your Bricks Builder custom fields and WooCommerce vision come to life. This is the most exciting part of the customization process, allowing you to create a truly unique brand experience.
My Account Header + Wrapper Styling
Header Section (Style → My Account Header):
Background and Borders:
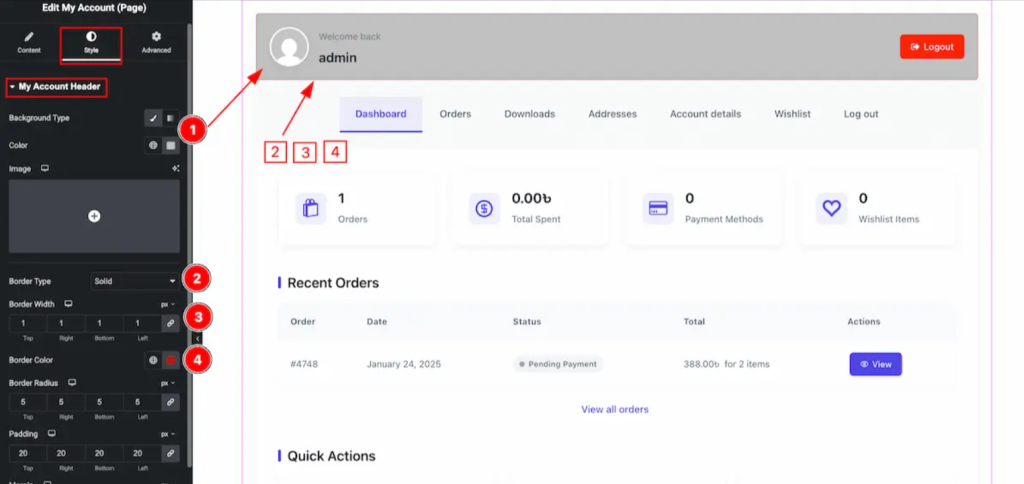
- Background Type: Choose from solid colors, gradients, or images
- Border Type: Select border style (solid, dashed, dotted, double)
- Border Width: Set thickness in pixels
- Border Color: Match your brand colors
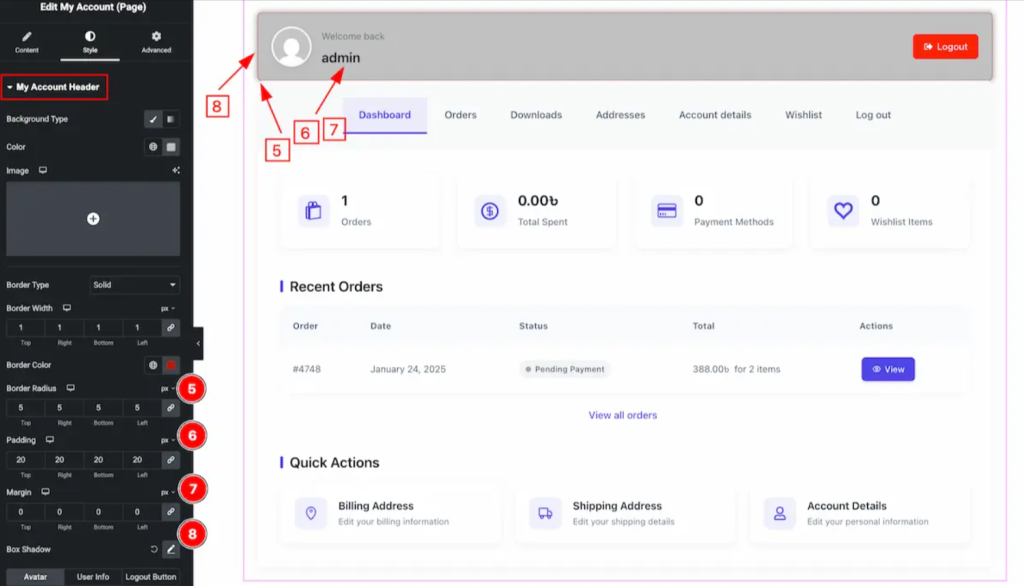
- Border Radius: Create rounded corners for a modern look
- Padding: Control inner spacing
- Margin: Adjust outer spacing
- Box Shadow: Add depth with subtle shadows
Avatar Customization:
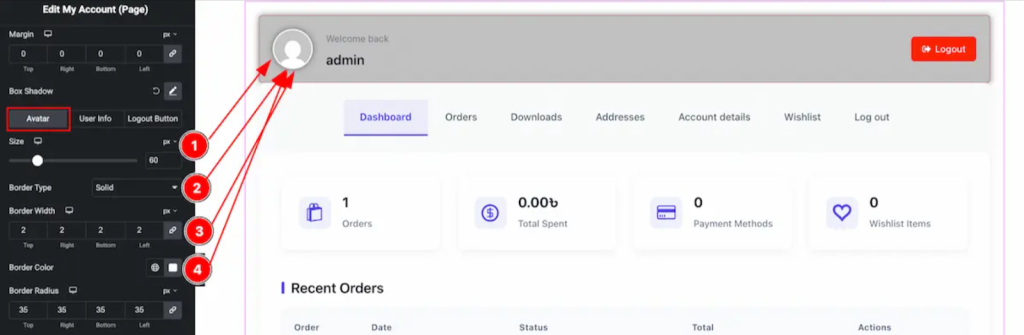
- Size: Control profile picture dimensions
- Border Type: Style the avatar border
- Border Width: Set avatar border thickness
- Border Color: Coordinate with your theme
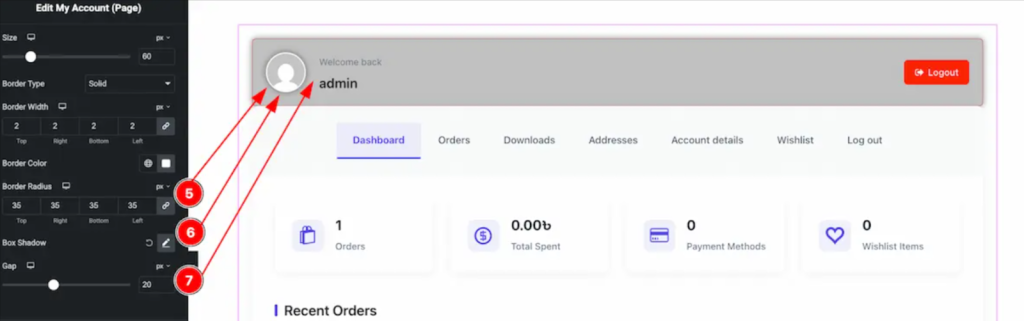
- Border Radius: Make circular or rounded square avatars
- Box Shadow: Add professional shadow effects
- Gap: Control spacing between avatar and text
User Info Styling:
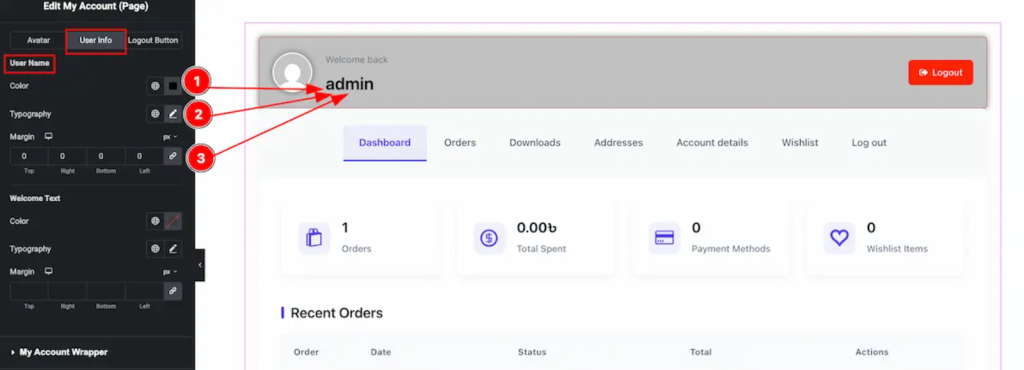
- Color: Set text color for user information
- Typography: Choose fonts, sizes, and weights
- Margin: Adjust spacing around user details
Logout Button Design:
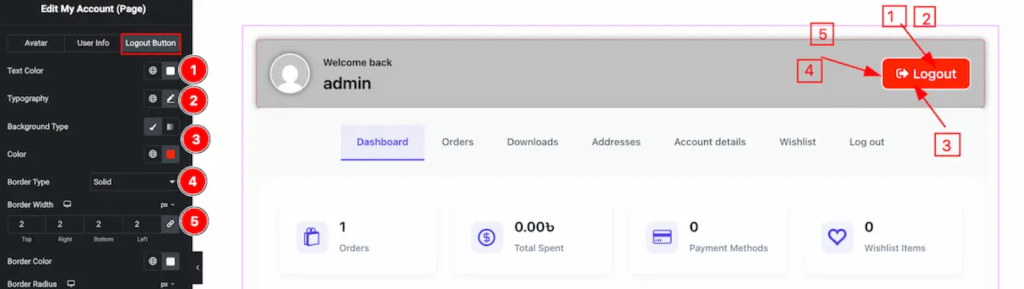
- Text Color: Style the logout link color
- Typography: Set font properties
- Background Type: Add background styling
- Border Type: Define border appearance
- Border Width: Control border thickness
Wrapper Section Styling
My Account Wrapper (Style → My Account Wrapper):

- Background Type: Set overall section background
- Border Type: Define wrapper borders
- Border Width: Control border thickness
- Border Color: Match your design scheme
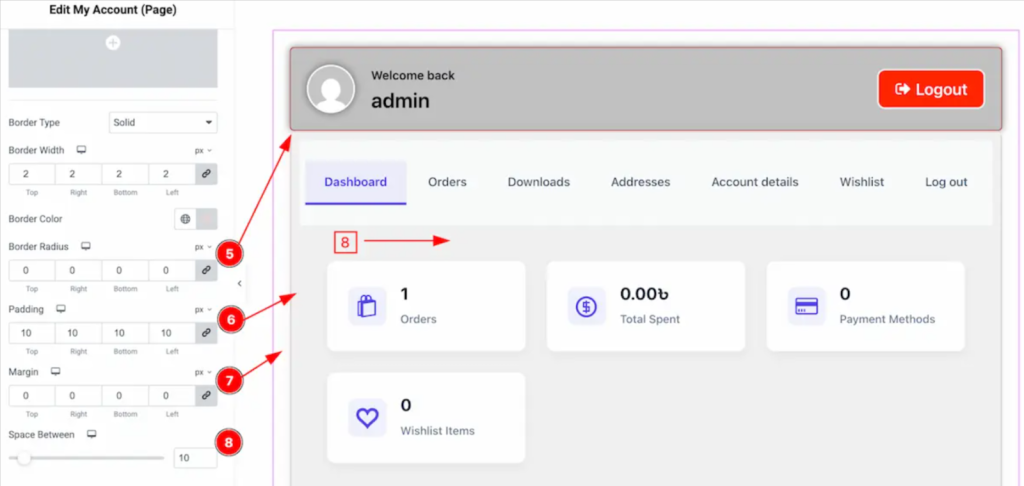
- Border Radius: Create consistent rounded corners
- Padding: Control inner content spacing
- Margin: Adjust outer spacing
- Space Between: Set gap between wrapper and other sections
Navigation Section Styling
Account Navigation (Style → Account Navigation):
The navigation is crucial for the user experience. Style it to match your brand while maintaining usability.
Navigation Container:
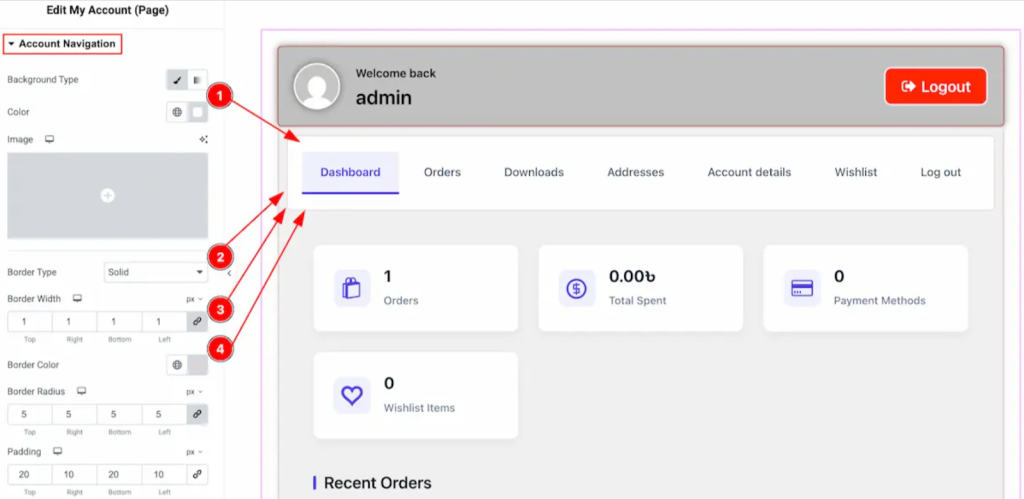
- Background Type: Set navigation area background
- Border Type: Define navigation borders
- Border Width: Control border appearance
- Border Color: Coordinate with your theme
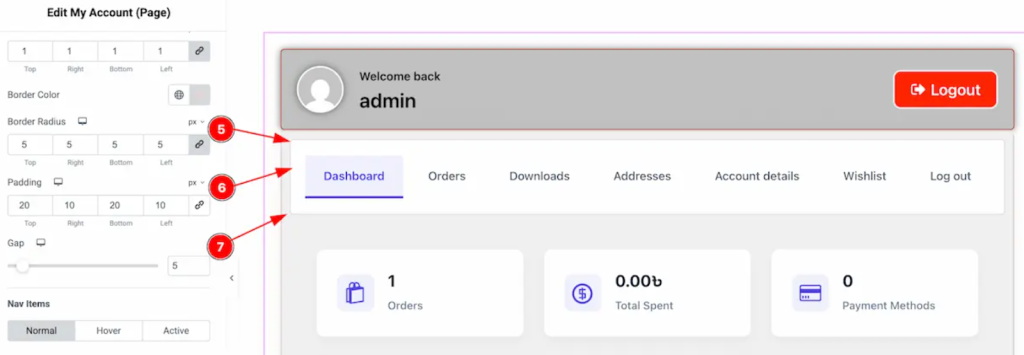
- Border Radius: Add rounded corners
- Padding: Control inner spacing
- Gap: Set spacing from the wrapper section
Nav Items Styling:
Normal State:
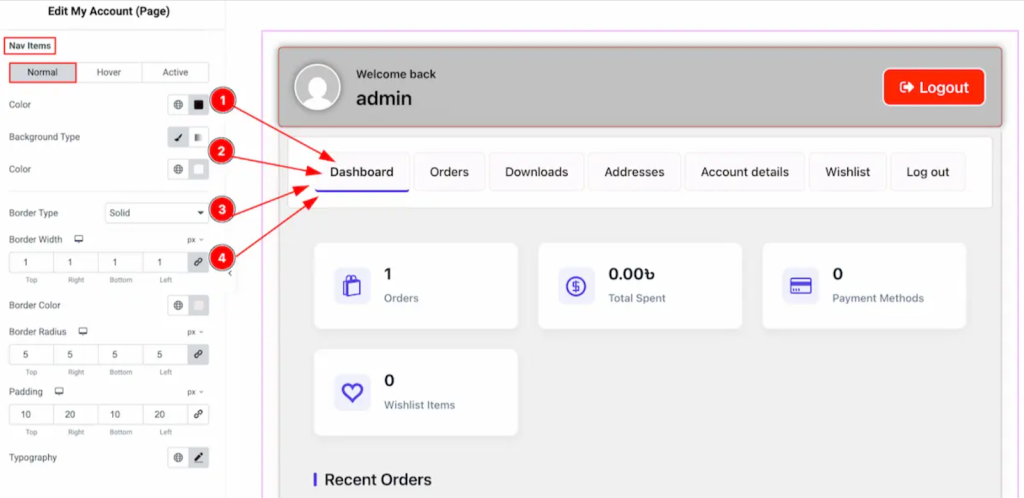
- Background Type: Default navigation item background
- Color: Text color for navigation items
- Border Type: Individual item borders
- Border Width: Border thickness
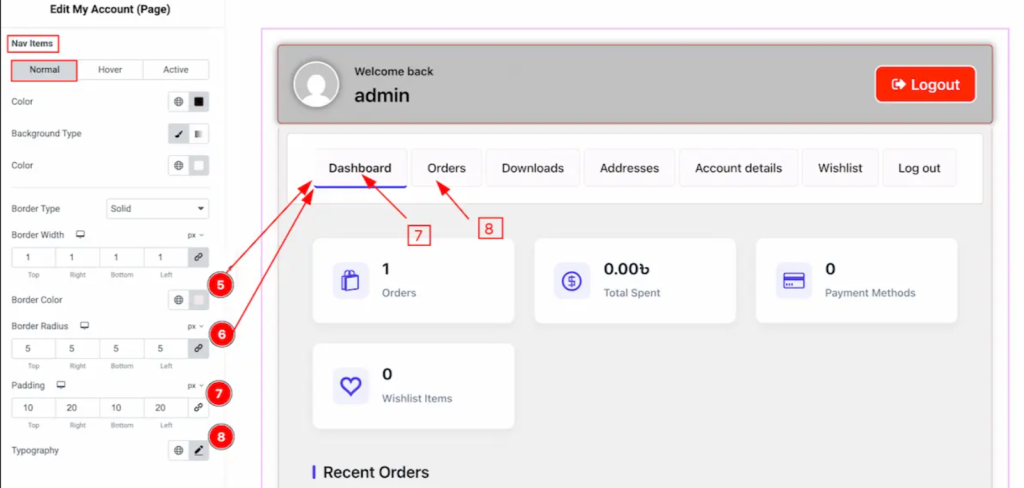
- Border Color: Border color coordination
- Border Radius: Rounded item corners
- Padding: Inner item spacing
- Typography: Font styling for navigation text
Hover State:

- Color: Text color on hover
- Background Type: Hover background effect
- Border Type: Hover border styling
Active State:
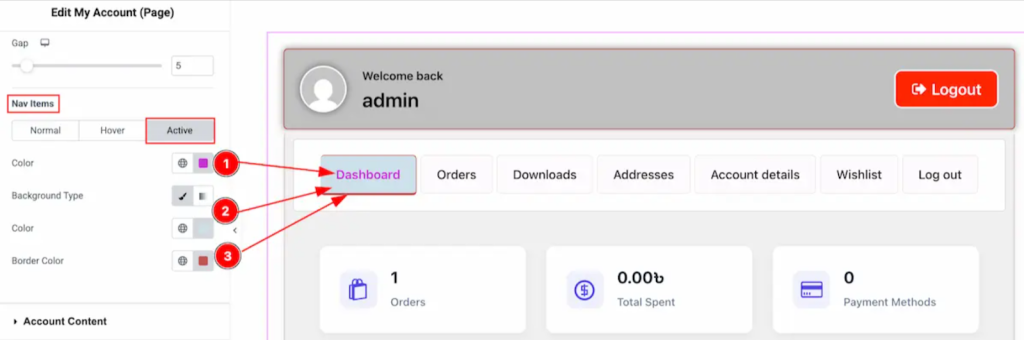
- Color: Active page text color
- Background Type: Active page background
- Border Color: Active page border color
Content and Tables Styling
Account Content (Style → Account Content):
This section controls how your main content area appears to customers.
Text and Color Settings:
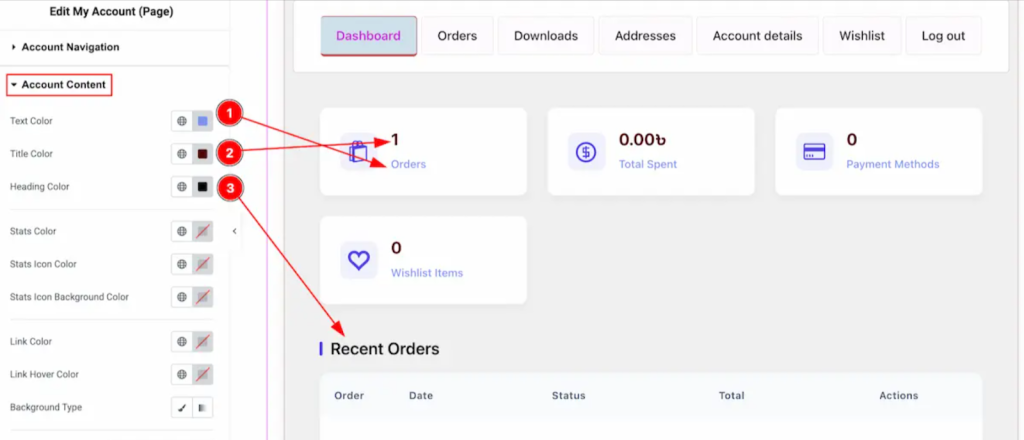
- Text Color: Main content text color
- Title Color: Section title colors
- Heading Color: Content heading colors
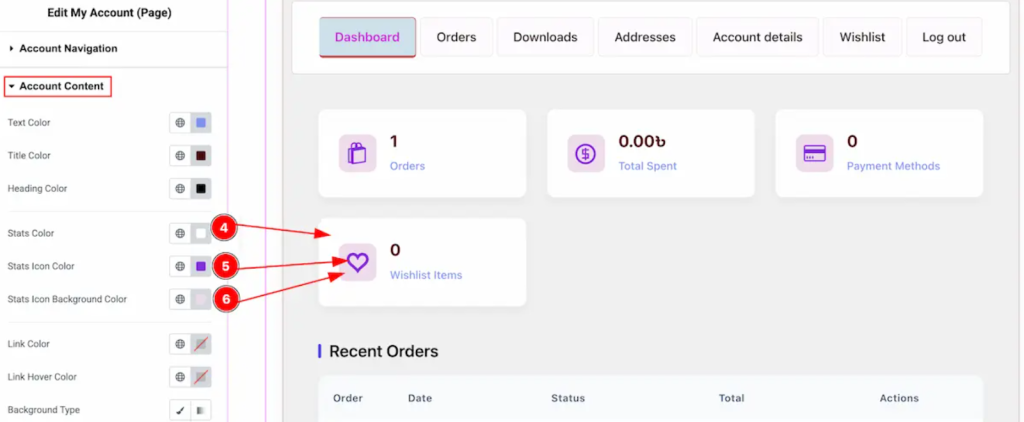
- Stats Color: Status indicator colors
- Stats Icon Color: Icon colors for status indicators
- Stats Icon Background Color: Background for status icons
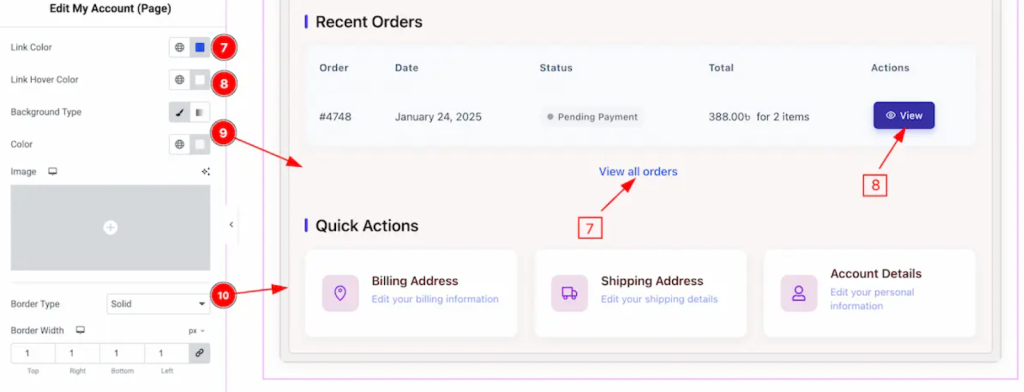
- Link Color: Regular link colors
- Link Hover Color: Link hover effects
Layout and Background:
- Background Type: Content area background
- Border Type: Content area borders
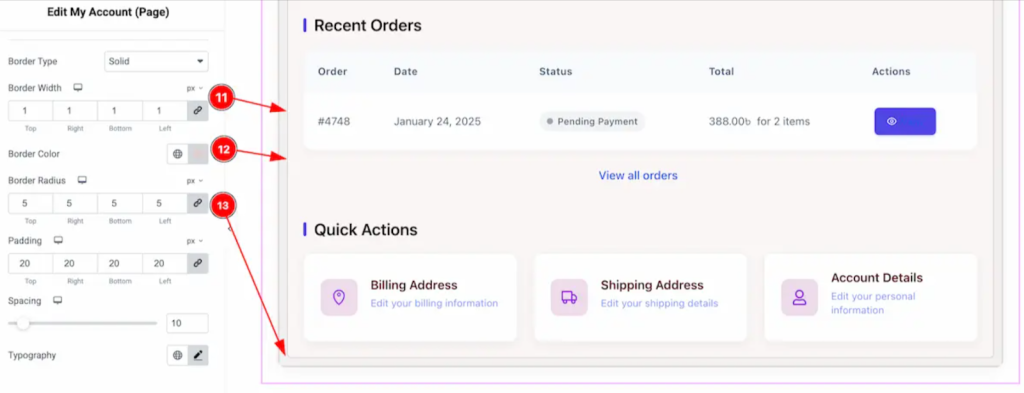
- Border Width: Border thickness
- Border Color: Border color coordination
- Border Radius: Rounded content corners
- Padding: Inner content spacing
- Spacing: Left section spacing
- Typography: Content font styling
Table Section (Style → Table):
Tables are essential for order history and downloads. Style them for better readability.
Table Structure:
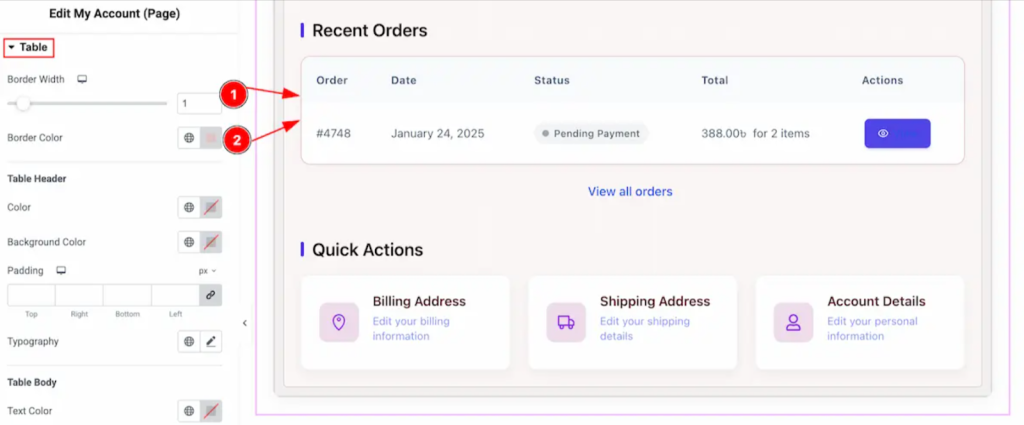
- Border Width: Table border thickness
- Border Color: Table border colors
Table Header:
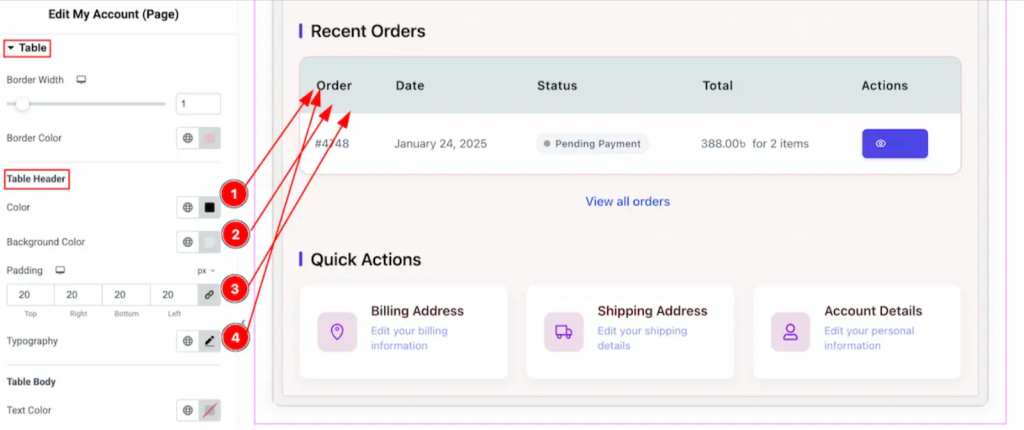
- Color: Header text color
- Background Color: Header background
- Padding: Header cell spacing
- Typography: Header font styling
Table Body:
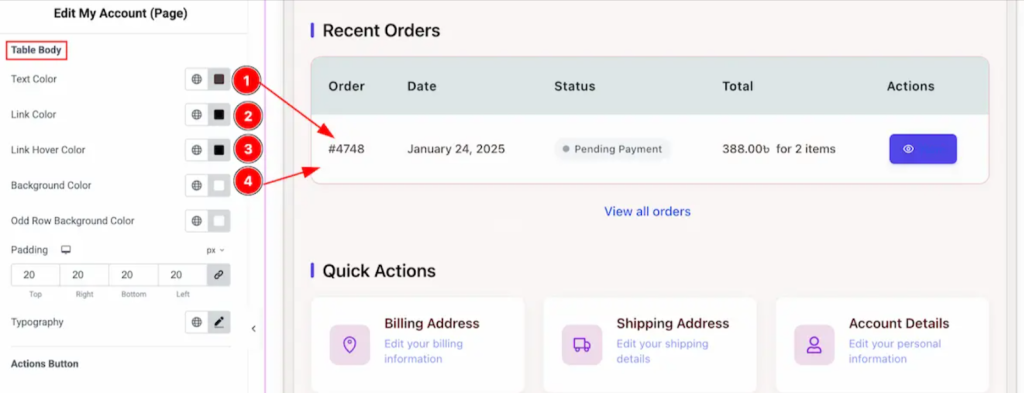
- Text Color: Body text color
- Link Color: Link colors in table cells
- Link Hover Color: Table link hover effects
- Background Color: Table body background
Action Buttons:
Normal State:
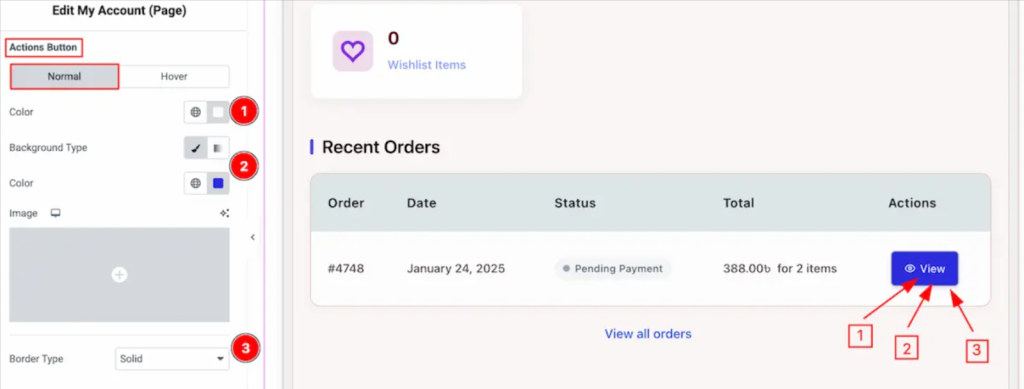
- Color: Button text color
- Background Type: Button background
- Border Type: Button border style
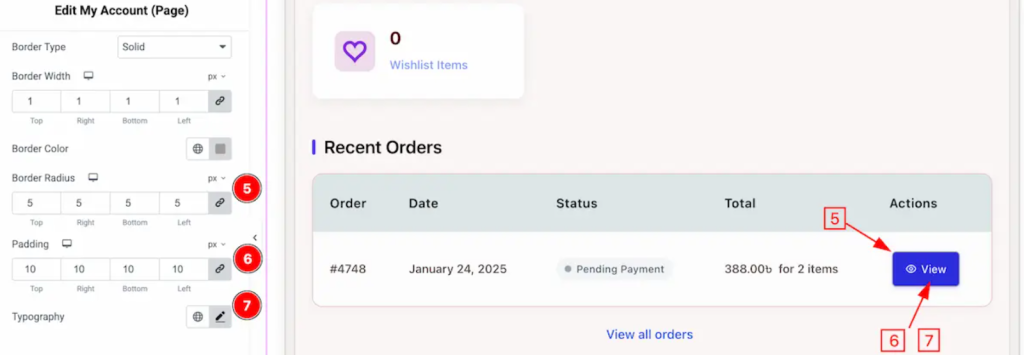
- Border Radius: Button corner rounding
- Padding: Button inner spacing
- Typography: Button font styling
Hover State:
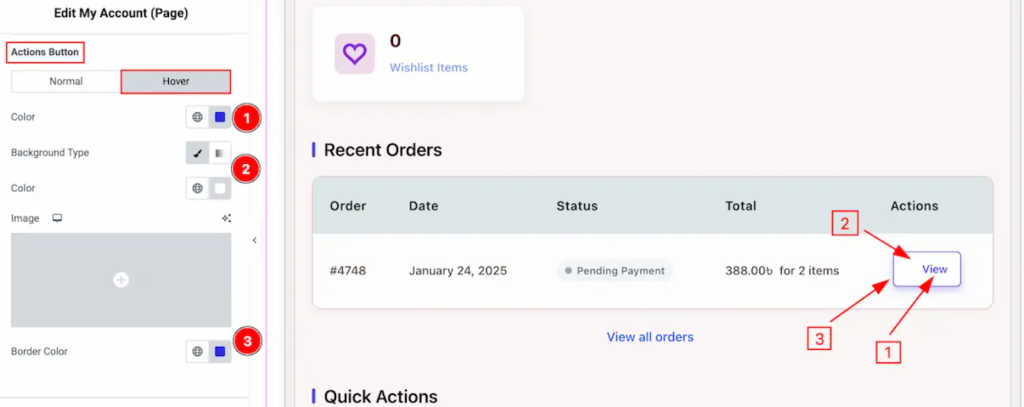
- Color: Hover text color
- Background Type: Hover background
- Border Color: Hover border color
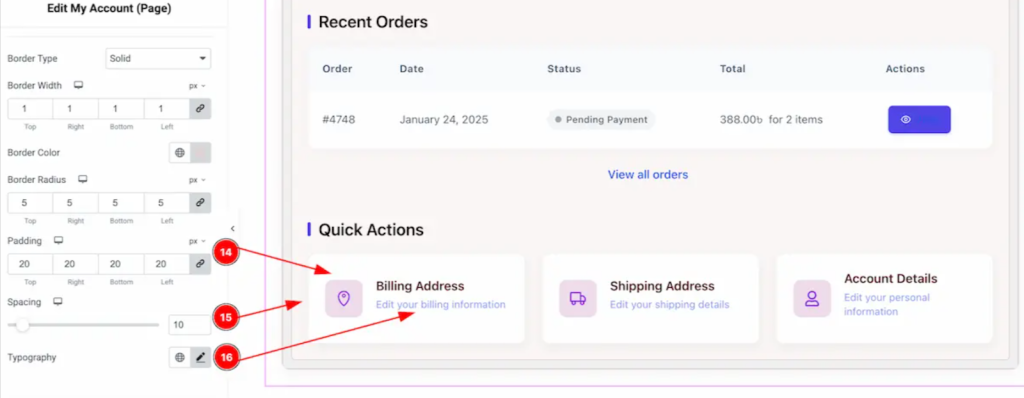
Address + Form Fields Styling
Address Section (Style → Address):
Address Info:
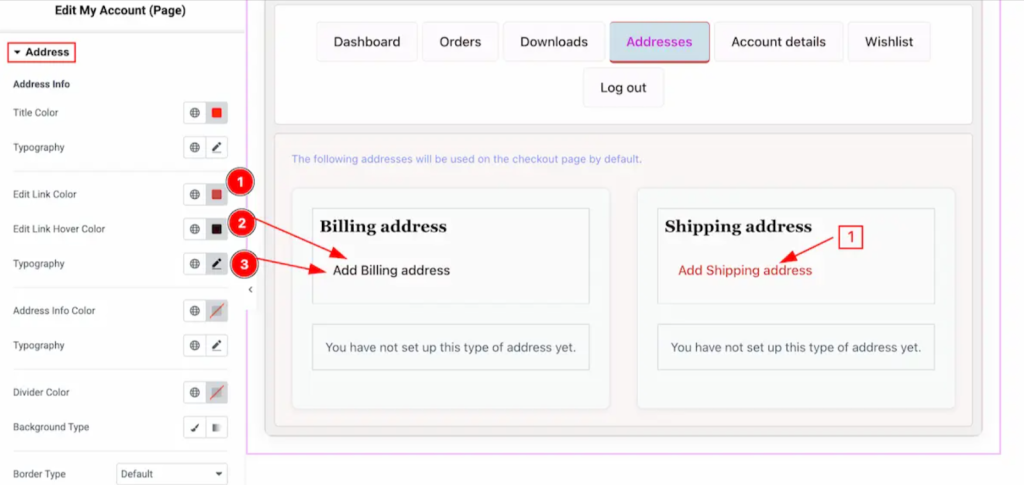
- Edit Link Color: Color for edit buttons
- Edit Link Hover Color: Hover color for edit buttons
- Typography: Font styling for address info
Address Info Display:
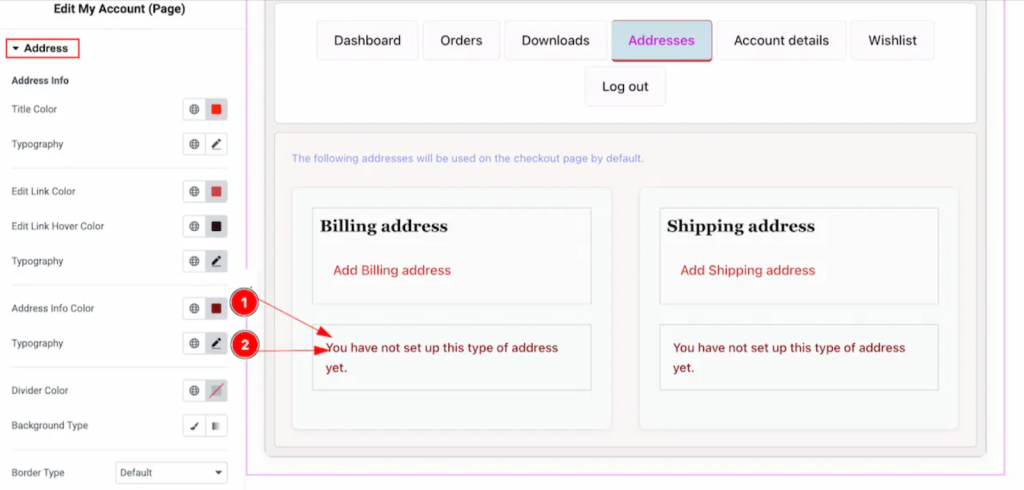
- Address Info Color: Text color for addresses
- Typography: Address text font styling
Divider Styling:
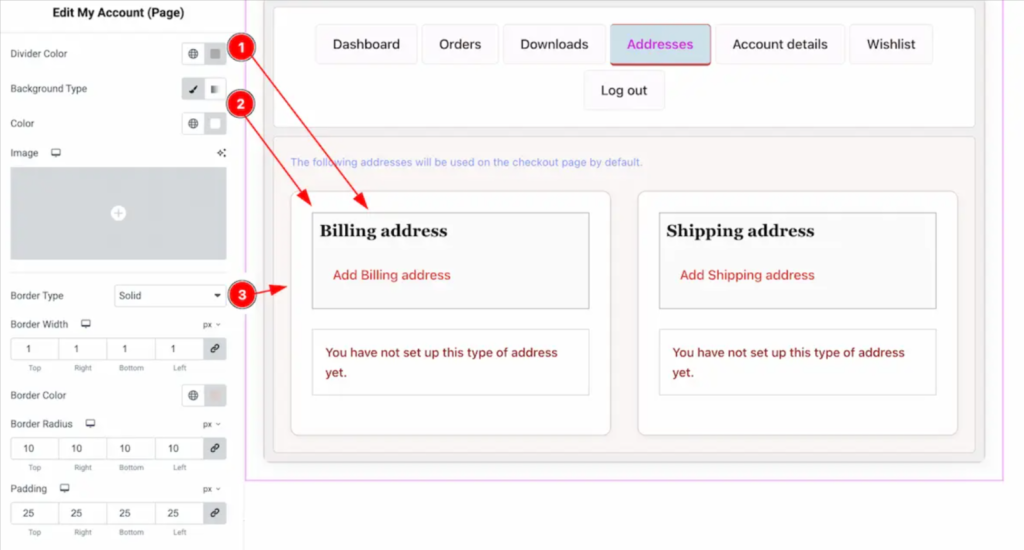
- Divider Color: Separator line color
- Background Type: Divider section background
- Border Type: Divider border styling
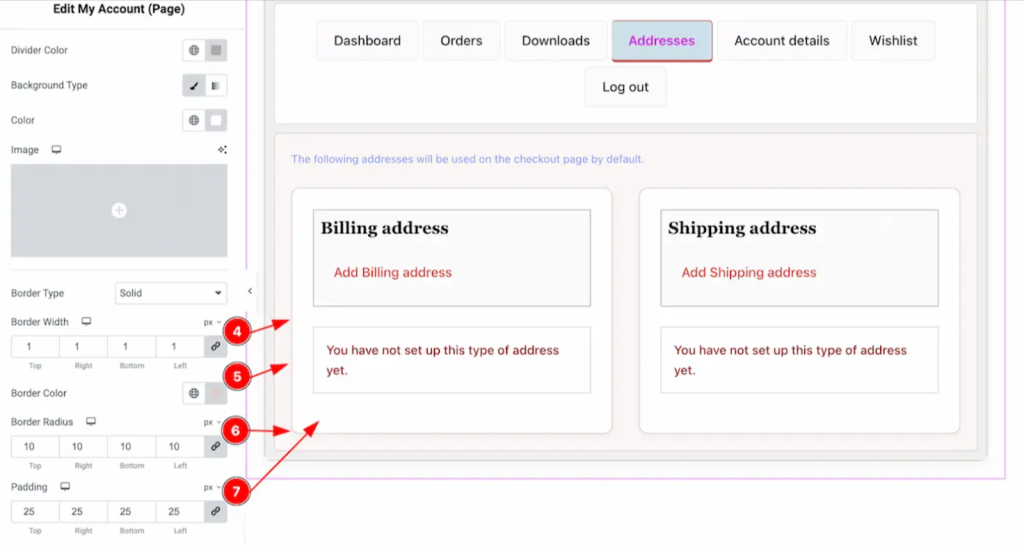
- Border Width: Divider border thickness
- Border Color: Divider border color
- Border Radius: Divider corner rounding
- Padding: Divider spacing
Form Fields (Style → Form Fields):
Form styling is crucial for user experience and conversions.
Field Titles:
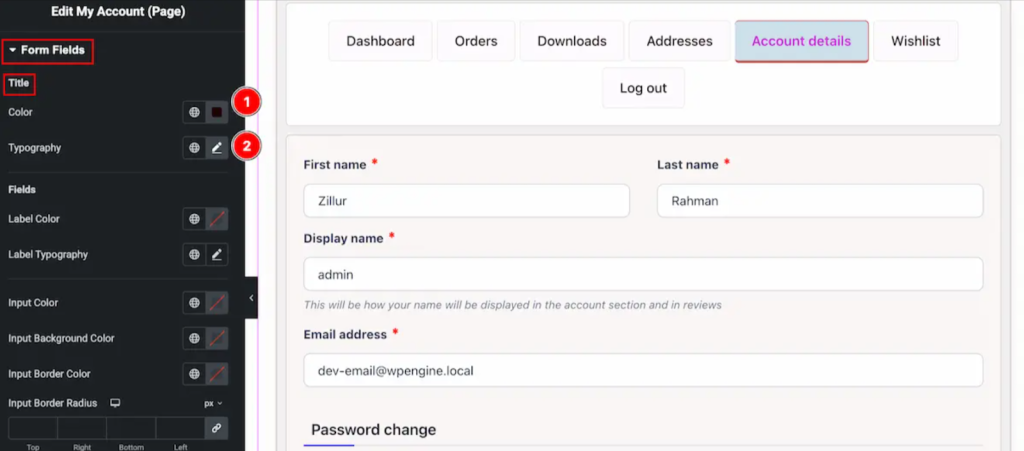
- Color: Field title colors
- Typography: Title font styling
Field Inputs:

- Label Color: Form label colors
- Label Typography: Label font styling
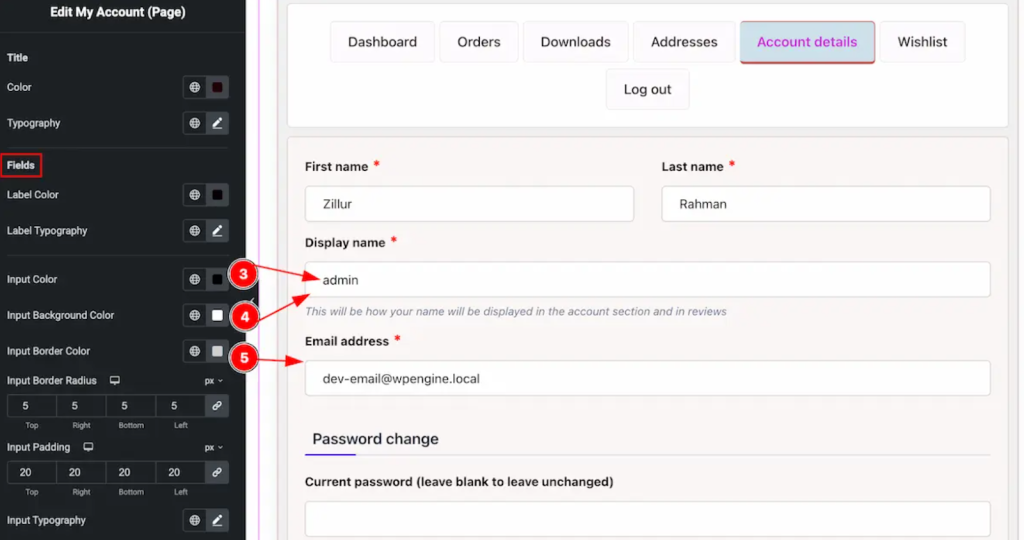
- Input Color: Input text color
- Input Background Color: Input field backgrounds
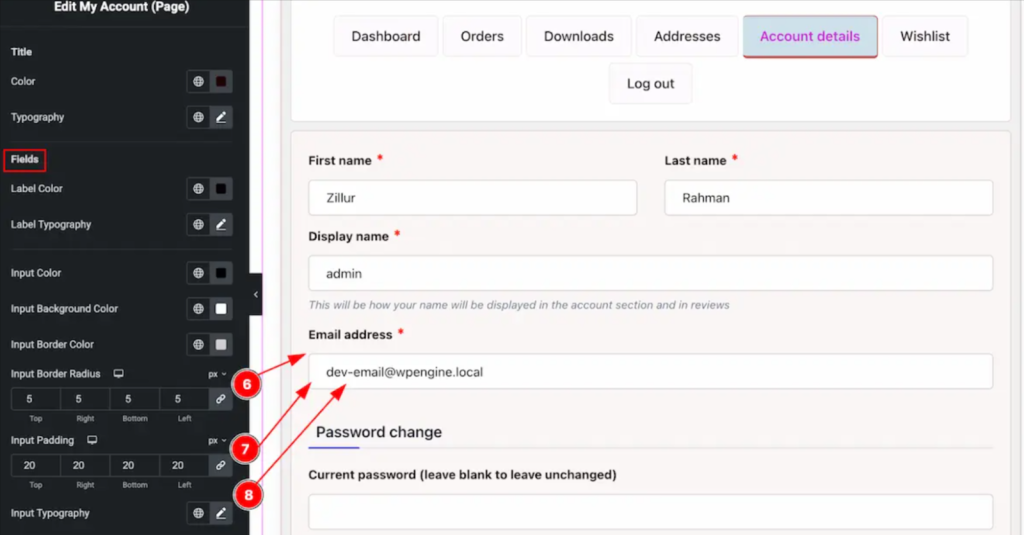
- Input Border Radius: Input field corner rounding
- Input Padding: Inner input spacing
- Input Typography: Input text font styling
Submit Buttons and Typography
Submit Button (Style → Submit Button):
The submit button is crucial for form completion and should be clearly visible.
Normal State:

- Color: Button text color
- Background Type: Button background styling
- Border Type: Button border appearance
- Border Width: Border thickness
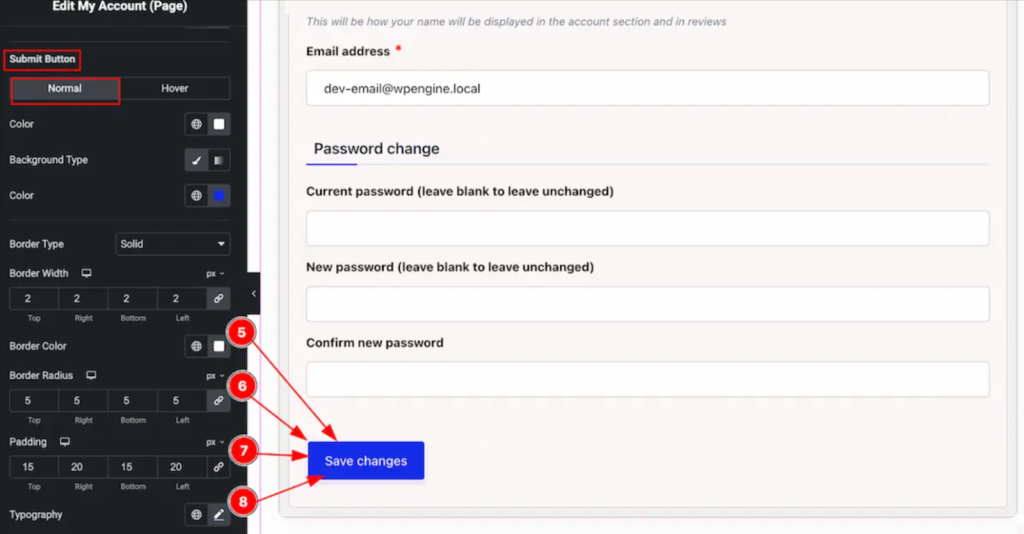
- Border Color: Border color coordination
- Border Radius: Button corner rounding
- Padding: Button inner spacing
- Typography: Button font styling
Hover State:
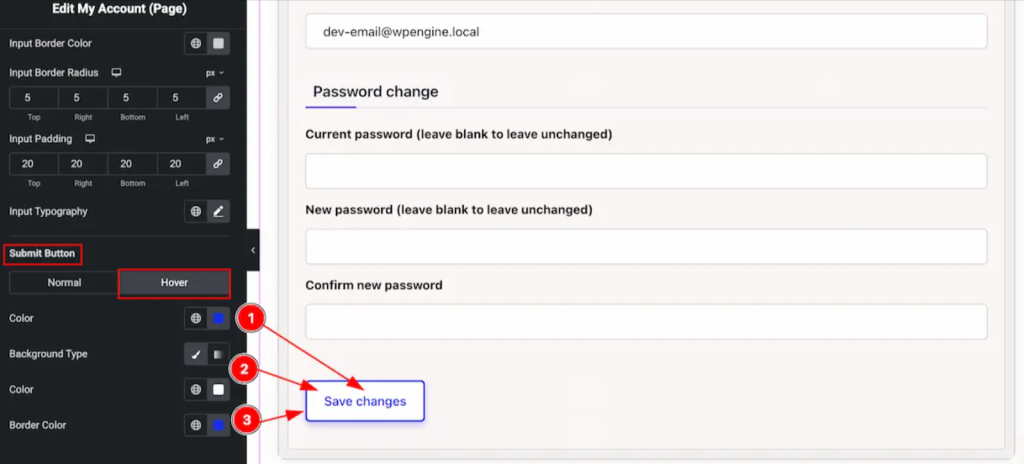
- Color: Hover text color
- Background Type: Hover background effects
- Border Color: Hover border color
Using Bricks Builder with Store Kit
Bricks Builder + Ultimate Store Kit unlocks full WooCommerce customization without code. Use dynamic data, shortcodes, and global templates to create high-performing, consistent designs.
Integration Methods:
- Shortcodes: Insert Store Kit shortcodes into Bricks elements to use dynamic WooCommerce fields sitewide.
- Global Templates: Design once in Store Kit, reuse across Bricks layouts for consistency.
- Widget Compatibility: Both tools follow modern design standards and work seamlessly together.
Advanced Benefits:
- No Coding Needed: Skip PHP or third-party field editors.
- Complete WooCommerce Control: Customize checkout, product displays, and more.
- Optimized Performance: Clean code ensures fast loading speeds.
Styling & UX Tips:
- Spacing & Colors: Use consistent spacing (8px–32px), brand colors for active/hover states.
- Typography: Set clear font hierarchy (size, weight, line-height).
- Mobile First: Design for mobile with touch-friendly elements (min. 44px x 44px).
- Performance: Optimize images, limit fonts.
- User Layout: Clear navigation, grouped form fields, and strong content hierarchy.
Conclusion: Take Full Control of WooCommerce Fields
Customizing Bricks Builder for WooCommerce fields doesn’t have to be complicated or require extensive coding knowledge. With the right approach and tools, you can create professional, branded account experiences that delight your customers and boost conversions.
Ultimate Store Kit Pro simplifies complex WooCommerce field editor plugin workflows and provides the missing link between Bricks Builder and advanced WooCommerce customization. With over 50+ specialized widgets and counting, it’s the most comprehensive solution for Bricks Builder WooCommerce integration.
FAQs: Customize Bricks Builder for WooCommerce Fields
Can I use Store Kit widgets inside Bricks Builder?
Yes! Ultimate Store Kit widgets are designed to work seamlessly with Bricks Builder. You can embed Store Kit widgets using shortcodes or integrate them through global templates.
Do I need Elementor to use the My Account Page widget?
While the My Account Page widget uses Elementor’s editor interface, it’s specifically designed to work within the Bricks Builder ecosystem through Ultimate Store Kit’s integration system. The widget creates the structure, and you style it using Bricks Builder’s visual controls for complete customization of Bricks Builder’s custom fields in WooCommerce.
Can I use custom colors and fonts for each field?
Absolutely! The Style Tab provides granular control over every visual element. You can customize colors, fonts, spacing, borders, and backgrounds for individual form fields, buttons, and text elements.
Is this method mobile responsive?
Yes, both Bricks Builder and Ultimate Store Kit are built with mobile-first design principles. All styling options automatically adapt to different screen sizes. However, you should always preview your edit to WooCommerce checkout fields customizations on mobile devices and make adjustments as needed to ensure optimal user experience.