
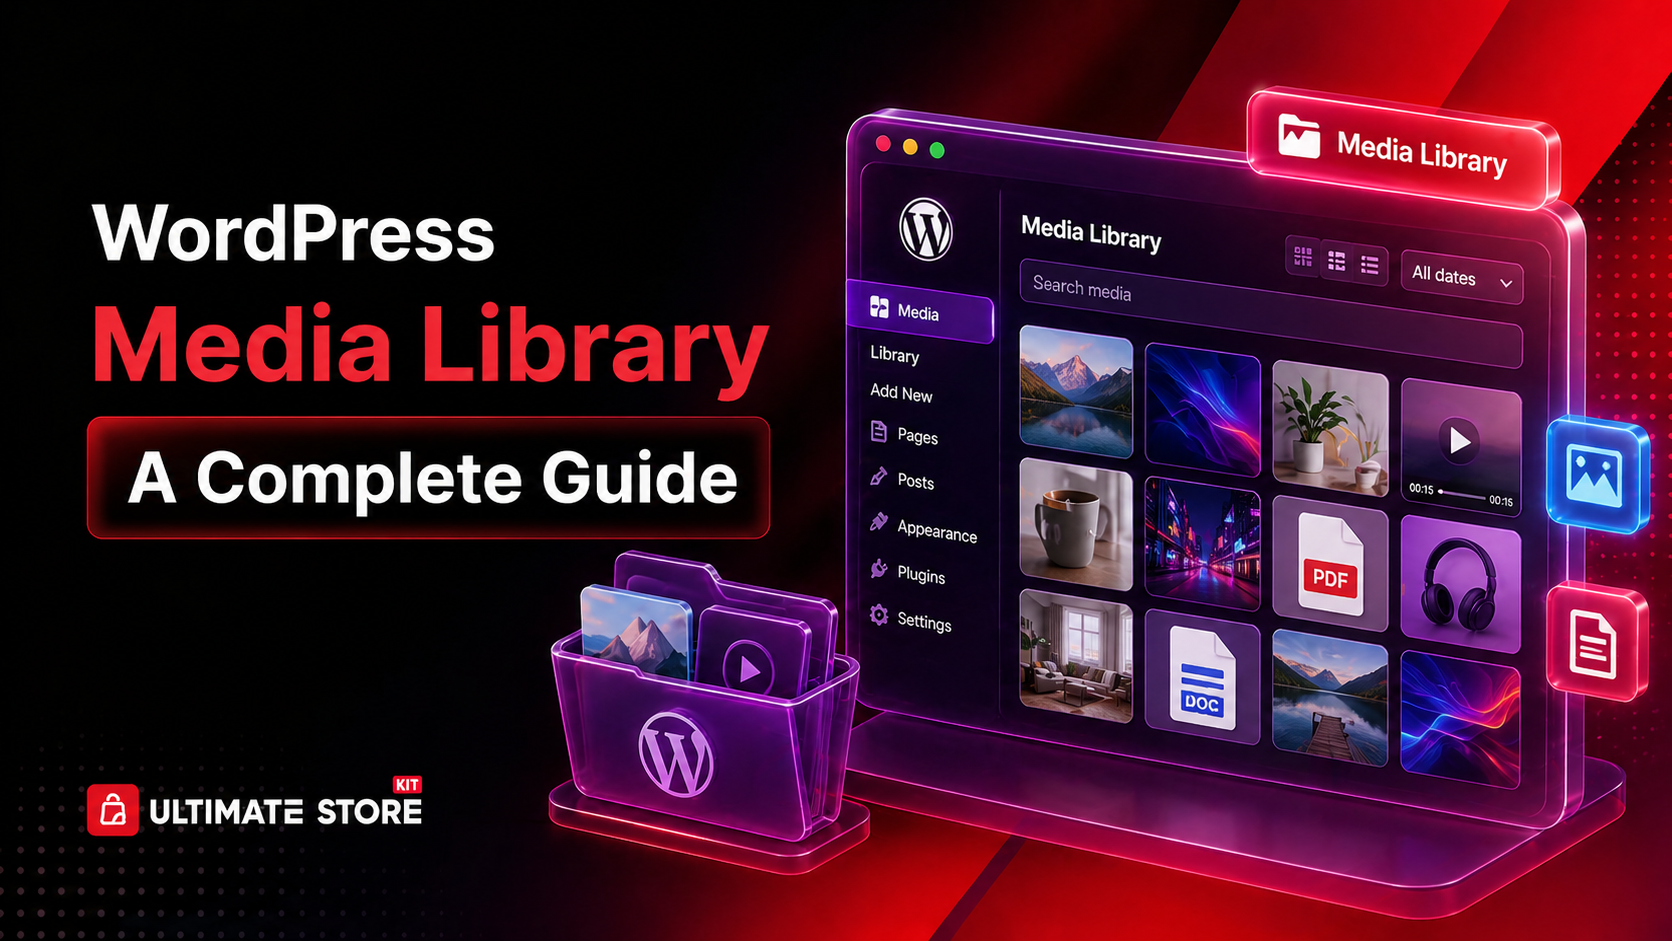
Every image you upload, every PDF you attach and every video you embed on your WordPress site passes through one central hub: the WordPress Media Library. It is the backbone of your site’s visual content and yet for most website owners, it remains one of the most underused and misunderstood corners of WordPress.
Whether you run a personal blog with a handful of images or a large e-commerce store with thousands of product photos, the way you manage your media directly affects your site’s loading speed, your search engine rankings, your visitors’ experience and the time you spend on routine tasks every week.
This guide covers everything you need to know about the WordPress Media Library, from the basics of uploading and editing files to advanced strategies for organizing folders, bulk editing, optimizing images for SEO and keeping your library clean.
Along the way, you will find out where the default WordPress tools fall short, which free plugins from the WordPress Plugin Directory can fill those gaps and how a tool like Sigma Media Manager from BdThemes can bring your entire media workflow under one roof.
The Problem With the Default WordPress Media Library
Out of the box, WordPress gives you a simple but limited media management system. You can upload files, browse them in a grid or list view and attach them to posts and pages. That is roughly where the built-in capability ends.
As your library grows, these limitations turn into real bottlenecks:
- No folder system: All uploaded files sit in a flat, date-organized directory. Finding an image from six months ago means scrolling through hundreds of files or guessing the filename.
- No bulk metadata editing: Updating alt text or captions for dozens of images requires clicking into each file one at a time.
- No cloud storage integration: Large libraries quickly fill up server space and WordPress has no built-in option to offload files to Amazon S3 or similar services.
- No access controls: Every uploaded file is publicly accessible via a direct URL. There is no native way to restrict documents to logged-in users or specific roles.
- No unused file detection: Orphaned and duplicate media builds up silently, consuming storage and adding unnecessary weight to your database.
- Limited image optimization: WordPress generates multiple sub-sizes automatically, but does not compress files, convert to modern formats like WebP or apply advanced optimization.
The WordPress ecosystem offers strong solutions for each one of these limitations. Some are free plugins.
Others, like Sigma Media Manager, combine all the solutions into a single, cohesive tool that replaces the need for multiple separate plugins.
How to Organize Your WordPress Media Library
Effective organization begins with a solid workflow for bringing content onto your site. Before diving into folders and categories, you can first master the different methods for adding files to your library.
How to Upload Files to the WordPress Media Library via the Dashboard
Uploading media through the WordPress admin dashboard is the most direct method and works for any file type WordPress supports.
Follow these steps:
- Log in to your WordPress admin panel.
- In the left sidebar, go to Media ⟶ Add New Media File.
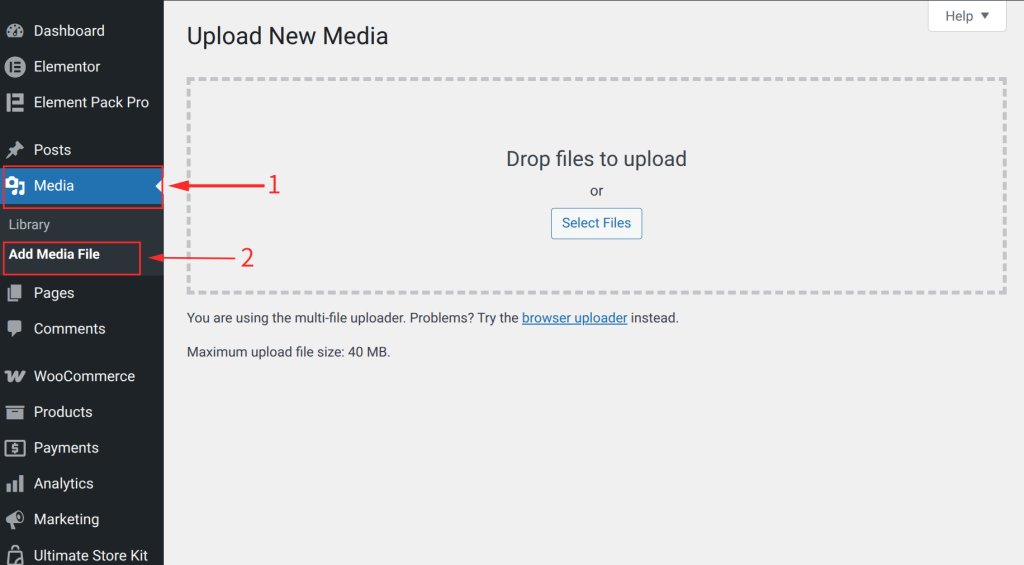
- On the upload screen, either drag and drop files directly from your computer into the upload area or click the Select Files button to browse your local storage.
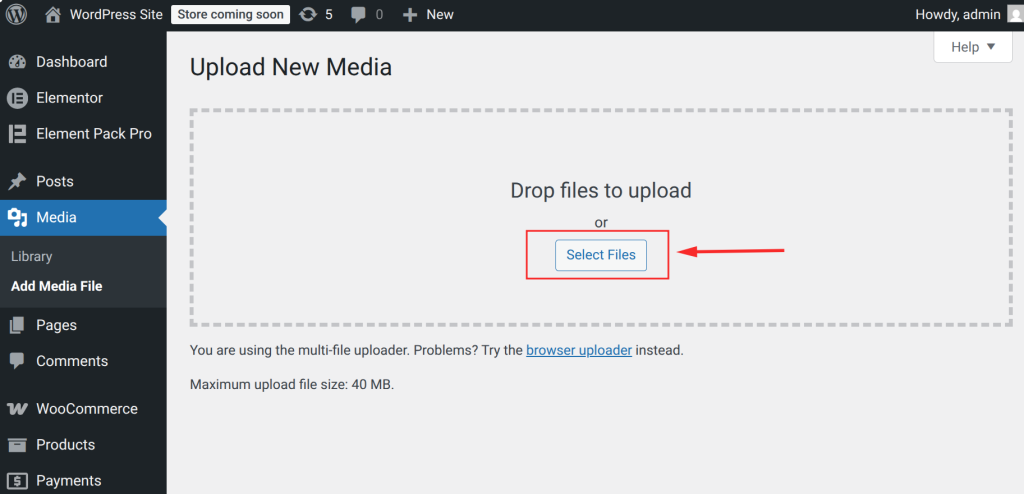
- WordPress accepts JPEG, PNG, GIF, WebP images, MP3/WAV audio, MP4 video and documents such as PDFs. Once the upload completes, each file appears with an editable title field below it.
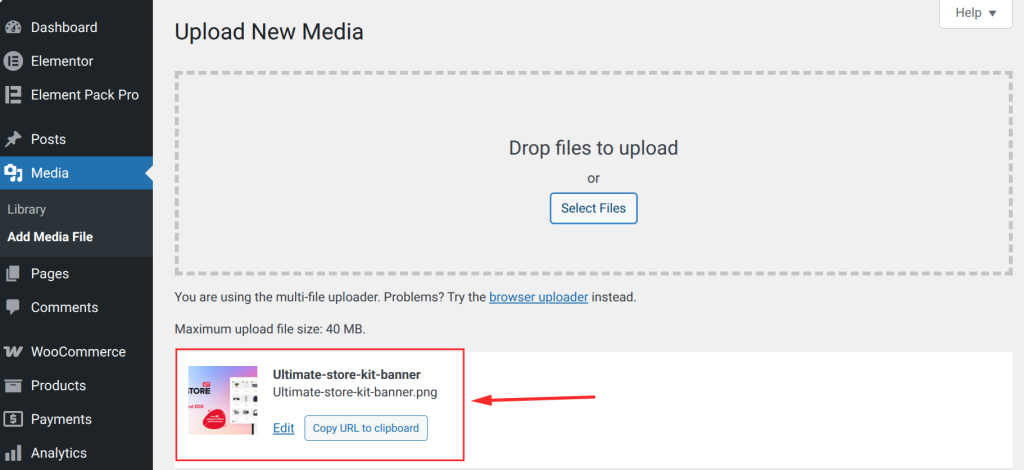
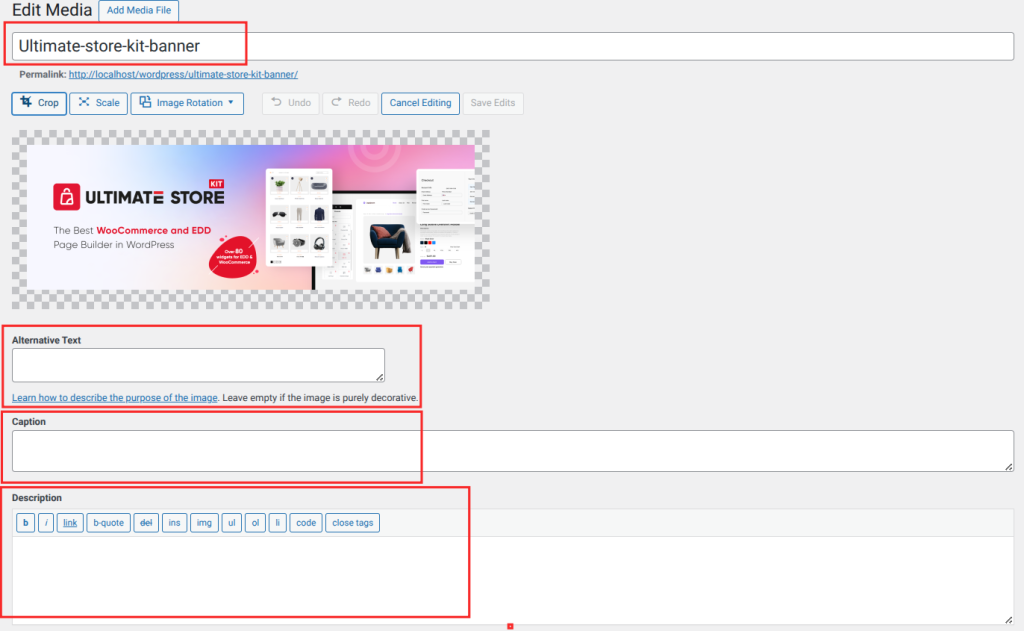
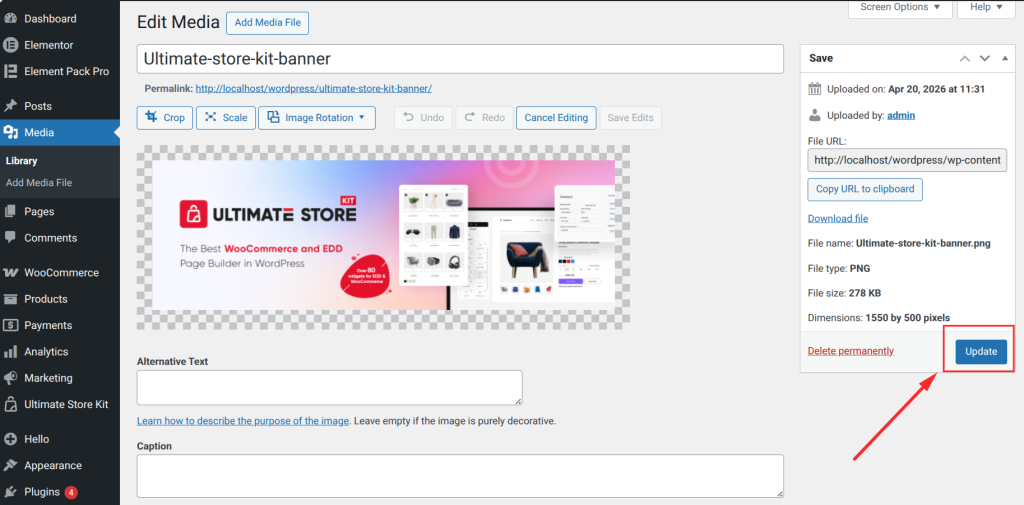
- Click on Edit of the uploaded file to open its detail panel. Here you can fill in the Title, Caption, Alternative Text and Description fields.
- Click Update to save the changes.
| Note: WordPress automatically generates several resized versions (thumbnail, medium, large, full) for every image you upload. These sub-sizes occupy additional server space, which adds up as your library grows. |
How to Upload Files to the WordPress Media Library via the Block Editor
The Gutenberg block editor lets you upload media and place it on a page in a single workflow, without leaving the editor.
Follow these steps:
- Open a post or page in the block editor.
- The page will appear like this.
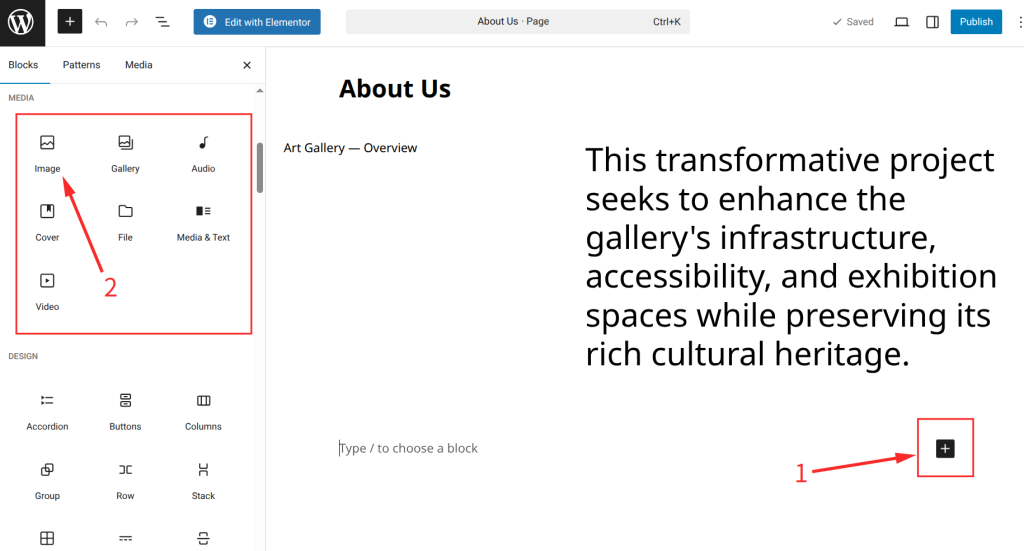
- Click the + button to add a new block. Choose Image, Video, Gallery, Audio or File depending on your file type.
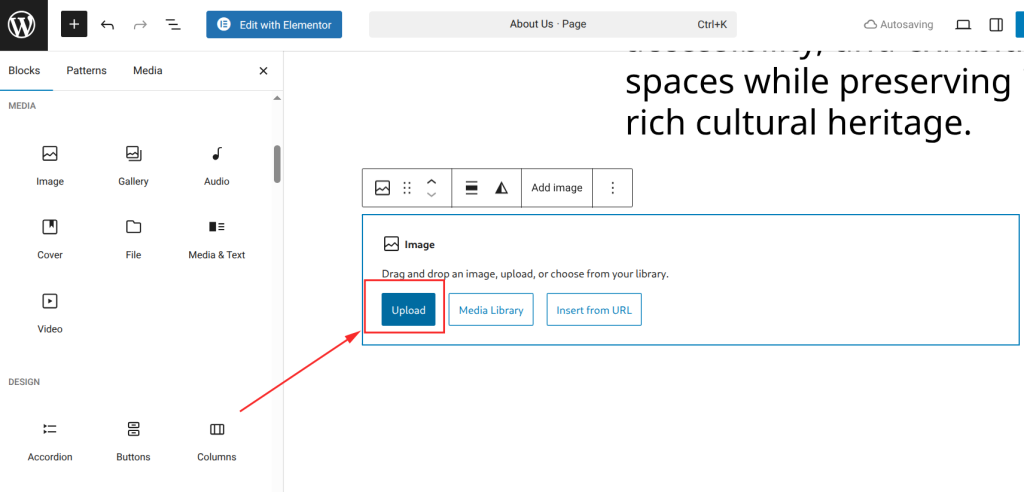
- Inside the block, click Upload to select a file from your computer. The file is uploaded directly to the Media Library and inserted into the block simultaneously.
- After inserting the image, use the right-side settings panel to add Alt Text and the widget top bar option for caption and link settings.

- The file is now available in your global Media Library for use in other posts and pages.
For uploading multiple images at once, the Gallery block lets you select or upload several images simultaneously and arrange them in a grid. This is efficient for event coverage, product showcases and portfolio pages.
How to Edit Images in the WordPress Media Library
WordPress includes a lightweight image editor you can access directly from the Media Library. It handles basic adjustments without needing external software.
Follow these steps:
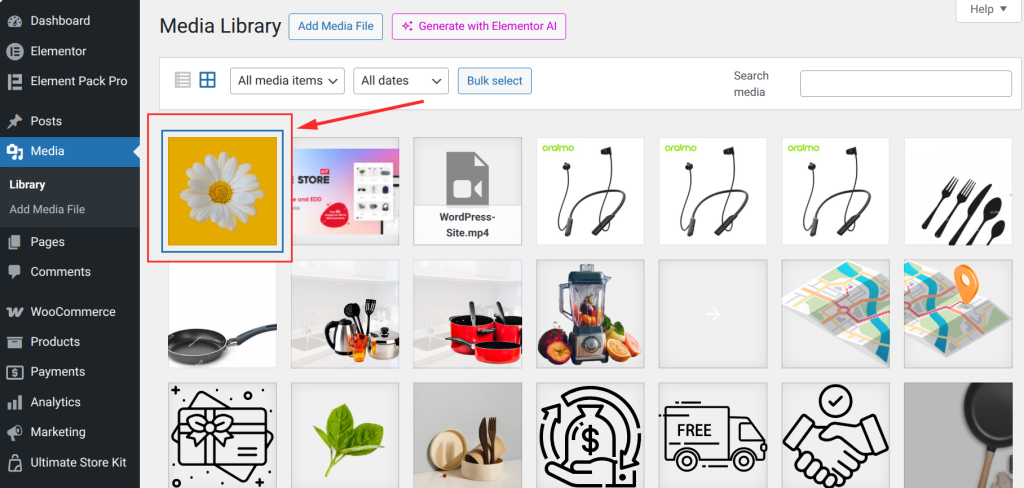
- Go to Media ⟶ Library in your WordPress dashboard.
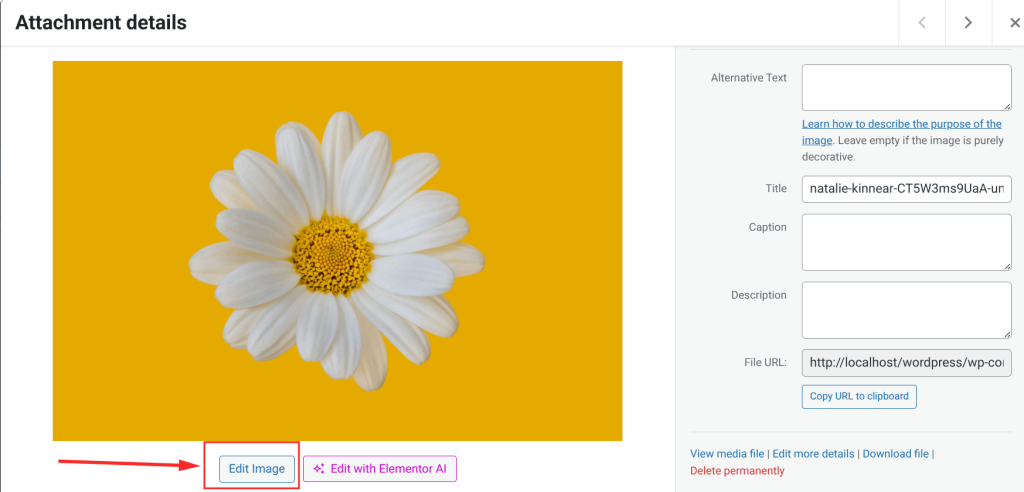
- Click on the image you want to edit to open its attachment detail page.
- Click the Edit Image button below the image preview.
- The image editor opens with a toolbar above the image.
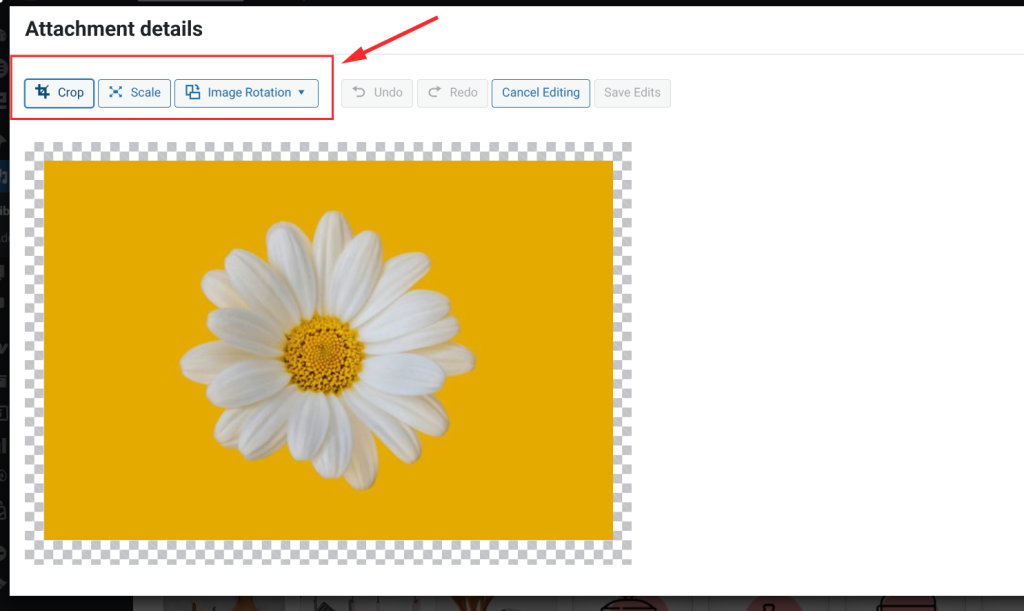
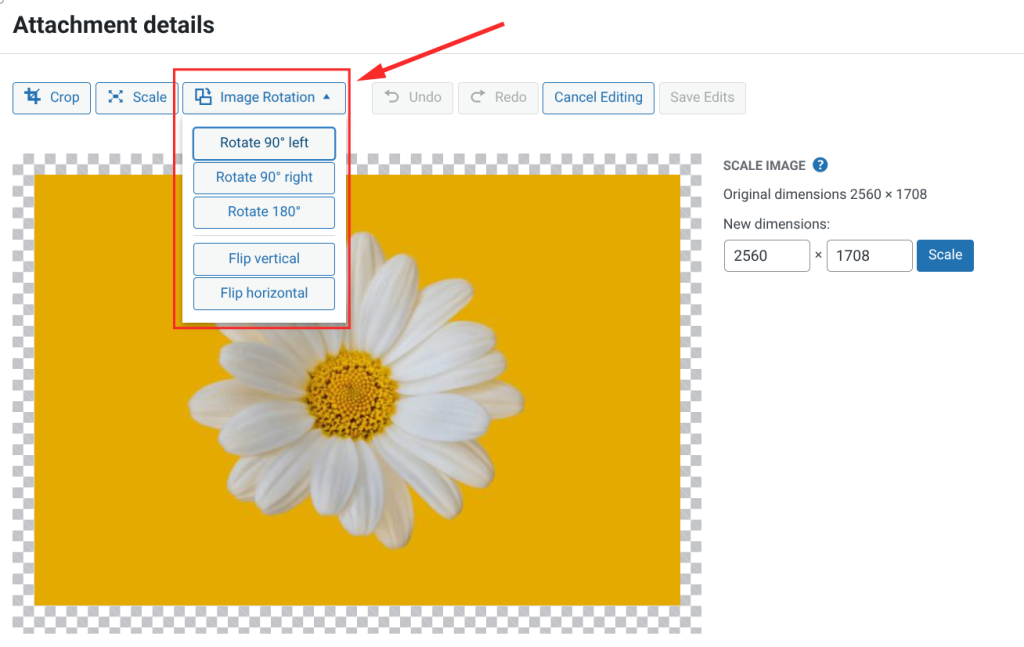
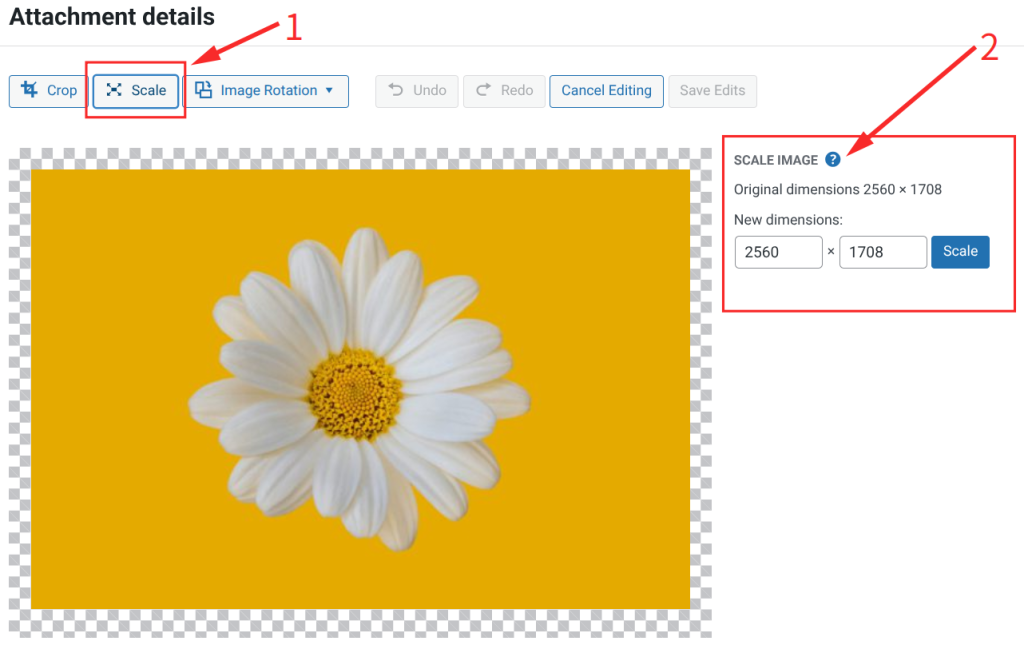
Cropping, Rotating and Resizing Images
The built-in editor supports these operations:
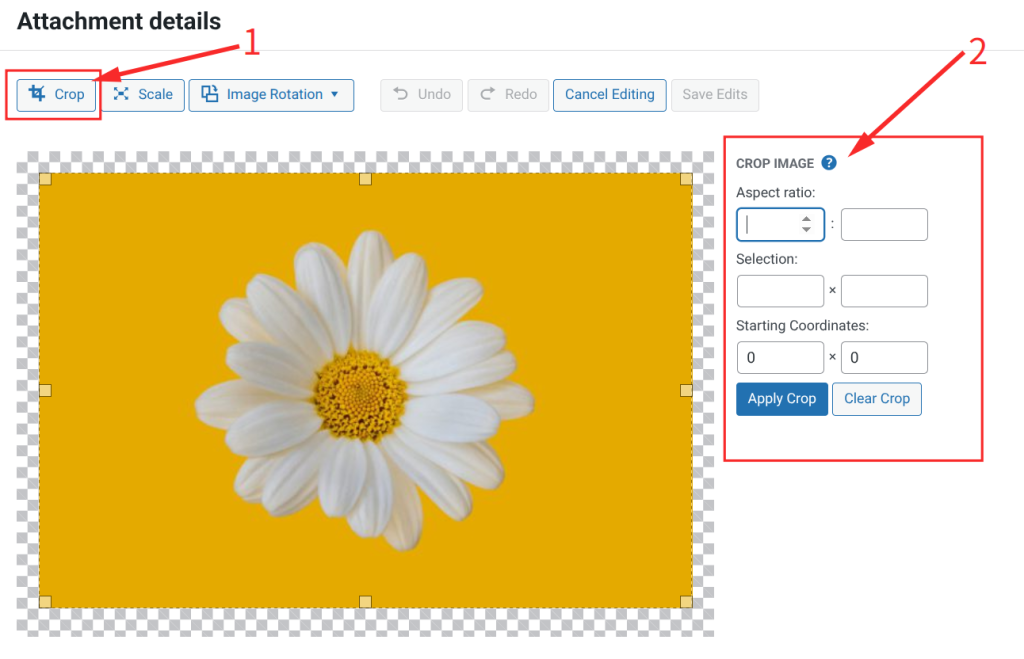
- Crop: Draw a selection box over the area you want to keep, then click the Crop button in the toolbar. You can type exact pixel dimensions in the Aspect Ratio and Selection fields for precision.
- Image Rotation: Use the Rotate Left or Rotate Right buttons to turn the image 90 degrees at a time.
- Scale: Enter a target width or height in the Scale Image section. WordPress automatically preserves the original aspect ratio.
- After making your edits, click Save to apply the changes to the stored image file.
| Note: WordPress keeps the original file and allows you to restore it using the Restore Original Image button. Once you save a cropped or scaled version, that becomes the active file until you restore it. |
For color correction, background removal, text overlays or format conversion, you will need a third-party plugin. The built-in editor is suitable only for basic adjustments.
Creating Folders and Subfolders on WordPress Media Library
Folder organization is one of the most frequently requested WordPress features, and the default Media Library does not offer it. WordPress organizes files by upload date in the server directory, but there is no user-facing folder interface in the admin.
For basic folder functionality, many free plugin available in the WordPress plugin directory. With these plugins, you can create folders, drag images into them and filter your view by folder.
For more demanding use cases, Sigma Media Manager takes folder management significantly further. Here is how to use its folder system:
Tips and Tricks to Creating and Managing Folders in Sigma Media Manager
First, download Sigma Media Manager from the BdThemes official website. Then, install the Plugin.
- After installing Sigma Media Manager, navigate to Media ⟶ Media Manager in your WordPress dashboard.

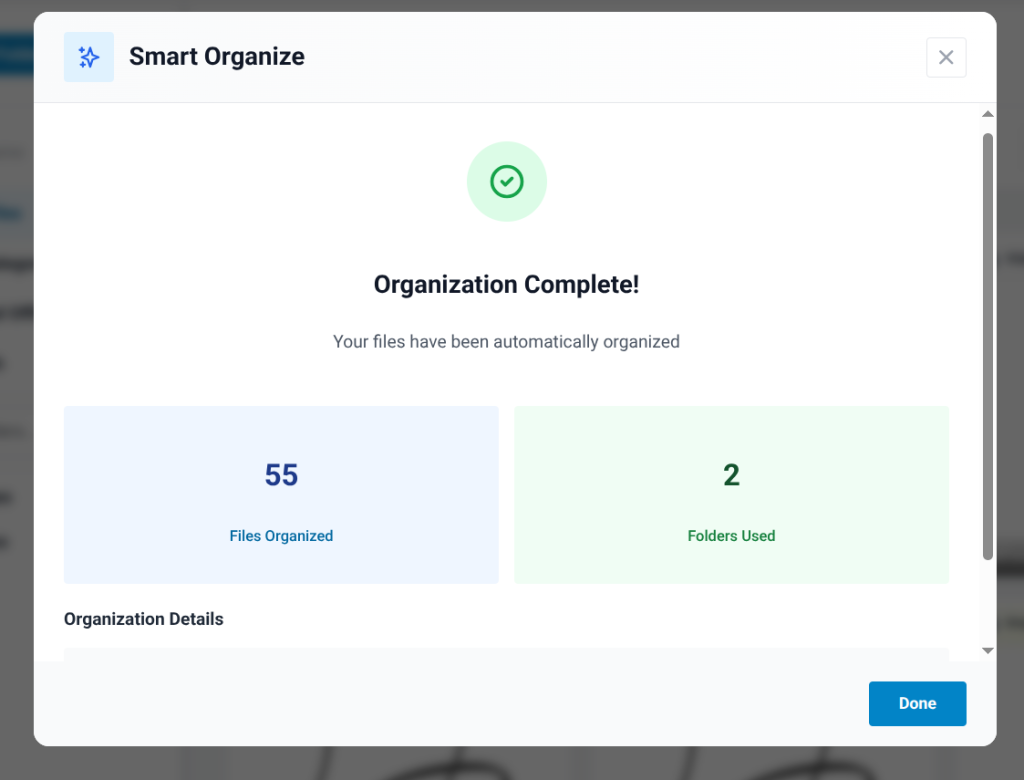
- On the first visit, all your files will appear under All Files and Uncategorized. Click the Smart Organize button to let Sigma’s AI automatically sort your existing media into categorized folders in one click.
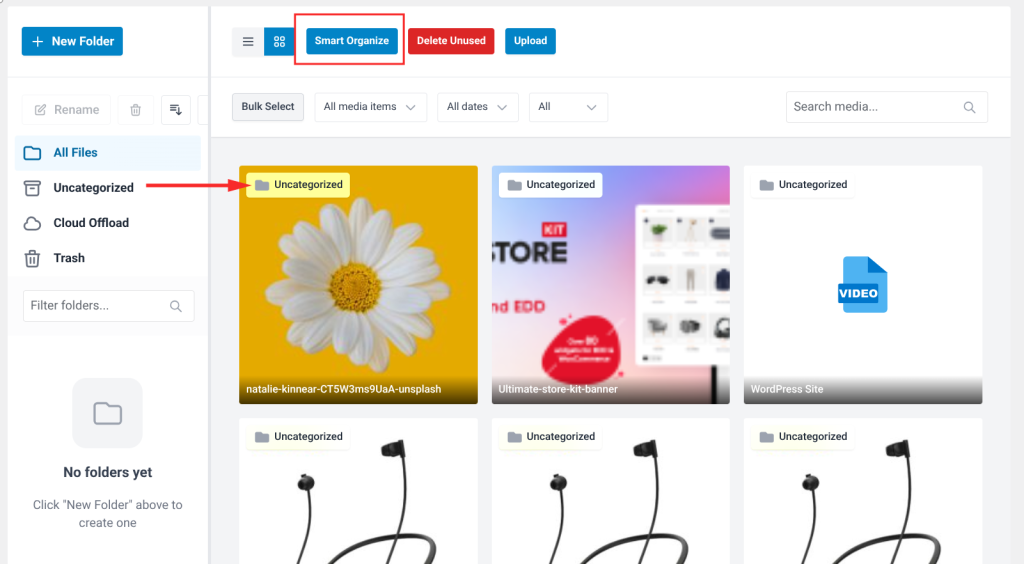
- A confirmation pop-up appears showing the total number of files to be organized, the number of folders that will be created and a preview of each folder with its file count. Select the Organize Now button to confirm.
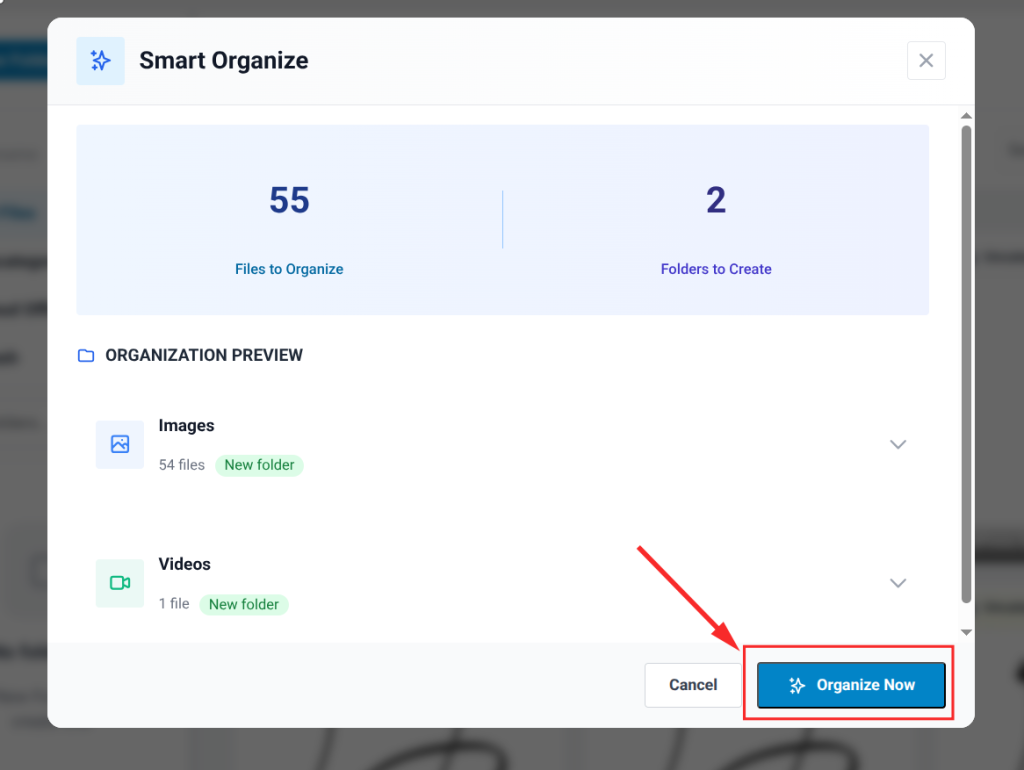
Then it will be the organization’s complete automation.
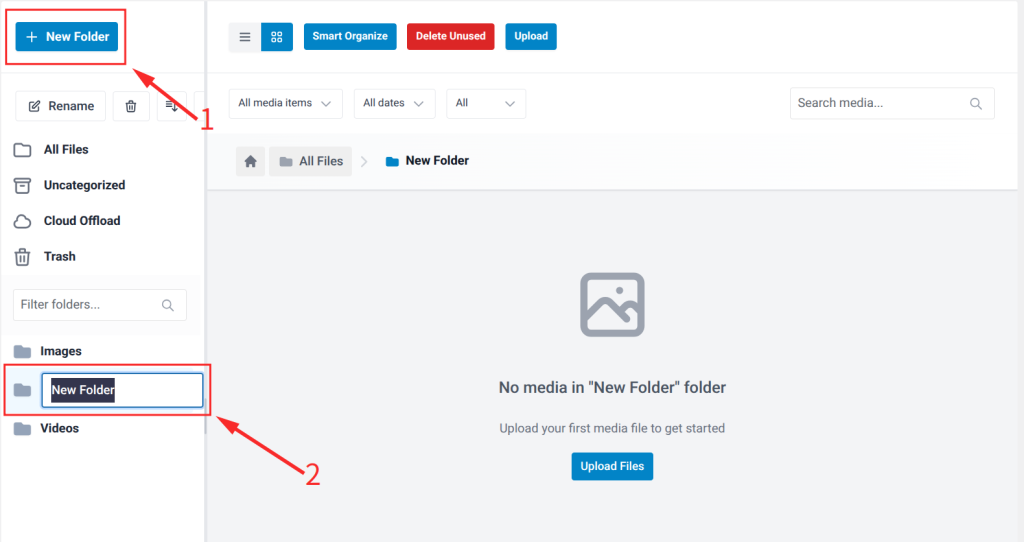
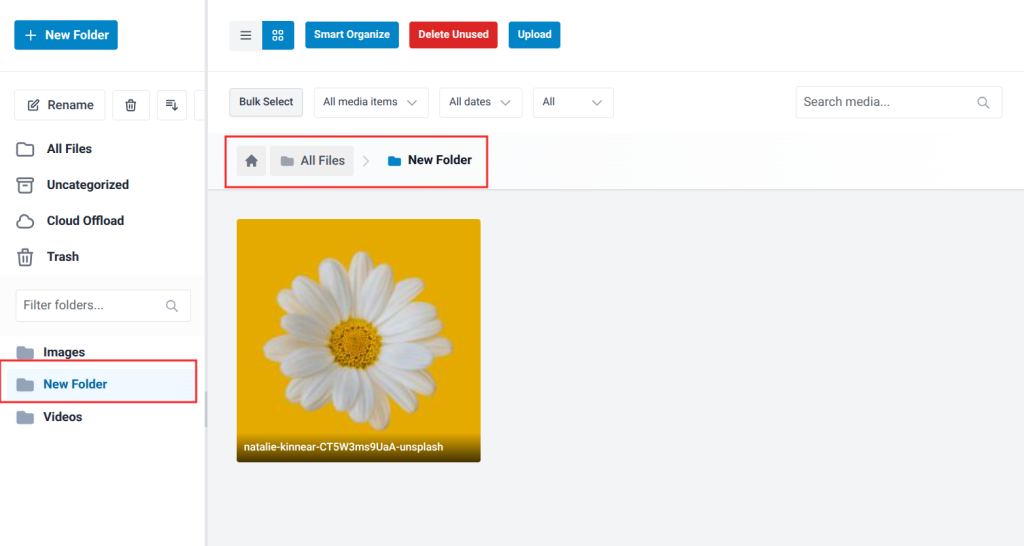
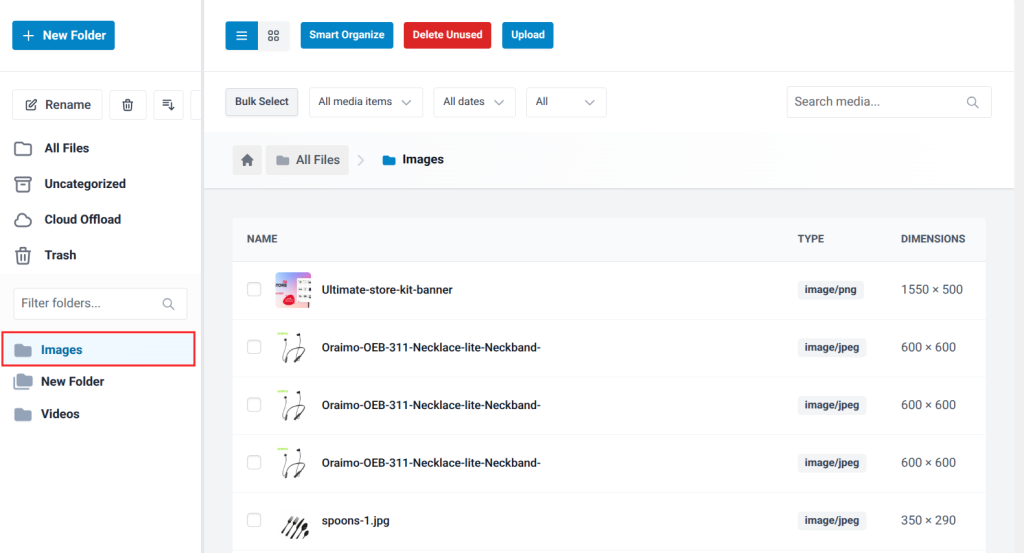
- To create a manual folder, click the New Folder button in the left panel. Type a name and press Enter.
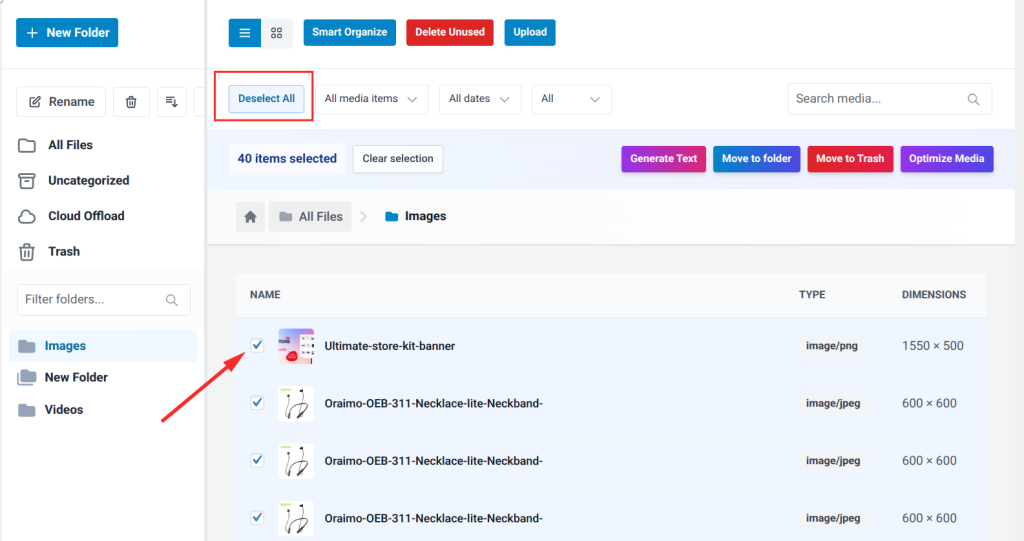
- To move files into a folder, select one or more files in the right panel by clicking their checkboxes.
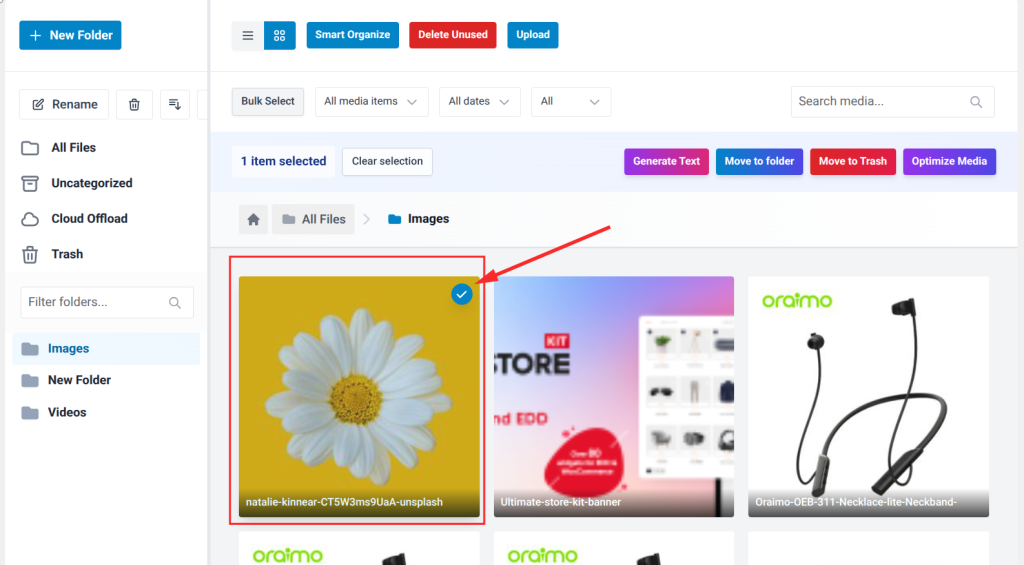
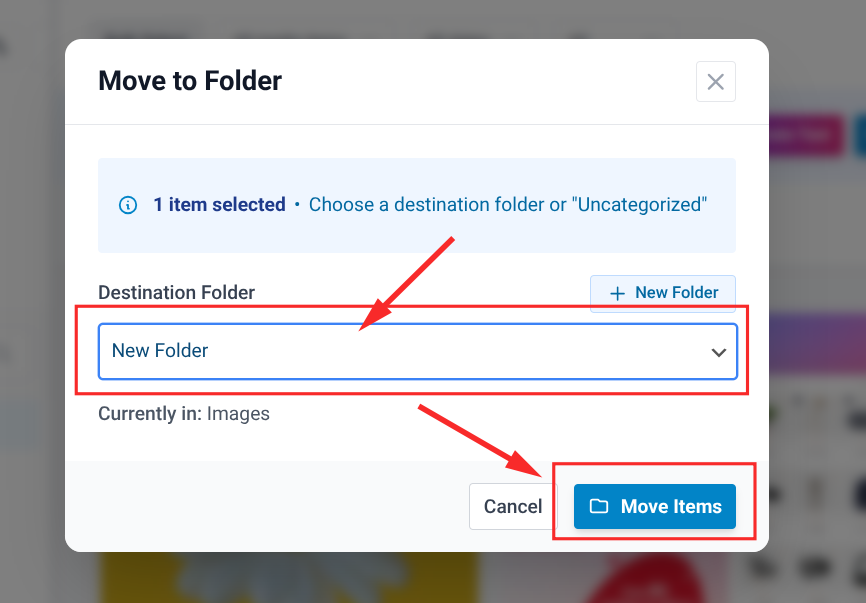
- Then click the “Move to folder” button.

- Choose your targeted folder, then click “Move Items.”
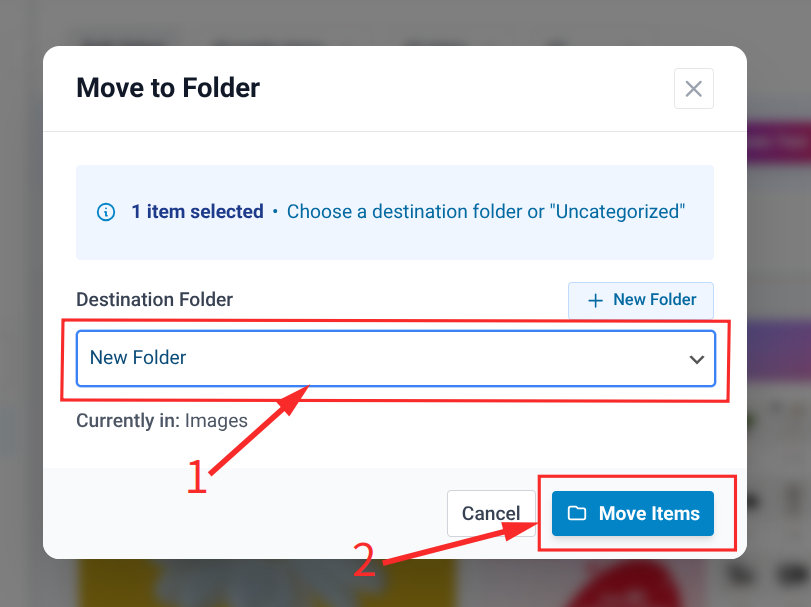
- Successfully move the image.
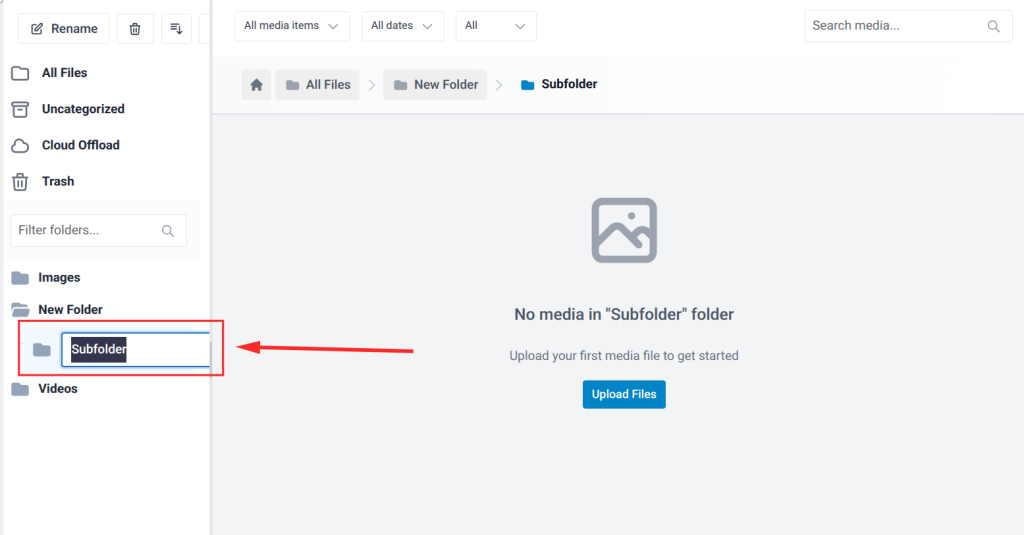
- To create a subfolder, right-click on an existing folder and select New Folder.
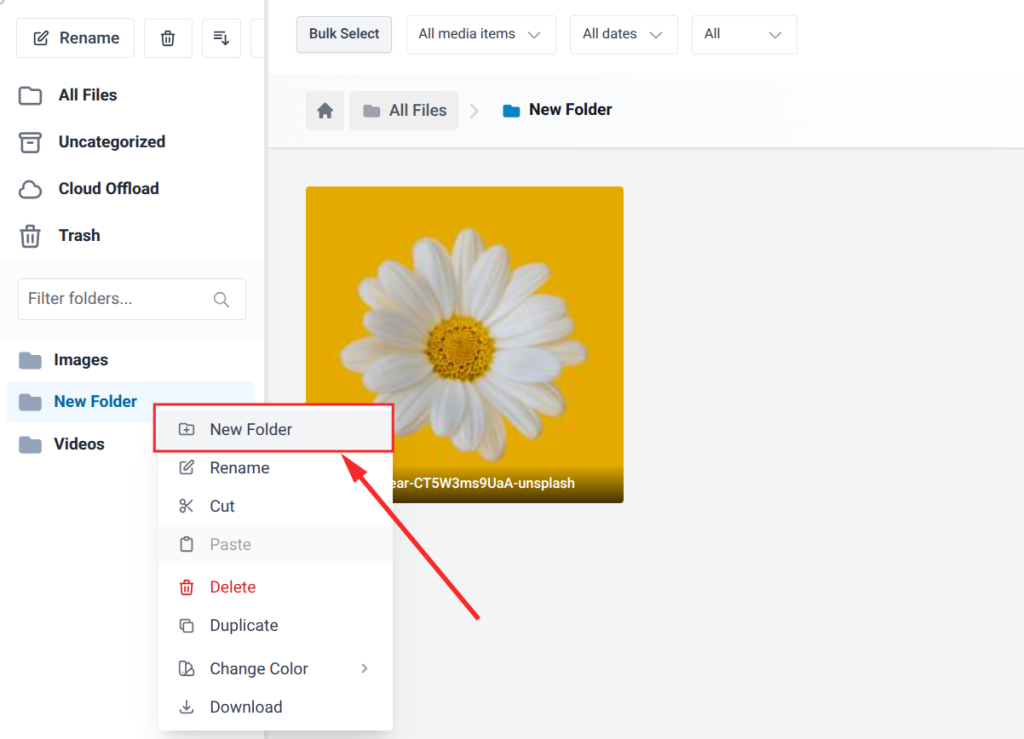
- Then name it. And Press Enter.
| Bonus tips on Sigma Media Manager Folder Management: Sigma Media Manager supports unlimited folders and subfolders, keyboard shortcuts (such as Ctrl+A to select all files) and folder sorting by name, date or file count.Files are not physically moved on the server. Organization is visual and fully compatible with all WordPress themes and plugins.You can also sort files within folders by name, date, author, file size and more using the Sort Files control in the right panel. |
Bulk Editing and Management
The default WordPress Media Library supports exactly one bulk action: delete. You can select multiple files and trash them. That is where built-in bulk functionality ends.
For bulk metadata updates, the free plugin Bulk Image Alt Text with AI (WordPress.org) lets you write alt text rules and apply them across multiple images at once.
For file renaming, Media File Renamer automatically renames files based on their attachment title.
Sigma Media Manager provides a comprehensive bulk management system within its Media Manager interface:
Tips on Bulk Actions in Sigma Media Manager
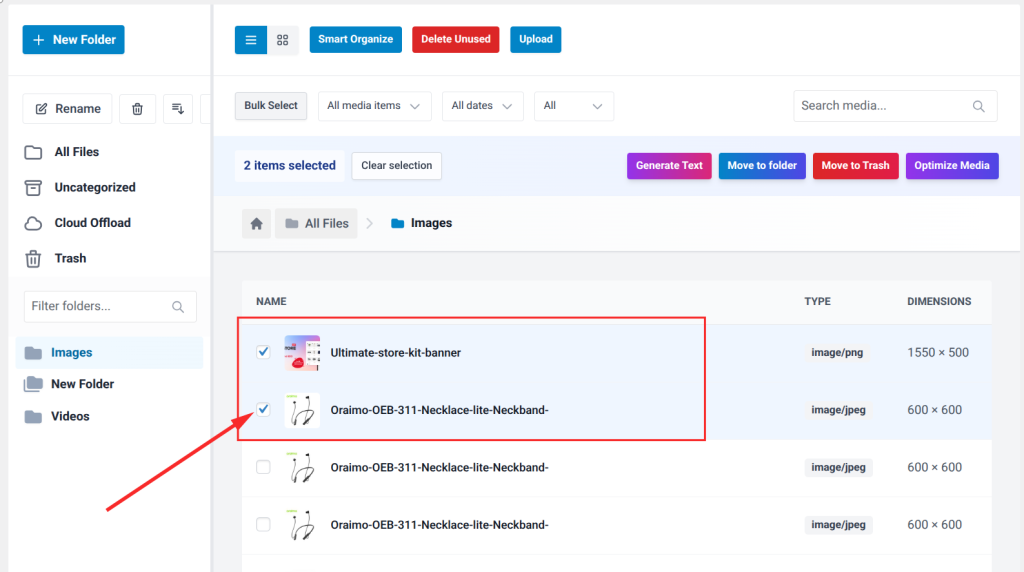
- Open Media ⟶ Media Manager and navigate to the folder containing the files you want to manage.
- Click the checkbox for individual files, or use the Bulk Select button to select all files in the current view.
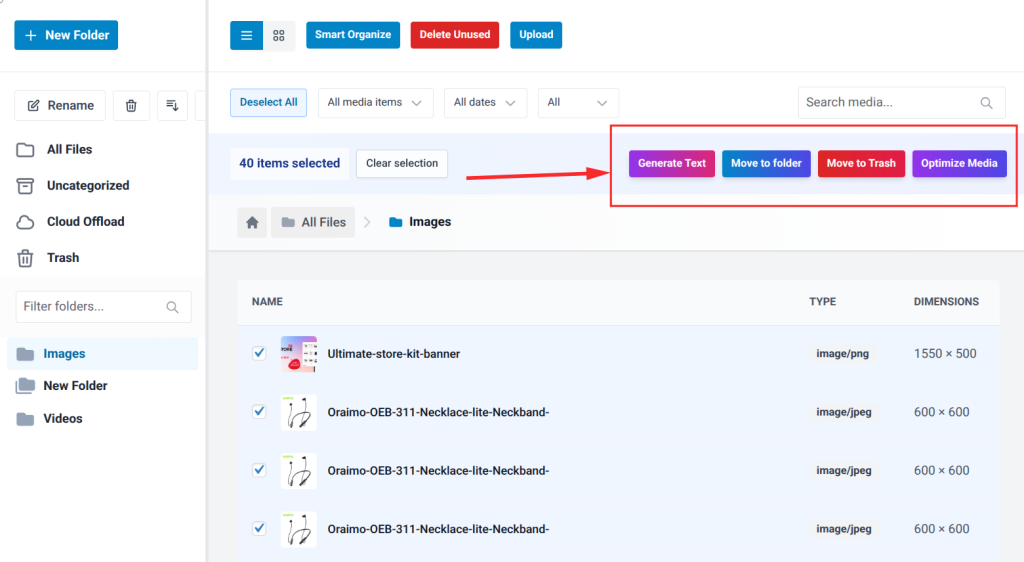
- A bulk action toolbar appears at the top of the file panel. Available actions include: Generate Text, Move to Folder, Move to Trash and Optimize Media.
- To move files, click Move to Folder, select the destination folder from the pop-up, then confirm.
- To bulk delete, click Move to Trash. Sigma Media Manager will check for references and warn you if any selected file is still attached to a post or page.
| Bonus Tips on Bulk Actions in Sigma Media Manager Sigma’s AI Generate Text feature lets you automatically create image titles, captions and descriptions for selected files in bulk, saving significant time when working on large untagged libraries. The Advanced Filtering system lets you quickly find files by type, upload date, folder or custom tags, then select and act on them. |
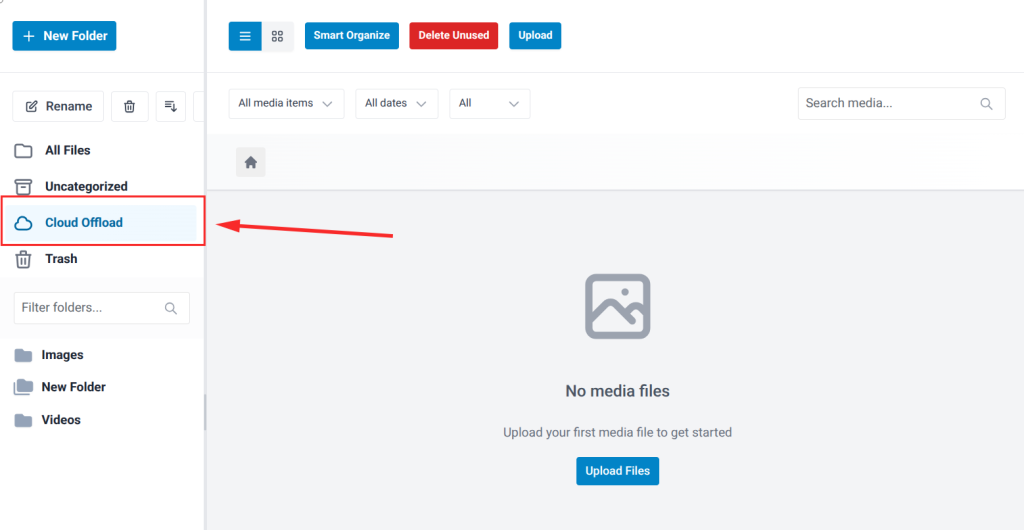
Cloud Storage Offload
WordPress stores all uploaded media on your web server by default. As your library grows into thousands of files, server storage fills up quickly, hosting costs increase and backups take longer.
Sigma Media Manager includes a built-in Cloud Offload folder in its left panel. Once you configure your cloud provider credentials in Sigma settings, any file you place in the Cloud Offload folder is automatically synced to your external storage.
This means you manage cloud offload from the same interface you use for folder organization and bulk editing, with no separate plugin required.
Secure Document Libraries
By default, every file uploaded to WordPress receives a publicly accessible URL. Anyone who obtains the link can access the file directly, regardless of login status. For public images, this is acceptable, but for paid downloads, member resources, legal documents or sensitive files, this is a significant problem.
Some free plugins provide basic download tracking and can restrict downloads to logged-in users with some configuration. For purchase-gated downloads, WooCommerce’s built-in product downloads feature is a common solution.
Sigma Media Manager addresses this through its Document Library feature. Here is how to set it up:
Tips on Creating a Secure Document Library
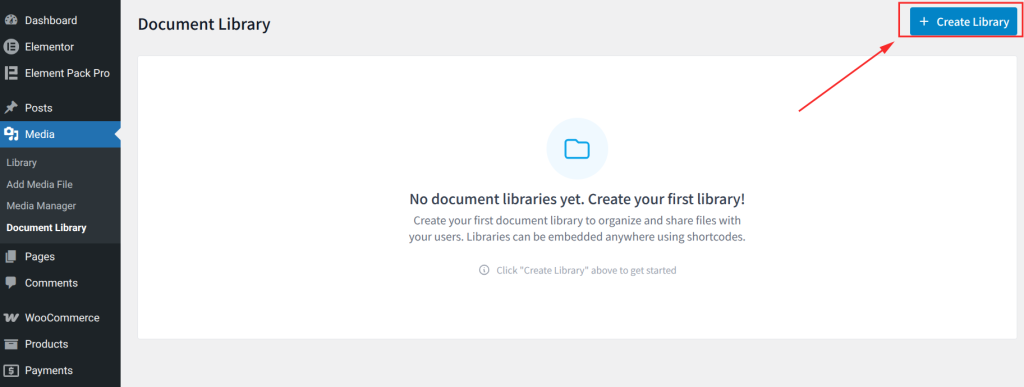
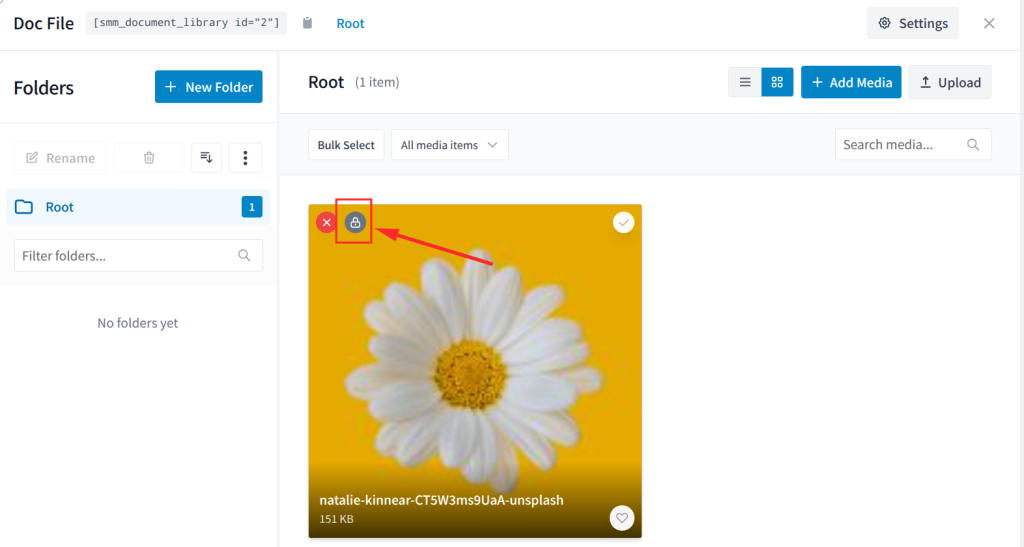
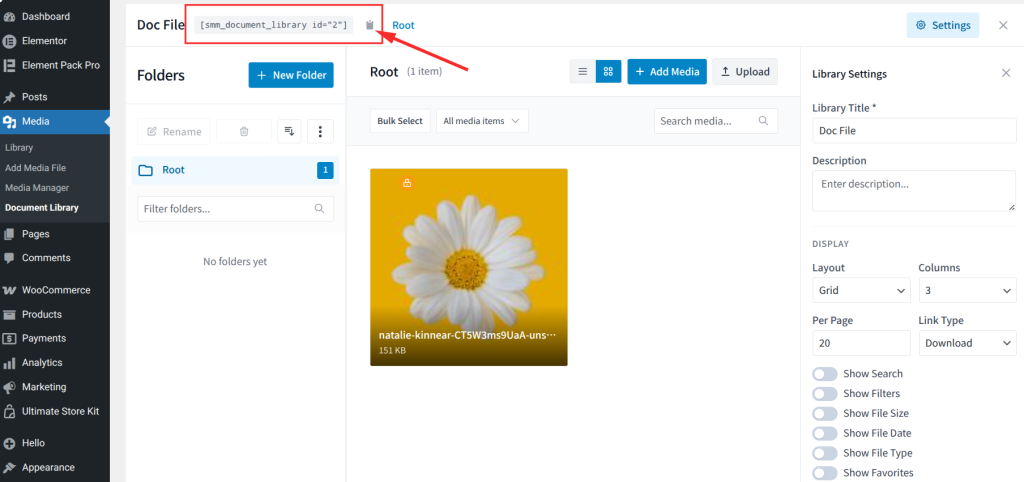
- Go to Media ⟶ Document Library in your WordPress dashboard.
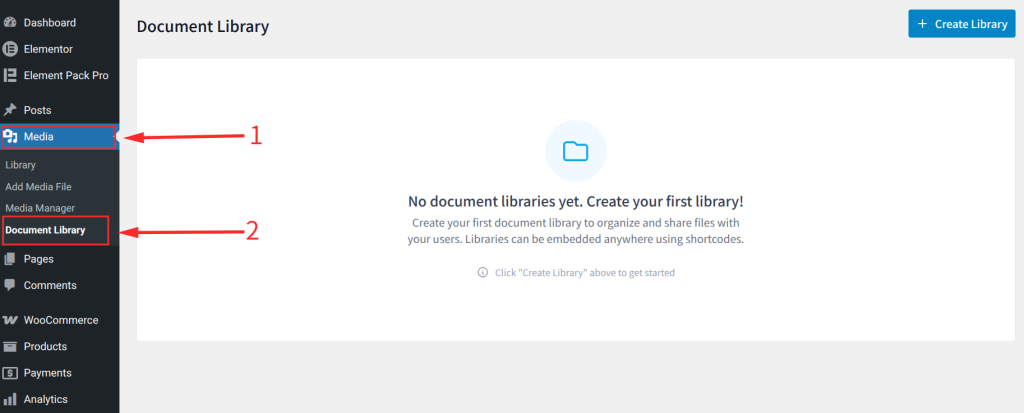
- Click Create Library to create a new document collection.
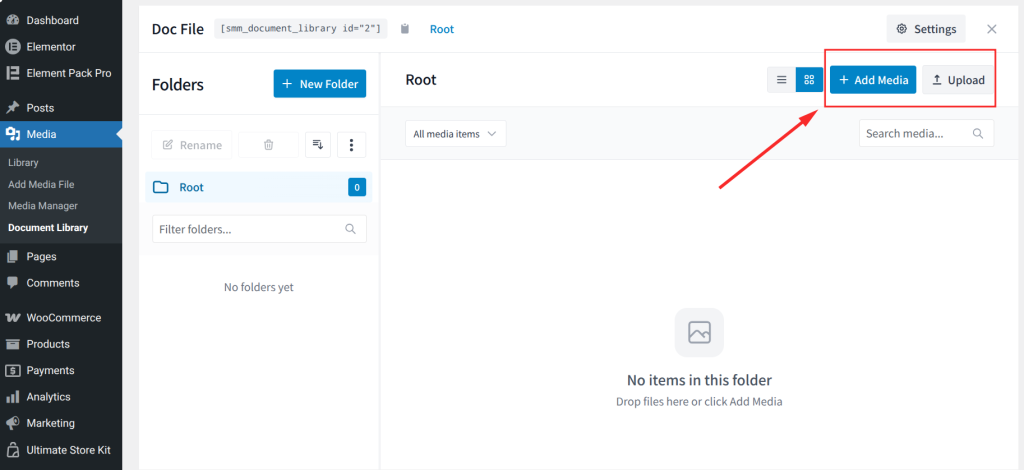
- Add files to the library by uploading new files or selecting existing ones from your Media Manager folders.
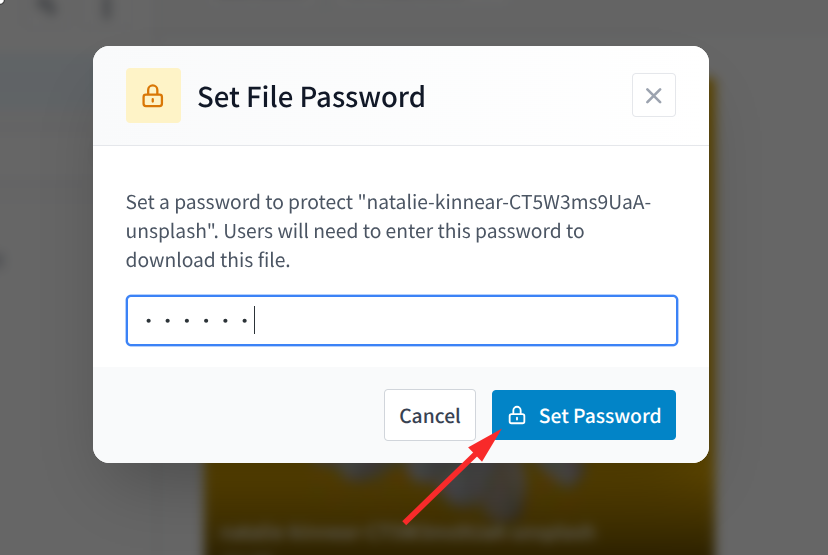
- Click on the lock icon to set a password to access the media.
- After clicking the lock icon, a pop-up will appear to enter the password, then click “Set Password.“
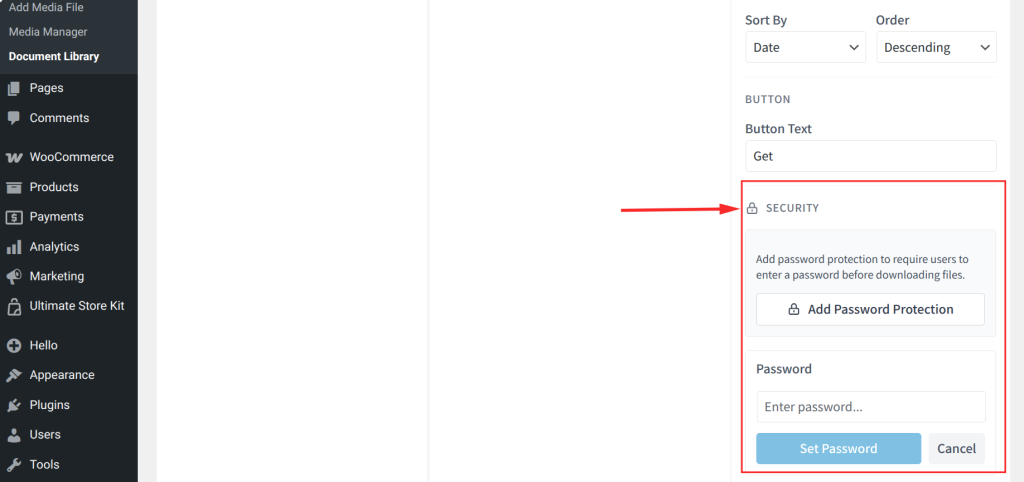
- Also, you can set a password on the full document library from Settings ⟶ Security
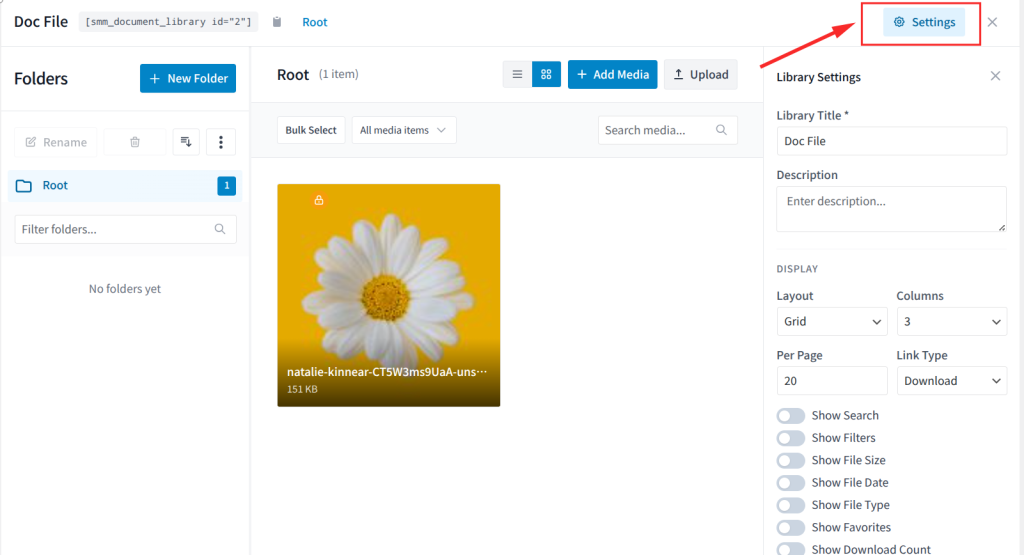
- For the security option for the password, scroll down on the right side.
- To publish the library, use the provided shortcode to embed it anywhere on your site.
| Tips on Creating a Secure Document Library with Sigma Media Manager: Protected files in Sigma Media Manager are served through a secure delivery mechanism that prevents direct URL access, not just through UI restrictions.This makes Sigma Media Manager an excellent choice for membership sites, online courses, law firms and any organization that needs secure document distribution. |
Download Spam Protection
If you offer downloadable files, automated bots can repeatedly hit your download links, wasting bandwidth, inflating analytics and potentially triggering abuse alerts from your hosting provider.
WordPress has no native protection for this. A common workaround is adding CAPTCHA verification to download forms using plugins like hCaptcha for WordPress or Cloudflare Turnstile, combined with a form plugin. This adds friction for bots but also affects legitimate users.
Sigma Media Manager includes the system tracks download frequency and enforces limits (configurable download count within a time window). The CAPTCHA system increases security by password-protecting files in the Sigma Media Manager document library when visitors or users download them.

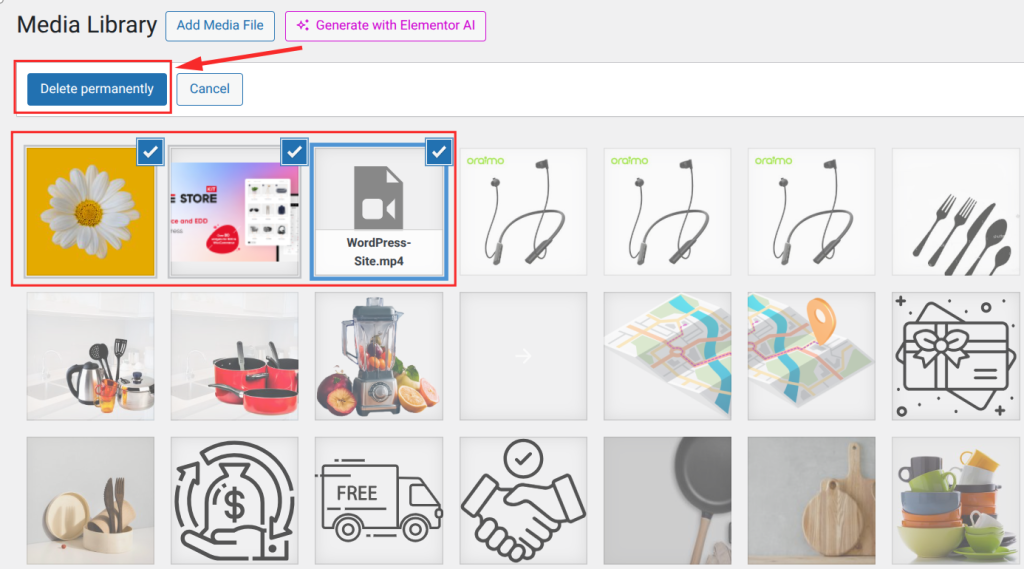
Bulk Delete Unused Media Files
Over time, WordPress libraries accumulate orphaned media, images uploaded and then detached from posts, leftover sub-sizes from deleted originals and files from deactivated plugins or themes. This wasted storage inflates backup sizes and clutters your workflow.
The free plugin Media Cleaner by Meow Apps is a reliable tool for finding and removing unused attachments.
It scans your database for files with no post references and presents them for review before deletion. Always run a full site backup before using any bulk delete tool, as automated scans can occasionally miss files referenced only in CSS or custom fields.
Sigma Media Manager includes a built-in orphan scanner that works alongside its folder system.
Because Sigma Media Manager knows which files are assigned to which folders and which folders are referenced in your content, its detection is more accurate than a standalone scanner.
Files flagged as unused are shown in context alongside their folder location, making it easy to verify before deleting.
Recommended Cleanup Workflow:
- Take a complete site backup using your hosting provider or a plugin like UpdraftPlus.
- Run the orphan scan in Sigma Media Manager or Media Cleaner.
- Review the flagged files carefully. Check for any that might be referenced in custom fields, CSS or builder templates.
- Delete confirmed orphans in batches rather than all at once. This makes it easier to identify and restore anything flagged incorrectly.
- After cleanup, run the Regenerate Thumbnails plugin to ensure all remaining images have the correct sub-sizes for your current theme.
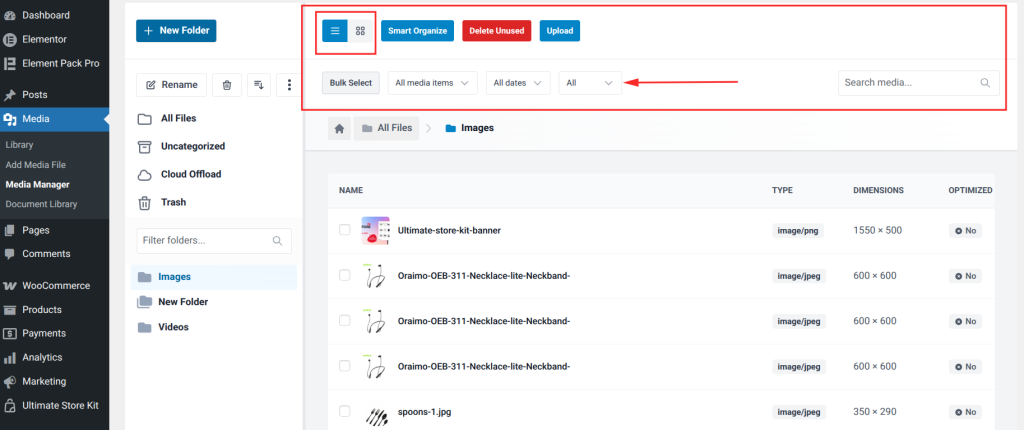
Flexible Media Library Views
WordPress provides two built-in views: a grid view that shows image thumbnails and a list view that shows files in a table. You can switch between them with the toggle icons in the top-right corner of Media ⟶ Library.
These views are adequate for basic browsing but lack features that busy users need, including column customization, sorting by file size or dimensions, filtering by type within the same view and quick inline editing.
Sigma Media Manager replaces the standard library view with a flexible, customizable interface:
- Switch between grid, list and detailed table views depending on the task at hand.
- Sort files by media item type, date (newest or oldest), used and unused files.
- Filter files by type, upload date, folder and custom tags simultaneously.
- Use the Advanced Filtering panel to create specific queries across large libraries quickly.
Optimizing Your Media for SEO
Media optimization is one of the highest-impact areas of WordPress SEO that most site owners overlook. Images are a key component of how search engines understand and rank your content.
Well-optimized images contribute to better rankings, faster page load times and improved accessibility.
For a broader look at how design and performance interrelate, the BdThemes blog covers topics like blog layout design, speed optimization and effective use of WordPress tools.
Bulk AI Metadata Generation for Images
Writing accurate, descriptive alt text for every image in a large library is important for SEO and accessibility, but tedious to do manually. Sigma Media Manager’s built-in AI Generate Text feature addresses this directly.
Tips on Using Sigma Media Manager AI Text Generation
- Open Media ⟶ Media Manager and select the files you want to generate metadata for. Then, click the AI Generate Text option from the bulk action toolbar.
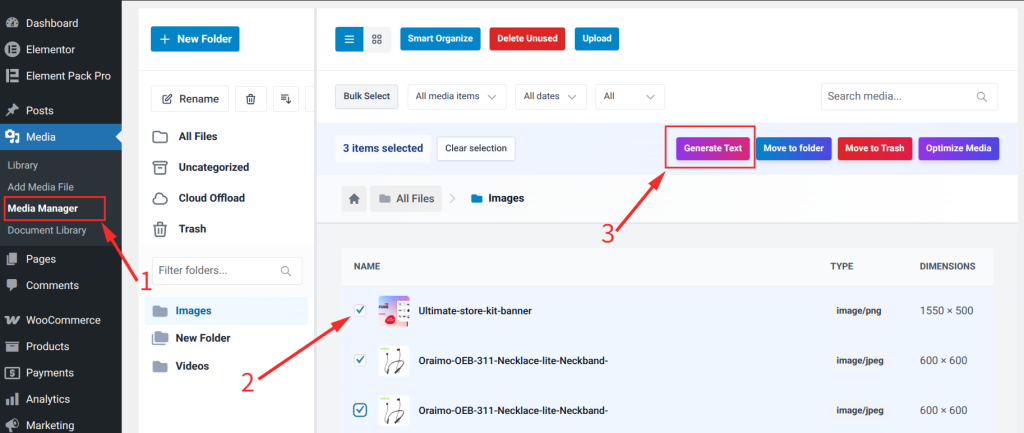
- A dialog appears where you can choose which fields to generate: Title, Caption and Description.

- Click Rename x Items. Sigma Media Manager analyzes each selected image using computer vision and fills in the chosen fields automatically.
- Review the generated text for each file. Edit any that need adjustment, then click Save to apply all changes at once.
| Bonus Tips on Using Sigma Media Manager AI Text GenerationThis feature saves significant time when onboarding a new site with an existing media library that lacks metadata, or when bulk importing product images for an e-commerce store.For manual alt text workflows without Sigma, the free plugin Bulk Image Alt Text with AI on WordPress.org offers similar batch processing capabilities. |
Image Optimization Plugins
Large, uncompressed image files are one of the leading causes of slow WordPress sites. Google’s Core Web Vitals framework directly penalizes sites with poor Largest Contentful Paint (LCP) scores, which are often caused by large images.
Optimizing your images improves load time, user experience and search rankings.
Several well-maintained free plugins in the WordPress Plugin Directory handle compression.
Sigma Media Manager natively incorporates image optimization into its workflow. New uploads are processed automatically and you can trigger bulk optimization on existing files from within the same Media Manager interface you use for organizing and tagging.
This eliminates the need for a separate optimization plugin, keeping your entire media workflow consolidated.
Tips on Image Optimization in Sigma Media Manager:
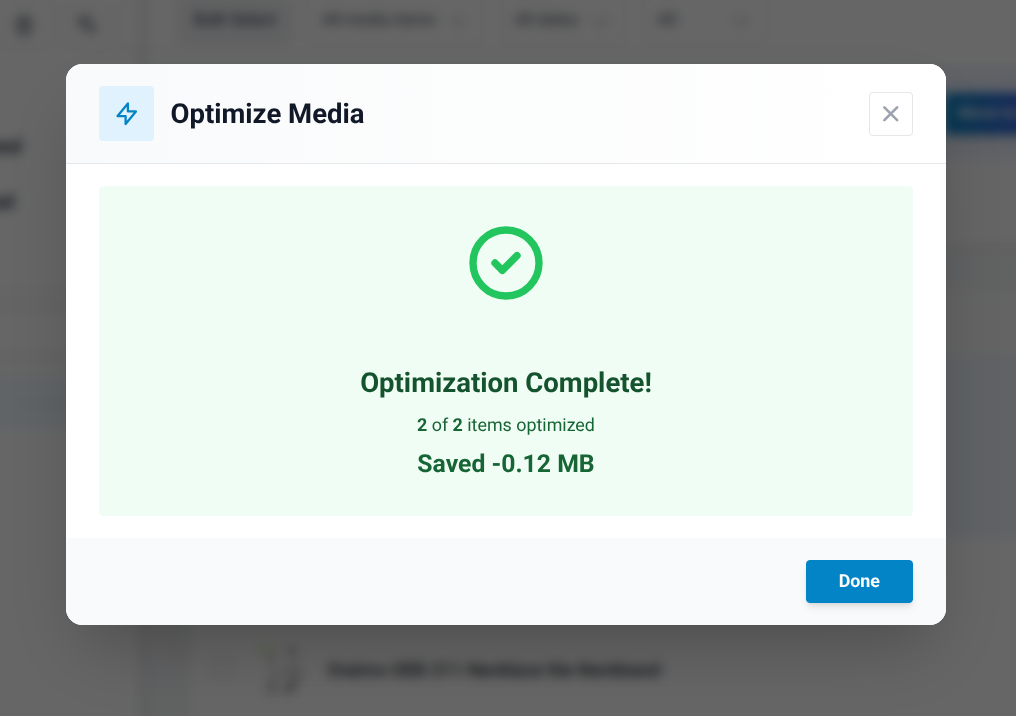
- Open Media ⟶ Media Manager and select the file you want to optimize.
- Click the “Optimize Media” button
- A pop-up will appear with the message “Ready to Optimize.”
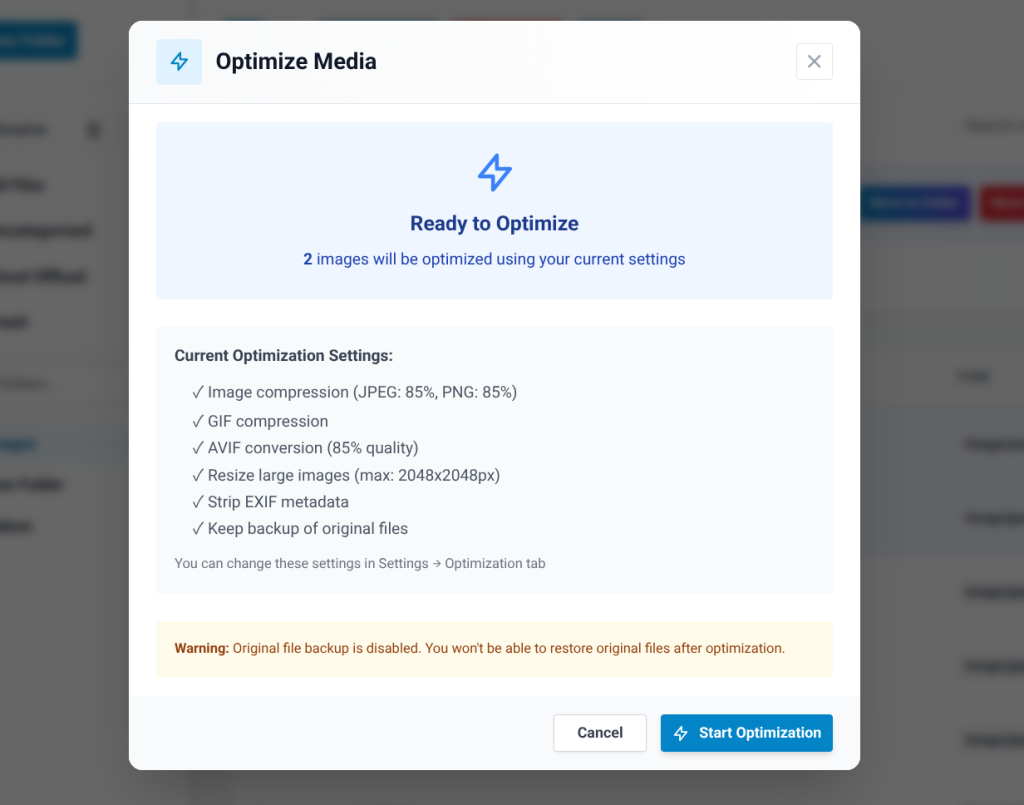
- Then, click “Start Optimization” to complete optimization.
Adding Captions and Alternative Text
Captions and alt text serve distinct purposes. Captions are visible text below an image that provides context for all visitors.
Alt text is invisible on the page and is used by screen readers to describe images to visually impaired users and by search engines to understand image content.
How to Add Alt Text via the Media Library:
- Go to Media ⟶ Library
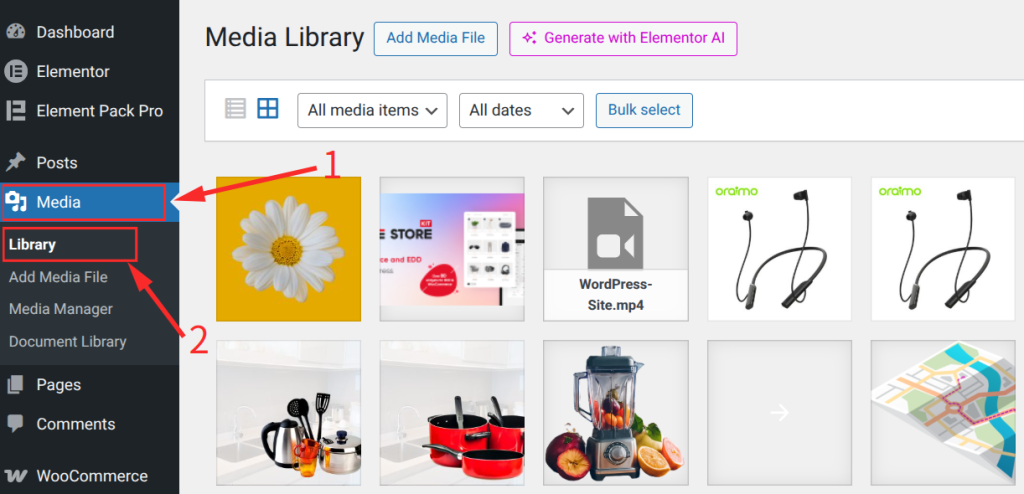
- Then, click on any image.
- In the attachment detail panel that opens, locate the Alternative Text field.
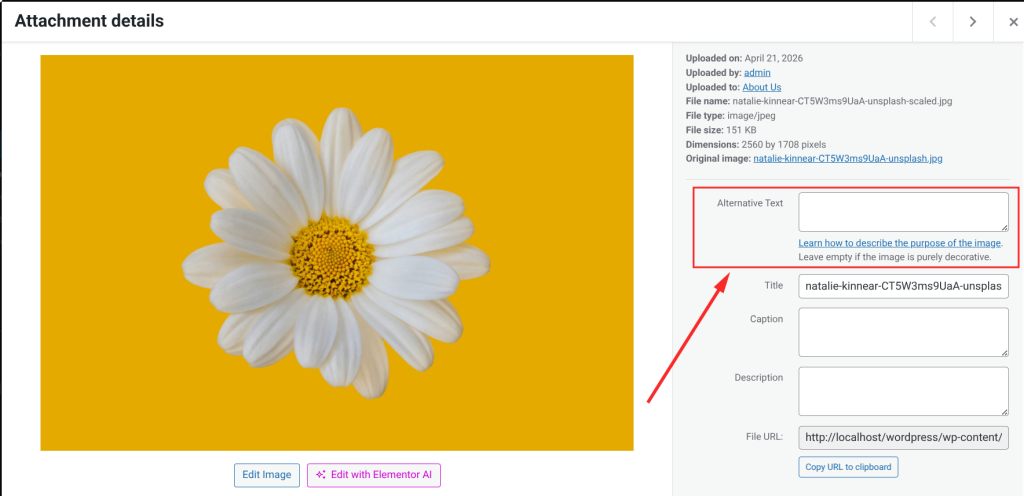
- Enter a descriptive alt text for the image and the back auto will be saved.
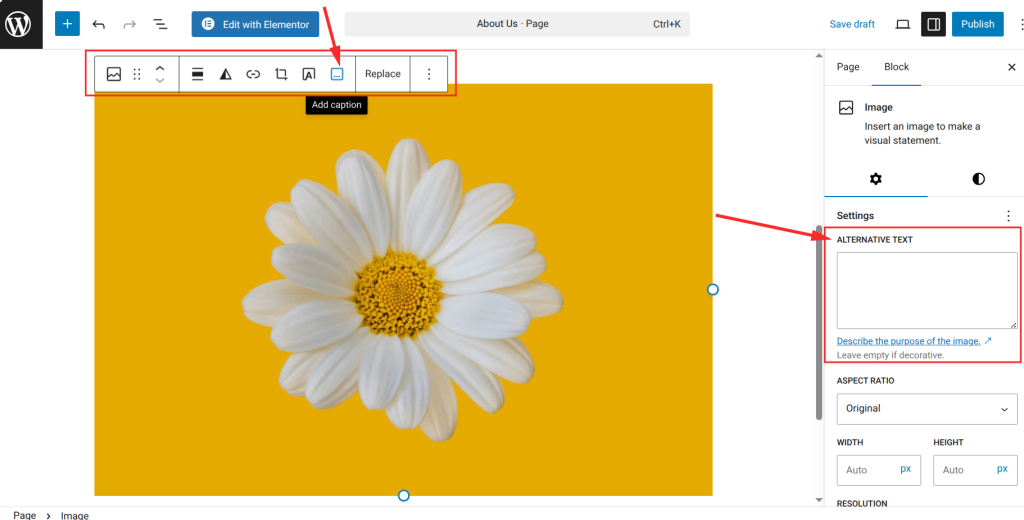
How to Add Alt Text via the Block Editor:
- Click on an image block in the editor.
- In the right-side settings panel under Image Settings, find the Alt Text field.
- Type your alt text. Changes are saved with the post.
Best Practices for Alt Text:
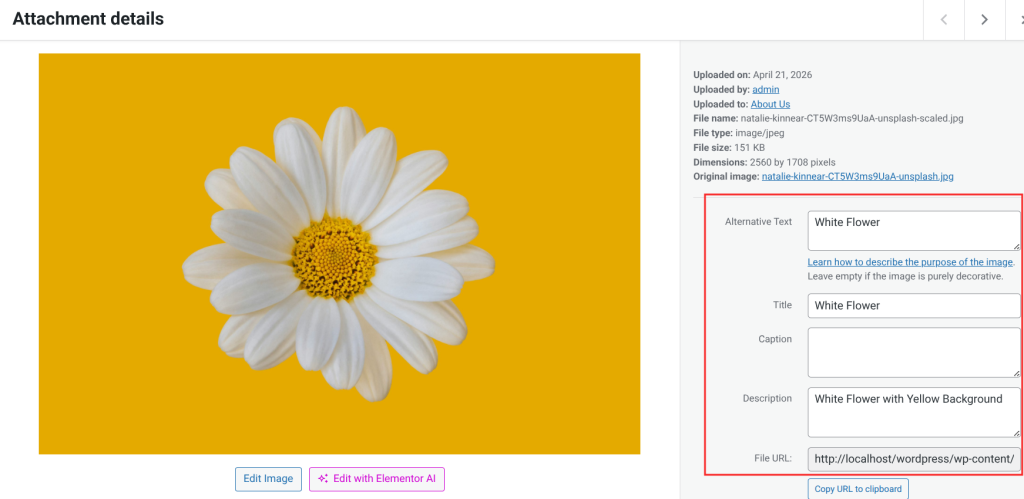
- Be specific and descriptive: “Red leather sofa in a minimalist Scandinavian living room” is far more useful than “sofa” or “image001.jpg.”
- Include relevant keywords naturally: If your target keyword fits the description naturally, include it. Never force keywords into alt text just for SEO.
- Keep it concise: 125 characters or fewer is the widely accepted guideline for alt text length.
- Avoid redundant phrases: “Image of” or “photo of” is unnecessary. Screen readers already announce the presence of an image.
- Decorative images: For purely decorative images with no informational value, leave the alt text field empty rather than filling it with irrelevant text.
For captions, write text that adds genuine information not already present in the surrounding content. A caption that simply repeats the paragraph above adds no value. A caption that provides a source, location, date or additional context benefits both readers and search engines.
Bonus: Cleaning Up Your Library
A cluttered media library slows your workflow, inflates backup sizes and increases storage costs. A periodic cleanup keeps your library lean and easy to navigate.
Here is a practical cleanup workflow:
- Audit first, delete second: Use Sigma Media Manager’s orphan scanner or the free Media Cleaner plugin to identify potentially unused files. Review the results before taking any action.
- Back up before you bulk delete: Always take a full site backup before bulk deleting. Your hosting control panel or UpdraftPlus can handle this quickly.
- Delete in batches: Remove orphaned files in smaller groups rather than all at once. If something was incorrectly flagged, it is much easier to restore a small batch from backup.
- Regenerate thumbnails: After deleting files or switching themes, some image sub-sizes may be missing or incorrectly sized. Use the free Regenerate Thumbnails plugin to recreate all sub-sizes for remaining images.
- Establish consistent naming and folder conventions: Use Sigma Media Manager to set up a folder structure you will follow for all future uploads. Consistent organization makes future cleanups significantly faster.
Advanced Management: APIs and External Storage
For developers and technically oriented site owners, WordPress exposes a REST API for programmatic media management. This is useful for headless WordPress setups, mobile apps posting content to WordPress and automated content pipelines.
The core media API endpoints are:
- GET /wp-json/wp/v2/media: Retrieve a paginated, filterable list of media items.
- POST /wp-json/wp/v2/media: Upload a new file with proper authentication headers.
- POST /wp-json/wp/v2/media/{id}: Update the title, alt text, caption or description for an existing item.
- DELETE /wp-json/wp/v2/media/{id}: Delete a media item and its associated physical files.
Authentication for the REST API is handled through Application Passwords, a built-in WordPress feature since version 5.6. For OAuth-based workflows, many free plugins provide a full implementation.
For external storage at scale, many 3rd-party plugins offer the most complete feature set, including background sync, CDN URL rewriting, and fine-grained control over offload rules. Pairing this with a CDN like Cloudflare, Bunny CDN or Amazon CloudFront ensures media is delivered from the fastest edge location for each visitor.
Sigma Media Manager extends the default WordPress REST API with additional endpoints for folder management, metadata operations and bulk processing.
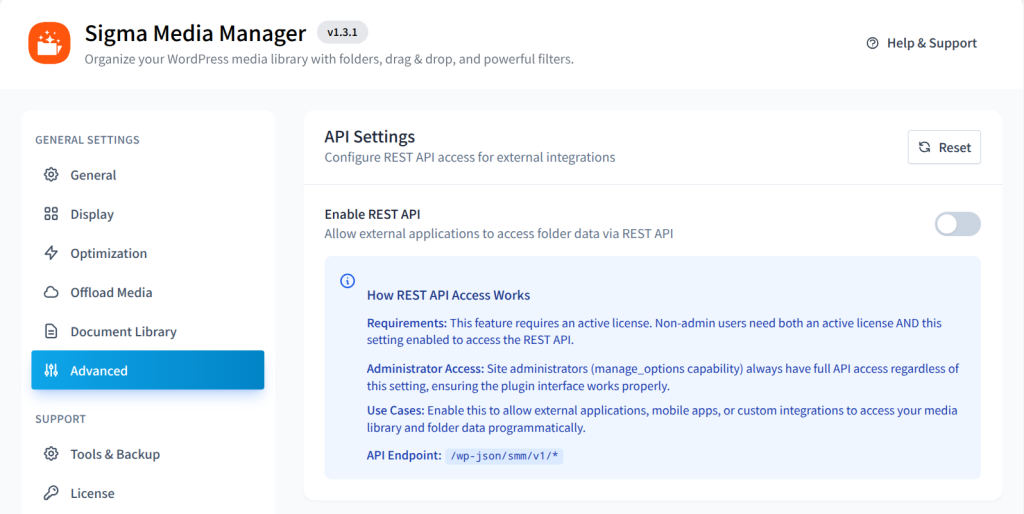
For agencies building custom dashboards or headless WordPress applications, these endpoints provide a solid foundation without requiring custom development from scratch.
Conclusion
The WordPress Media Library is both more capable and more limited than most site owners realize. Understanding that balance is what allows you to build a media management workflow that scales with your site instead of holding it back.
For everyday tasks like uploading files, editing images and adding alt text, the default WordPress tools are reliable and require no additional setup.
For site owners and teams who want a single, integrated system, Sigma Media Manager brings together folder organization, AI-powered metadata generation, bulk editing, image optimization, cloud storage, secure document delivery, and a customizable interface in one plugin.
Rather than managing a collection of single-purpose tools, Sigma Media Manager gives you a complete media management system designed for the complexity of a growing WordPress site.
Whatever your starting point, investing in better media management practices pays off in faster load times, stronger SEO, lower storage costs and hours of time saved every month. You can explore the BdThemes blog for more guides on WordPress performance, design tools and plugin recommendations.
Frequently Asked Questions
What is the WordPress Media Library?
The WordPress Media Library is the built-in file management system for your site. It stores all uploaded files, including images, videos, audio, PDFs, and other documents, and provides an interface for uploading, organizing, and editing those files from the admin dashboard.
How do I access the WordPress Media Library?
Log in to your WordPress admin dashboard and go to Media ⟶ Library in the left sidebar. You can also access it while editing a post or page by clicking the block inserter (+) and adding a media block.
Can I create folders in the WordPress Media Library?
WordPress does not include a built-in folder system. To add folder functionality, install a plugin such as Sigma Media Manager, which provides an unlimited folder and subfolder hierarchy with drag-and-drop management.
How do I add alt text to images in WordPress?
Go to Media ⟶ Library, click on an image to open its detail page and enter your description in the Alternative Text field. You can also add alt text when inserting an image in the block editor by selecting the image block and using the Alt Text field in the right-side settings panel.
How do I delete unused media from WordPress?
Use a plugin like Media Cleaner or Sigma Media Manager to scan your library for orphaned files. Always create a full backup before performing bulk deletions and review the flagged file list carefully before confirming the deletion.
What is the maximum file upload size in WordPress?
The upload limit is controlled by PHP settings on your server, specifically upload_max_filesize and post_max_size. The default is often 2 MB, but most hosts allow you to raise this through your hosting control panel or a php.ini file. Many hosts support 32 MB or higher without any configuration changes.
How do I optimize images in the WordPress Media Library?
For compression and format conversion, install a plugin such as Sigma Media Manager, which includes built-in optimization that handles compression and WebP conversion without a separate plugin.
Can I restrict access to certain files in my WordPress Media Library?
By default, all files uploaded to WordPress have public URLs. To restrict access, you need a plugin that implements protected file delivery. Sigma Media Manager supports role-based access control for specific folders and files, allowing you to create private document libraries and member-only downloads within WordPress without exposing direct file URLs.
What is Sigma Media Manager and how is it different from other plugins?
Sigma Media Manager is a WordPress plugin by BdThemes that combines folder organization, AI metadata generation, bulk editing, image optimization, cloud offload, secure document libraries and a customizable media interface in one tool. Rather than installing and configuring multiple single-purpose plugins, Sigma covers the full media management workflow from a single, integrated interface built into the WordPress admin.