

Did you know that 69.57% of online shopping carts are abandoned? One of the top reasons is a clunky, confusing checkout experience.
If your WooCommerce checkout page is not optimized, you’re likely losing potential sales—right at the finish line. Long forms, poor mobile UX, or off-brand design can all contribute to customers bouncing before they complete their purchase.
The good news? With the right tools, you don’t need to be a developer to fix it.
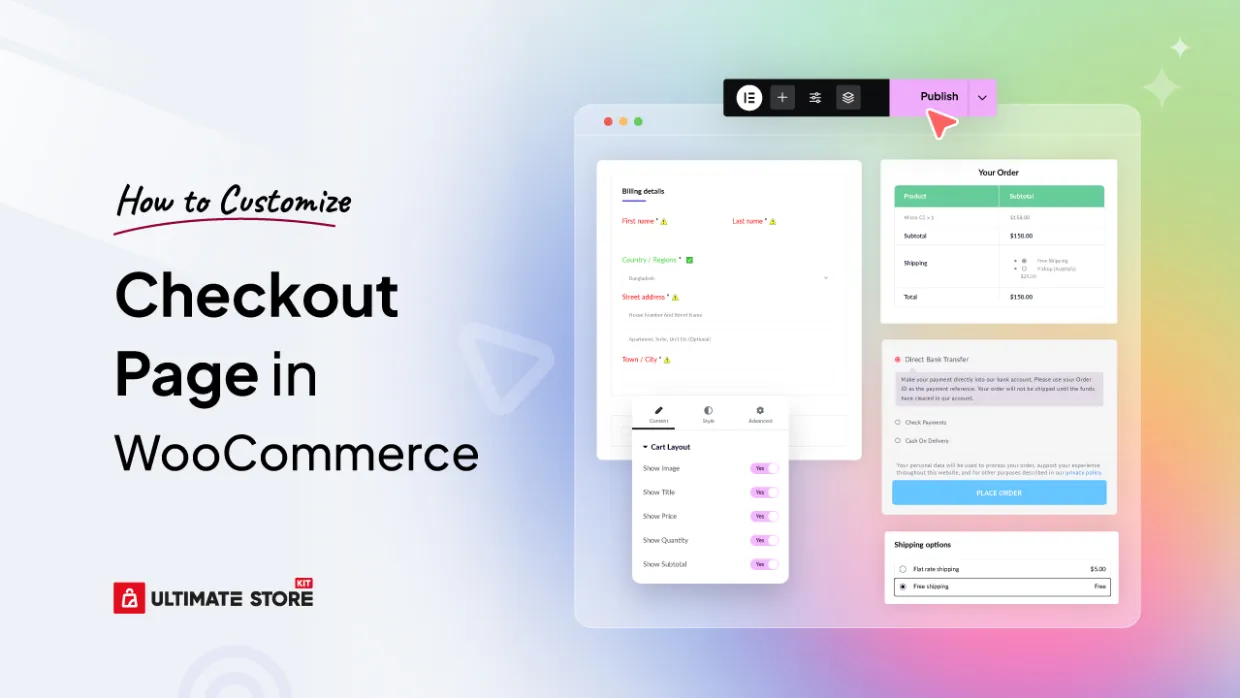
You can easily use the Checkout (Page) widget to completely customize checkout page in WooCommerce visually. If you want to change field styles, improve layout, or enhance checkout UX, you’ll also have full control—no coding required.
In this step-by-step guide, you’ll learn:
- How to edit your WooCommerce checkout page
- Powerful customization options for checkout fields, design, and layout
- UX tips to improve conversions
Ready to transform your default checkout into a high-converting experience? Let’s dive into the essentials you’ll need to get started.
Pre-requisites:
Before diving into WooCommerce checkout page customization, make sure the Elementor plugin (free or pro) is installed and activated from your WordPress dashboard.
We’ll do our entire customization of the checkout page using Elementor.
Step-by-Step: How to Customize Checkout Page Using StoreKit
Now, elementor is enough for basic to moderate checkout page customization, however, if you want to create a advanced custom checkout page for your woo store, the elemntor especially the free version may lack behind.
So, here, in this guide, we’re going to use a freemium woocommerce page builder plugin “Ultimate Storekit”.
And, this is not only my personal recommendation to use it for your store building, many woocommerce experts talk about this plugin as an easy, yet powerful store builder.
Ultimate Store Kit is a powerful WooCommerce builder plugin designed to extend Elementor’s capabilities. It’s Checkout (Page) widget lets you customize the WooCommerce checkout page from top to bottom, using Elementor’s drag-and-drop interface.
With over 80+ custom widgets, built-in template builder, and deep integration with WooCommerce, Elementor, and EDD, this plugin is purpose-built for sellers who want flexibility, style, and functionality without hiring a developer.
So, let’s begin.
Step 1: Enable the Checkout (Page) Widget
Customizing your WooCommerce checkout page is now easier than ever with the Checkout (Page) widget from the Ultimate Store Kit.
Before you start designing, you need to activate the Checkout (Page) widget in StoreKit:
- From your WordPress dashboard, go to: Ultimate Store Kit > WC Widgets.
- In the search bar, type Checkout (Page).
- Toggle the widget ON to activate it.
- Click the Save Settings button.
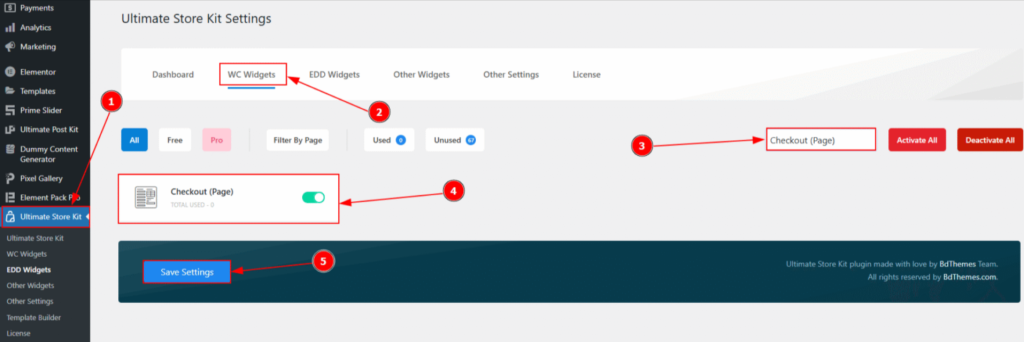
This enables the widget in Elementor so you can begin visually designing your checkout experience.
By enabling this, you’re unlocking full WooCommerce checkout customization capability — allowing you to modify layouts, fields, colors, and more from within Elementor.
Step 2: Insert the Checkout Widget in Elementor
Now that the widget is enabled, it’s time to bring it into your design:
- Navigate to Pages > Add New or select an existing page you want to use as your checkout.
- Click Edit with Elementor.
- In the Elementor panel, search for Checkout (Page).
- Drag and drop the widget into your layout.

Once placed, the checkout form will appear — ready for styling.
This widget lets you edit everything from headers to forms and payment methods using Elementor’s drag-and-drop interface — no coding required.
Step 3: Style the Checkout Page
The real magic begins here. With the widget in place, use Elementor’s Style tab to personalize every section of your checkout page.
Let’s break it down by sections for full WooCommerce checkout page customization.
Heading Section
Navigate to Style > Heading. Here you can customize the look of your checkout heading:
- Color – Change the text color of the heading to match your brand.
- Bottom Spacing – Adjust the space between the heading and the container for better structure.
- Alignment – Choose from left, center, or right aligned text.
- Typography – Customize font family, size, weight, transform, style, decoration, line height, letter spacing, and word spacing.
A clean and clear heading improves scannability and creates hierarchy on your checkout page.
Container Section
Navigate to Style > Container
This section controls the checkout form’s surrounding container.
- Background – Set the background color for the container.
- Alignment – Position form labels to the left or right.
- Padding – Add internal spacing within the container.
- Margin – Control the spacing between container elements.
Additional Styling:
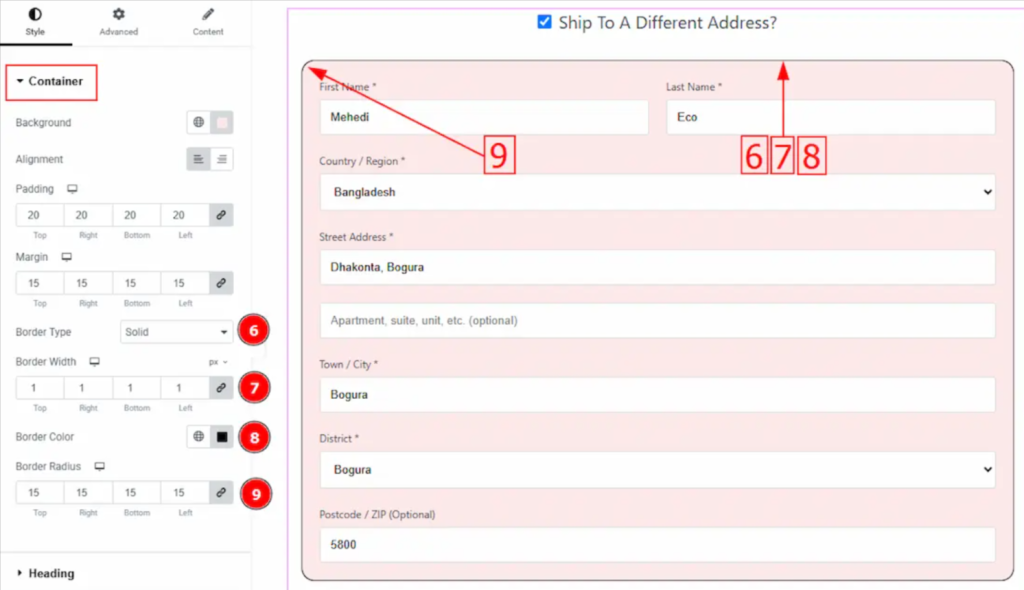
- Border Type – Choose from solid, double, dotted, dashed, or grooved styles.
- Border Width – Adjust the thickness of the container borders.
- Border Color – Set a border color that fits your site design.
- Border Radius – Make your corners sharp or rounded for a modern aesthetic.
Using clean margins and padding ensures content breathability — a critical element in WooCommerce checkout UX.
Form Section
Navigate to Style > Form
This area lets you fine-tune labels and input fields — crucial for how to edit checkout fields in WooCommerce without coding.
Label Tab
- Color – Set the label text color.
- Required Indicator Color – Color the asterisk (*) that indicates required fields.
- Bottom Spacing – Adjust the spacing under each label.
- Typography – Customize all font-related properties.
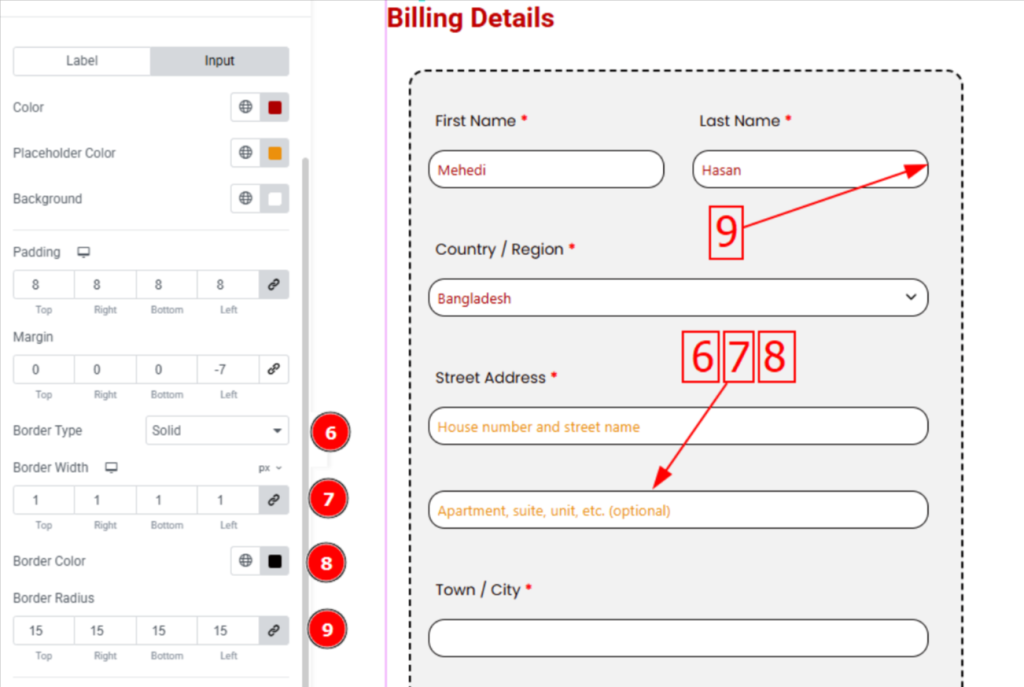
Input Tab
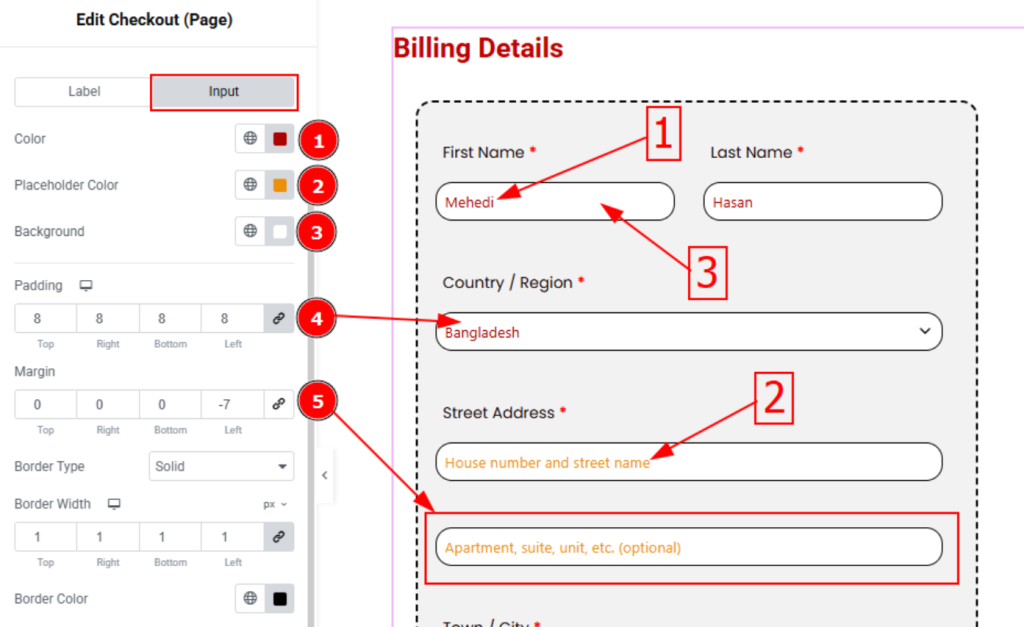
- Color – Define the text color inside form inputs.
- Placeholder Color – Change the placeholder text color.
- Background – Set a background color for input fields.
- Padding and Margin – Control the spacing inside and around the fields.
Focus Tab

Used to style inputs when they’re focused (clicked or selected):
- Color & Background – Highlight fields when users interact.
- Border Type, Width, Color – Emphasize selected fields with visual cues.
- Typography – Customize the font inside active inputs.
Clear and accessible form fields can reduce checkout abandonment by up to 35%, according to Baymard Institute.
Order Details Section
Navigate to Style > Order Details
Breaks into three tabs: Header, Body, and Footer.
General Styling
- Border Type, Width, Color – Add or adjust borders to section containers.
Header Tab
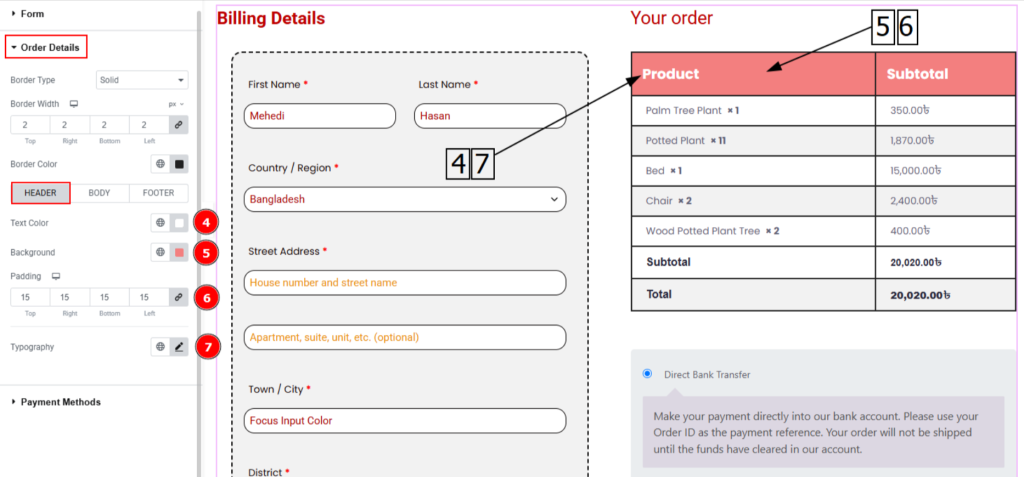
- Text Color – Set heading text color (e.g., “Your Order”).
- Background – Change background color to separate visually.
- Padding – Add internal spacing.
- Typography – Adjust font styles for visual impact.
Body Tab
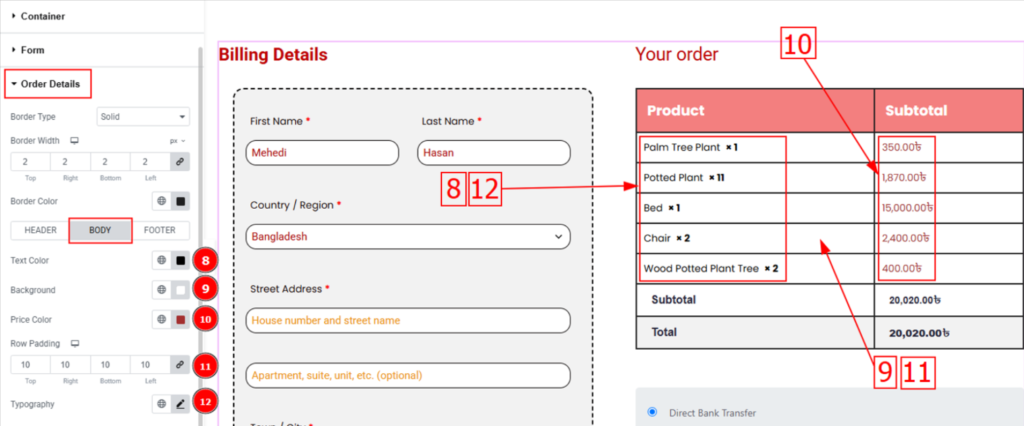
- Text & Price Color – Style product details and prices.
- Background – Set background tone.
- Row Padding – Add breathing room between line items.
- Typography – Customize font styles for product listings.
Footer Tab
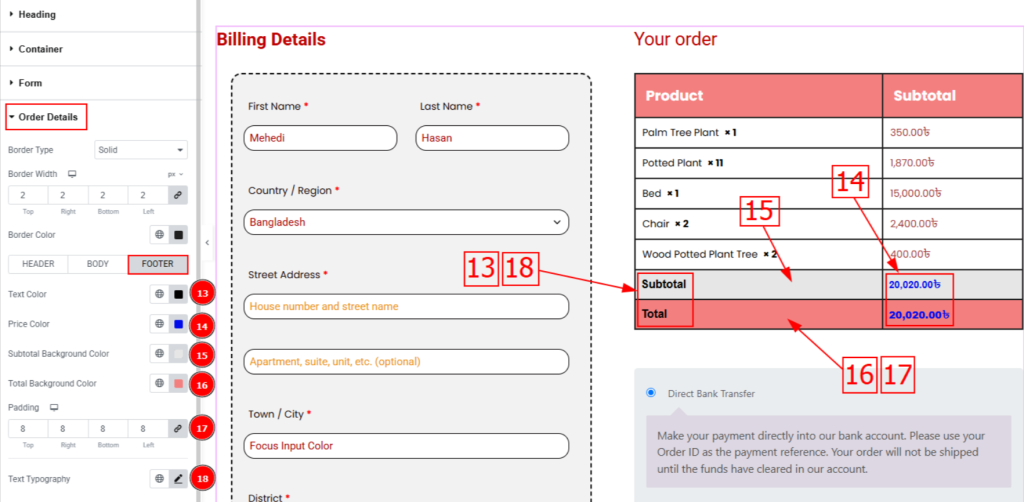
- Text, Price, Subtotal & Total Background Colors – Highlight totals clearly.
- Padding – Space out elements.
- Typography – Ensure consistency with the rest of the checkout.
Shoppers process totals quickly — a clean layout helps reinforce trust and prevent confusion.
Payment Methods Section
Navigate to Style > Payment Methods
Split into two tabs: Content and Button.
Content Tab
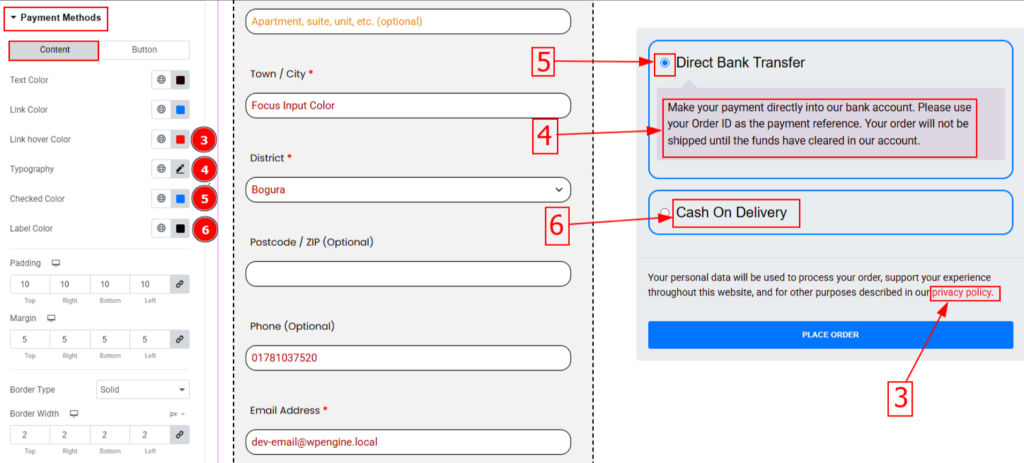
- Text, Link, and Hover Colors – Style payment descriptions and links.
- Typography – Adjust readability of payment method text.
- Checked & Label Colors – Style selected payment method appearance.
- Padding & Margin – Space out payment options cleanly.
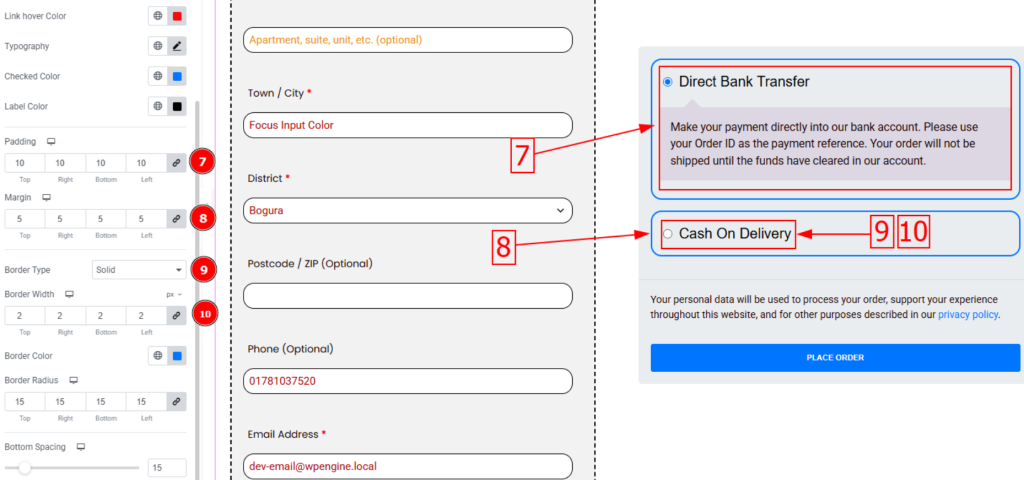
- Border Options – Style selection containers with custom borders and radius.

Button Tab
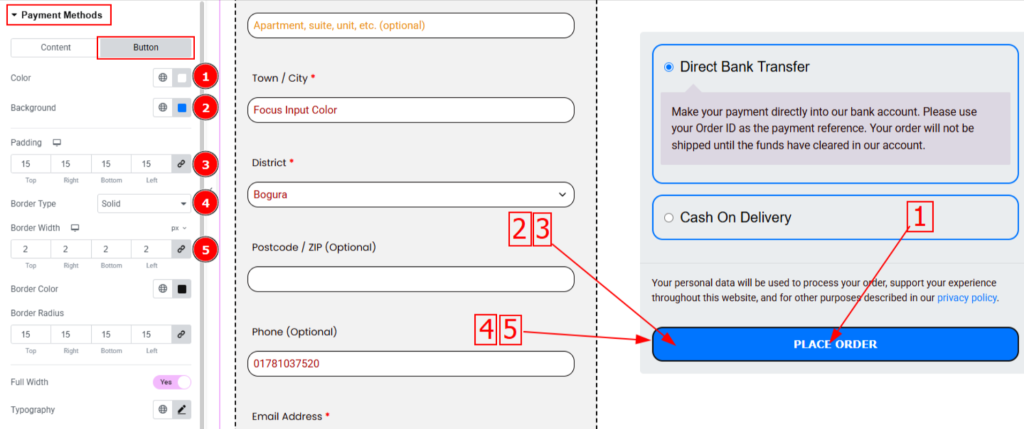
- Text & Background Color – Set the main call-to-action (e.g., “Place Order”).
- Padding – Ensure the button is easy to tap.
- Border & Radius – Customize button shape and outline.
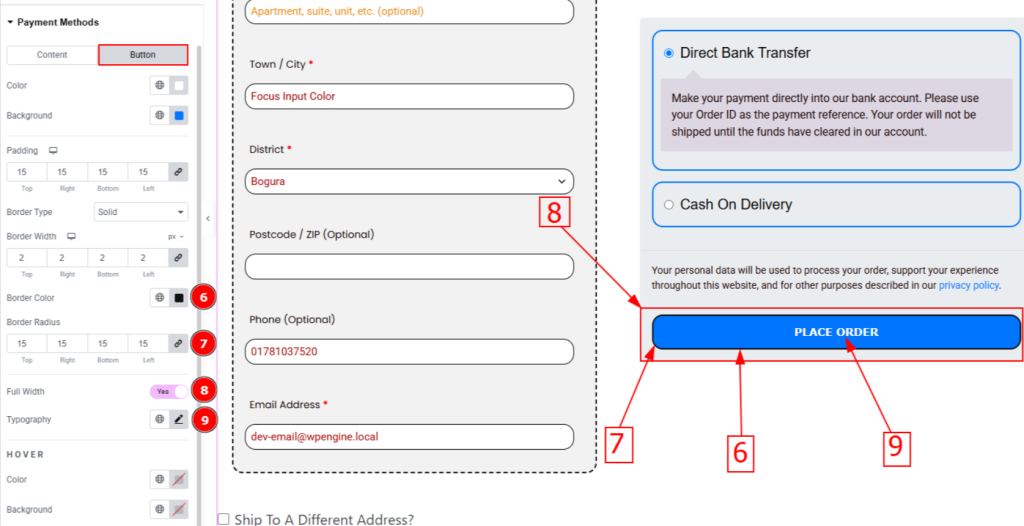
- Hover Effects – Add interactive styling on hover.
- Full Width Option – Make the button span the entire container.
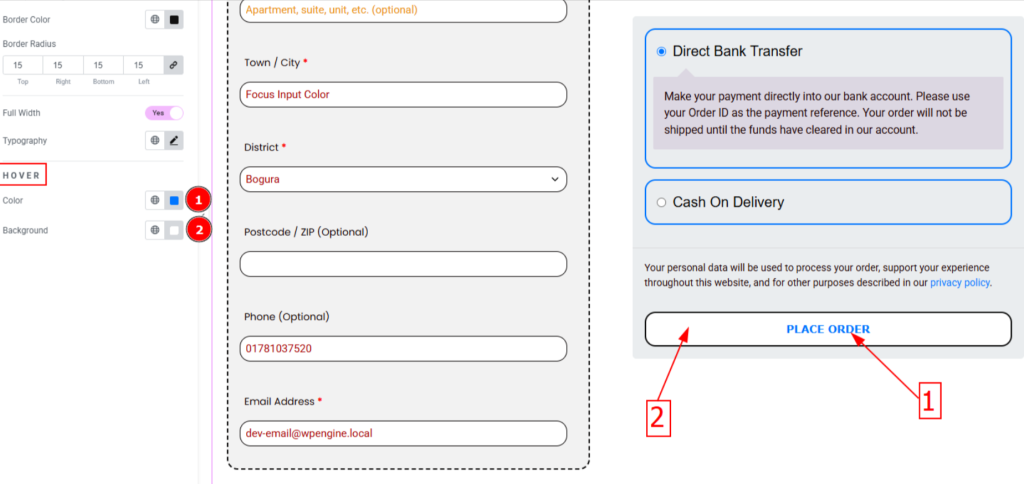
According to Sleeknote, a clear CTA button can increase conversions by up to 45%.
Visual Summary Table
Here’s a quick recap of what you can customize with the Checkout (Page) widget:
| Section | Customizable Elements |
| Heading | Color, alignment, bottom spacing, typography |
| Container | Background, border type, width, color, radius, padding, margin, alignment |
| Form (Label/Input) | Colors, typography, spacing, background, borders, focus state styles |
| Order Details | Header, body, and footer styling including colors, spacing, and fonts |
| Payment Methods | Text/link styling, padding, borders, CTA button design, hover effects |
That wraps up the step-by-step section!
This full customization flow is ideal for creating a high-converting, fully branded WooCommerce checkout page without needing to touch code — thanks to StoreKit WooCommerce Builder and Elementor.
Pro Tips to Improve WooCommerce Checkout UX (User Experience)
Improving your WooCommerce checkout user experience (UX) is one of the most impactful ways to reduce cart abandonment and increase conversions. A smoother, faster, and more intuitive checkout page keeps users focused and builds trust.
Here are expert tips, backed by real data, to help you get the most out of your WooCommerce checkout page customization:
- Minimize the Number of Checkout Fields. You can remove unnecessary fields using StoreKit’s Form Section settings, or use conditional logic to display fields only when relevant.
For Example: If you don’t need a company name or second address line, hide them to streamline the form.
- Optimize for Mobile Users. You can use Elementor and StoreKit to preview and style your checkout layout for tablet and mobile views. Ensure buttons are full-width, inputs are touch-friendly, and elements don’t overlap.
- Build Trust with Secure Design Elements. For this, you can display trust badges, SSL certificate icons, and secure payment logos near the payment section.
- Keep the Design Clean and Focused. So, avoid clutter. Use whitespace effectively. Highlight key elements like headings and CTA buttons with proper spacing and color contrast.
StoreKit’s styling options (especially border radius, spacing, and typography controls) help keep the design clean and focused.
- Display Shipping and Tax Costs Upfront. Use StoreKit’s Order Details section to clearly show itemized pricing — subtotal, shipping, taxes, and total — before the final button.Also consider offering free shipping thresholds and highlighting them early in the cart/checkout process.
- Use Smart Autofill and Validation. You can enable browser autofill and use real-time validation where possible (e.g., for email or zip code fields).
While StoreKit handles styling, you can also install free extensions like “Checkout Field Editor” to improve field behavior further.
- Offer Multiple Payment Methods. Customize the Payment Methods section in StoreKit to make each option visually distinct, easy to select, and clearly labeled.
- Allow Guest Checkout. In WooCommerce settings, enable guest checkout. You can later prompt account creation after the order is placed.
Use StoreKit’s styling tools to ensure the guest checkout interface is as intuitive as the logged-in experience.
- Show Clear Error Messages. Make error messages visible and descriptive. For example, instead of “Invalid input”, use “Please enter a valid phone number.”
With StoreKit, you can style error states via the Form > Focus and Input tabs — making sure they stand out and guide the user effectively.
These tips, combined with StoreKit’s intuitive tools and Elementor’s flexibility, allow you to build a checkout experience that’s fast, user-friendly, and conversion-focused.
Frequently Asked Questions (FAQ)
Will this affect my payment gateways or order process?
Not at all. Customizing the design doesn’t interfere with payment gateway functionality or order processing.
Is the Checkout (Page) widget compatible with all WooCommerce themes?
Yes, StoreKit is designed to work with most modern WooCommerce-compatible themes, especially those built with or support Elementor.
Can I revert to the default WooCommerce checkout if needed?
Yes, just disable the Checkout (Page) widget in StoreKit settings, and WooCommerce will fall back to the default layout.
Will this slow down my website?
No, StoreKit is optimized for performance and built to work smoothly with Elementor and WooCommerce without affecting speed.
Can I use dynamic content or custom fields in the checkout?
Yes, you can add custom fields with compatible plugins and style them using StoreKit’s form customization options.
Is StoreKit free or paid?
StoreKit offers both free and premium versions. The Checkout (Page) widget is available in the premium plan, which unlocks full design capabilities.
Conclusion: Your Checkout, Your Way
Customizing your WooCommerce checkout page doesn’t have to be complicated or require code. With the StoreKit WooCommerce builder and Elementor, you can design a sleek, branded, and optimized checkout experience that boosts conversions and improves UX — all in just a few clicks.
From editing checkout fields to styling your payment sections and order summary, StoreKit’s Checkout (Page) widget gives you total control over the WooCommerce checkout page design — no limitations.
And the best part? It’s easy, fast, and scalable.
Ready to optimize your WooCommerce checkout page?
Download the Ultimate Store Kit and start customizing your checkout today — no coding required!