

The “Add to Cart” button is a critical part of any WooCommerce store. When it doesn’t appear, becomes unclickable, or fails to respond, it directly affects the user journey and prevents sales from occurring.
A report by the Baymard Institute found that 17% of their purchases due to website errors issues like a broken cart button fall squarely into this category.
This problem is more common than it seems and often stems from conflicts between themes, misconfigured page builders, or JavaScript errors that disrupt the checkout flow. Fortunately, resolving it doesn’t require custom code or developer intervention.
In this step-by-step guide, you’ll learn exactly why the add to cart button in WooCommerce might not be working, how to identify the root cause, and what actions you can take to restore full functionality and ensure your store is ready to convert every visitor into a paying customer.
Why the WooCommerce Add to Cart Button Doesn’t Work
A missing or unresponsive “Add to Cart” button is a frustrating issue for WooCommerce store owners and a costly one. It’s not just a minor glitch; it directly affects your store’s ability to convert visitors.
Let’s explore the most common technical causes behind this issue:
Theme Conflicts
Outdated or poorly coded WordPress themes are a frequent culprit. They may override WooCommerce templates or fail to include necessary hooks, which can break essential features, such as the cart button.
Plugin Conflicts
WooCommerce stores often rely on multiple plugins—many of which interact with the product page. When two plugins (e.g., Element Pack or checkout customizers) inject conflicting scripts, the add to cart button may disappear or fail to function.
AJAX or JavaScript Errors
WooCommerce utilizes AJAX to facilitate real-time cart updates without requiring page reloads. But if a single JavaScript error occurs—due to a theme, plugin, or manual code tweak—the entire process can fail silently.
WooCommerce Settings Misconfiguration
Sometimes, the problem isn’t technical at all—it’s a settings issue. If a product lacks a price, is out of stock, or is set as an external or affiliate product, WooCommerce may hide the “Add to Cart” button by default.
Page Builder or Custom Code Misuse
Visual page builders like Elementor offer flexibility, but incorrect usage can break WooCommerce functionality.
Users may unintentionally remove key widgets, skip dynamic content, or use incompatible templates.
Pro Tip: Use Developer Tools to Identify Errors
Open your browser’s Developer Tools (by pressing F12) and check the Console tab for red error messages.
These JavaScript errors can help you quickly identify plugin conflicts or theme-related issues. It’s one of the fastest ways to diagnose why the WooCommerce add to cart button is not working.
Prerequisites Before You Start
Before diving into the solution, ensure the following essentials are already in place on your website:
- WordPress is installed and properly configured
- WooCommerce is activated and set up with your products
- Elementor page builder is installed and active
Having them ready ensures a smooth setup process and prevents further compatibility issues down the line.
Step-by-Step: How to Fix the Add to Cart Button in WooCommerce
Assuming that you have all the prerequisites in place, let’s move forward and walk through the exact steps to restore a fully functional “Add to Cart” button using Elementor and a reliable WooCommerce builder addon.
Step 1: Installing and Activating a Powerful WooCommerce Builder Addon for Elementor
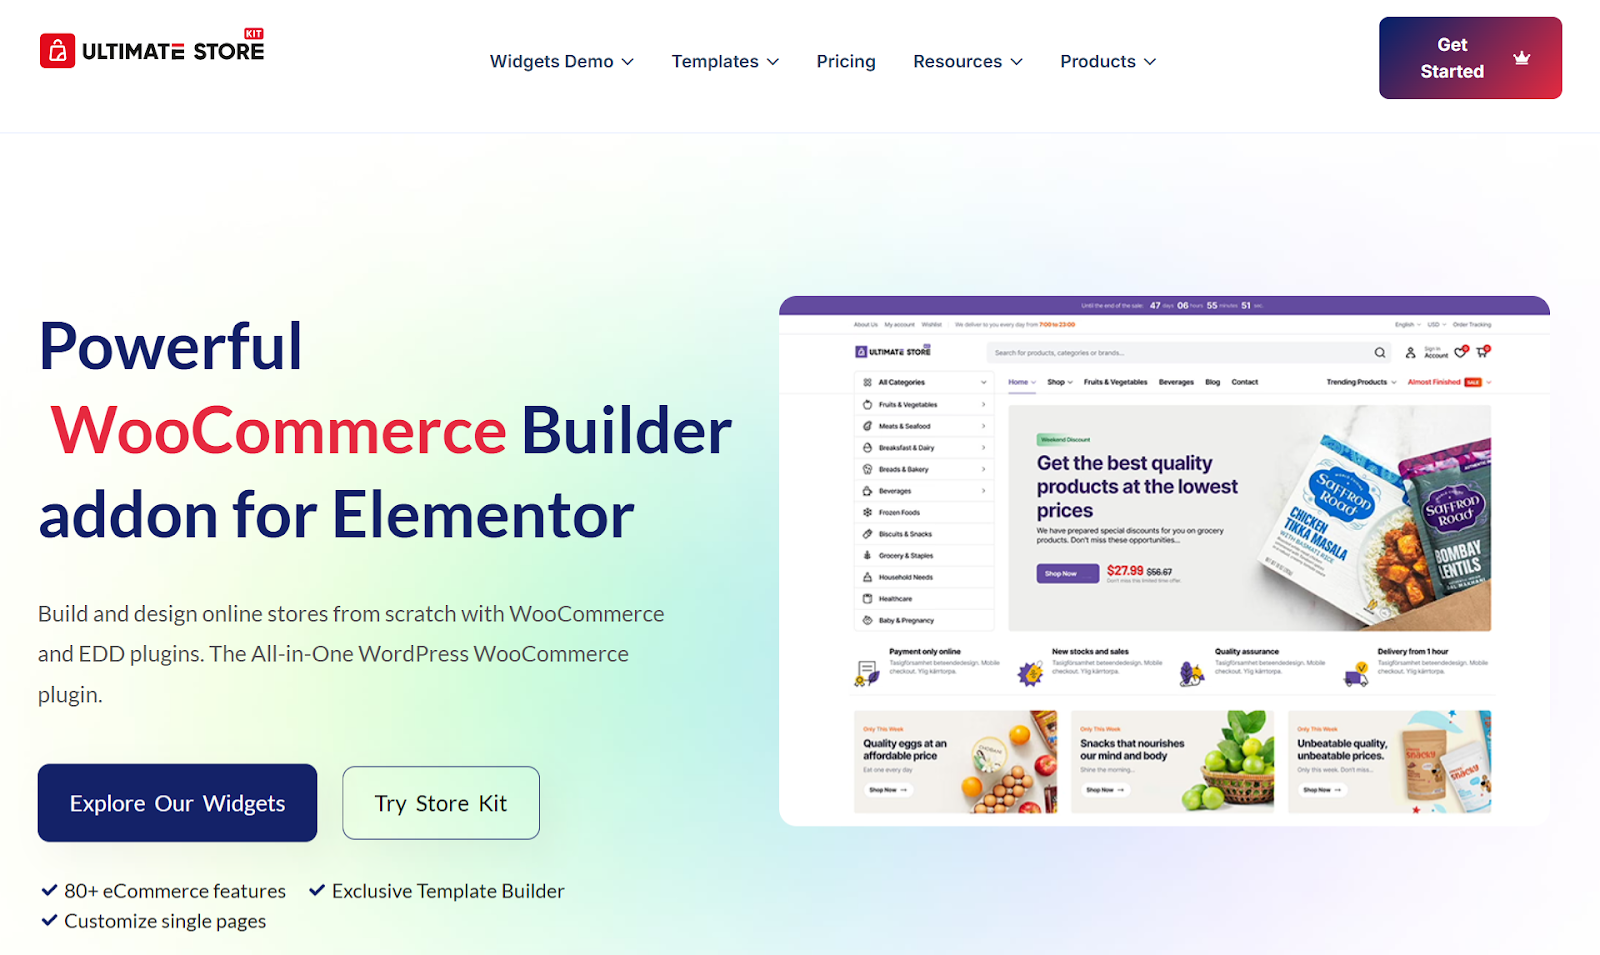
There are only a few Elementor addons that provide true WooCommerce design control—Ultimate Store Kit is one of the most complete and performance-optimized options available.
It gives you access to advanced widgets and layout flexibility without requiring any coding or Elementor Pro.
Here’s why Ultimate Store Kit stands out:
- Seamless integration with WooCommerce and Easy Digital Downloads
- 80+ customizable widgets tailored for online stores
- Visual builder support for shop, cart, checkout, and product pages
- Lightweight, performance-optimized for faster page loads
- SEO-friendly and responsive widget design
- Extensive styling controls for layout, buttons, and quantity fields
- A free version available with essential widgets included
To install the Ultimate Store Kit:
- Go to your WordPress Dashboard
- Navigate to Plugins > Add New
- Search for Ultimate Store Kit
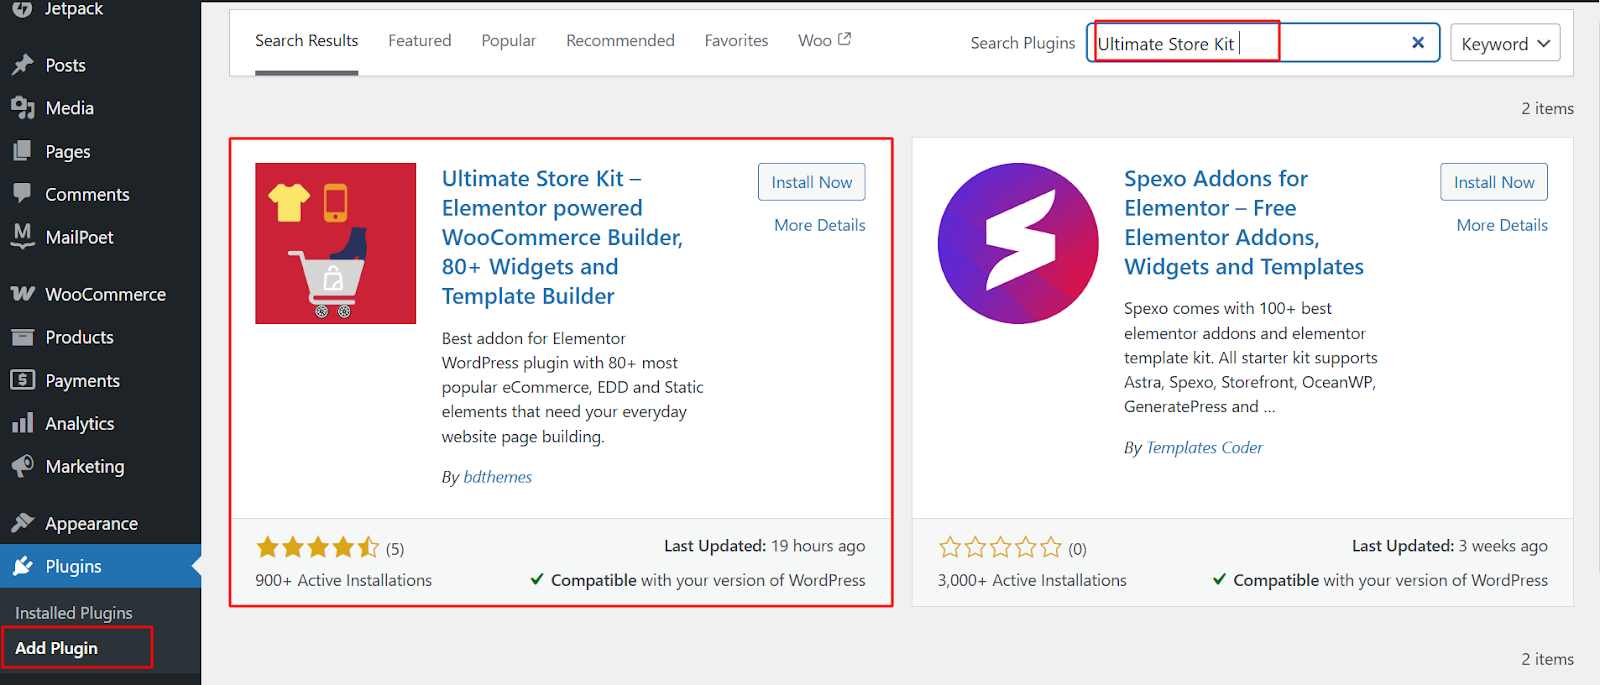
- Click Install Now, then Activate
Once activated, you’re ready to enable the Add to Cart widget in the next step.
Step 2: Enable the Add to Cart Widget from the Ultimate Store Kit
To begin customizing and using the Add to Cart button, you first need to enable the widget within the Ultimate Store Kit plugin.
- Go to Ultimate Store Kit Plugin dashboard: From the left sidebar, click on Ultimate Store Kit to open its main settings page.
- Select the WC Widgets tab: Within the plugin dashboard, click the WC Widgets tab to access all available WooCommerce-related widgets.
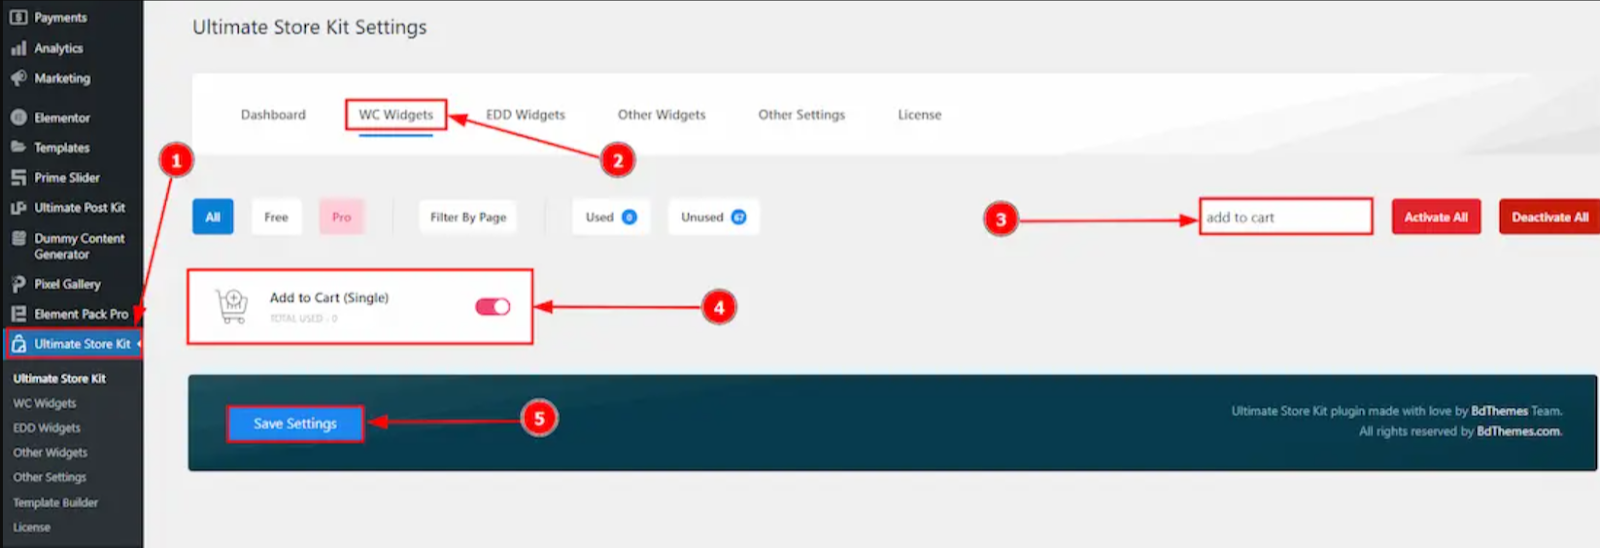
- Search for “Add to Cart Widget”: In the widget list, locate the Add to Cart widget either by scrolling or using the search bar.
- Enable the Add to Cart Widget: Toggle the switch or checkbox to activate the Add to Cart widget.
- Save your settings: After enabling, make sure to click the Save Settings button at the bottom or top of the page to apply the changes.
Once enabled, the Add to Cart widget becomes available for insertion in Elementor.
Step 3: Insert the Add to Cart Widget in Elementor
Next, you will add the Add to Cart widget to your product pages using Elementor’s editor:
- Open the Elementor editor: Go to the WordPress page or product template where you want the Add to Cart button and click Edit with Elementor.
- Add a new section or select an existing one: Choose the appropriate location on your product page layout for the button.
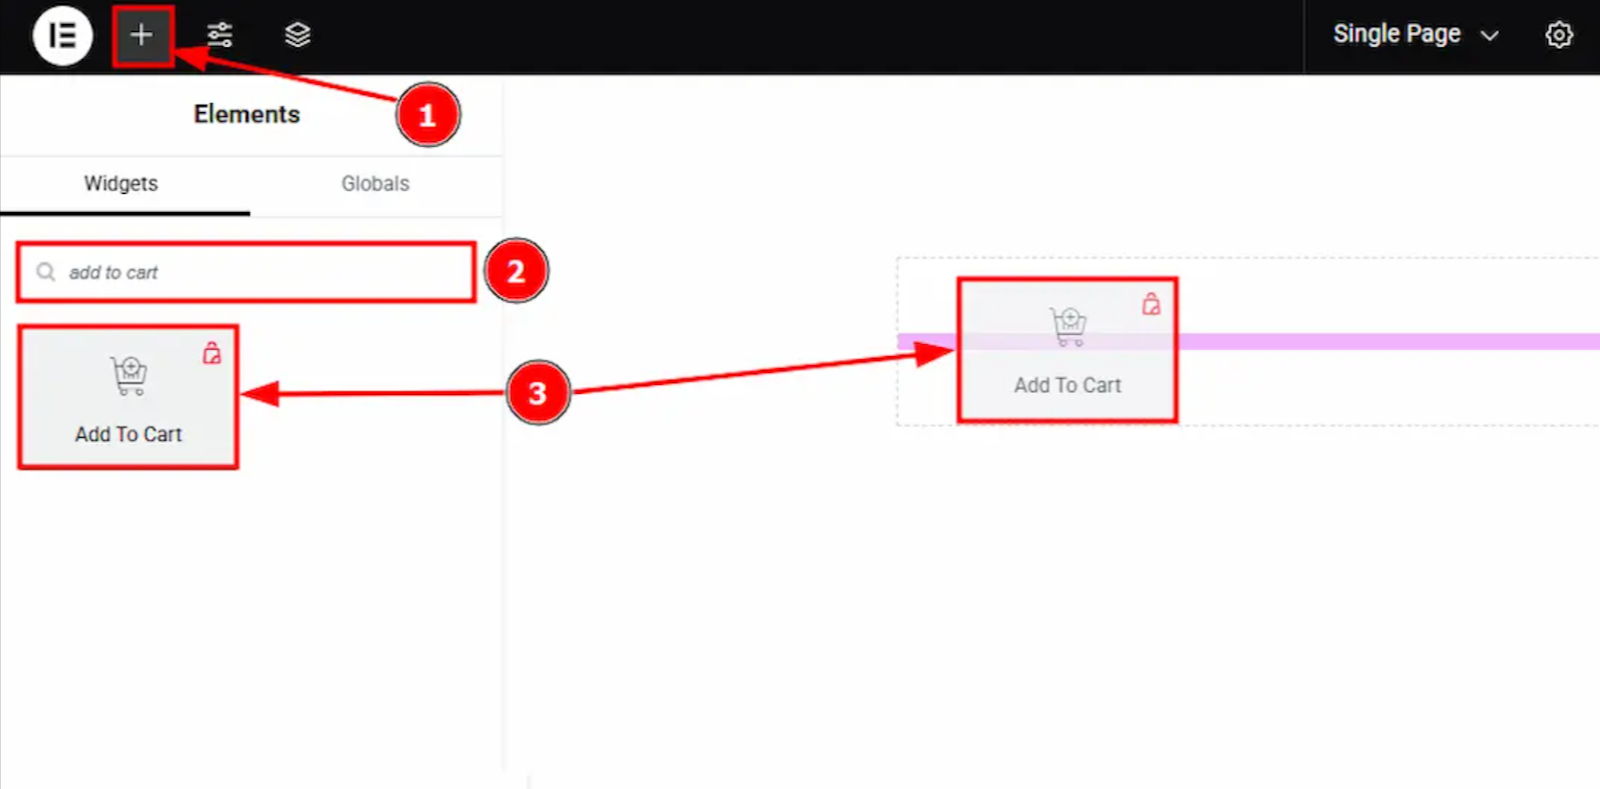
- Search for the Add to Cart widget: In the Elementor sidebar search field, type “Add to Cart” to quickly find the widget.
- Drag and drop the Add to Cart widget: Click and hold the widget, then drag it to your chosen section on the page.
Placement tip: The Add to Cart widget should only be used on product pages or templates that display individual products to ensure proper functionality.
Now that the widget is inserted, you can configure its settings.
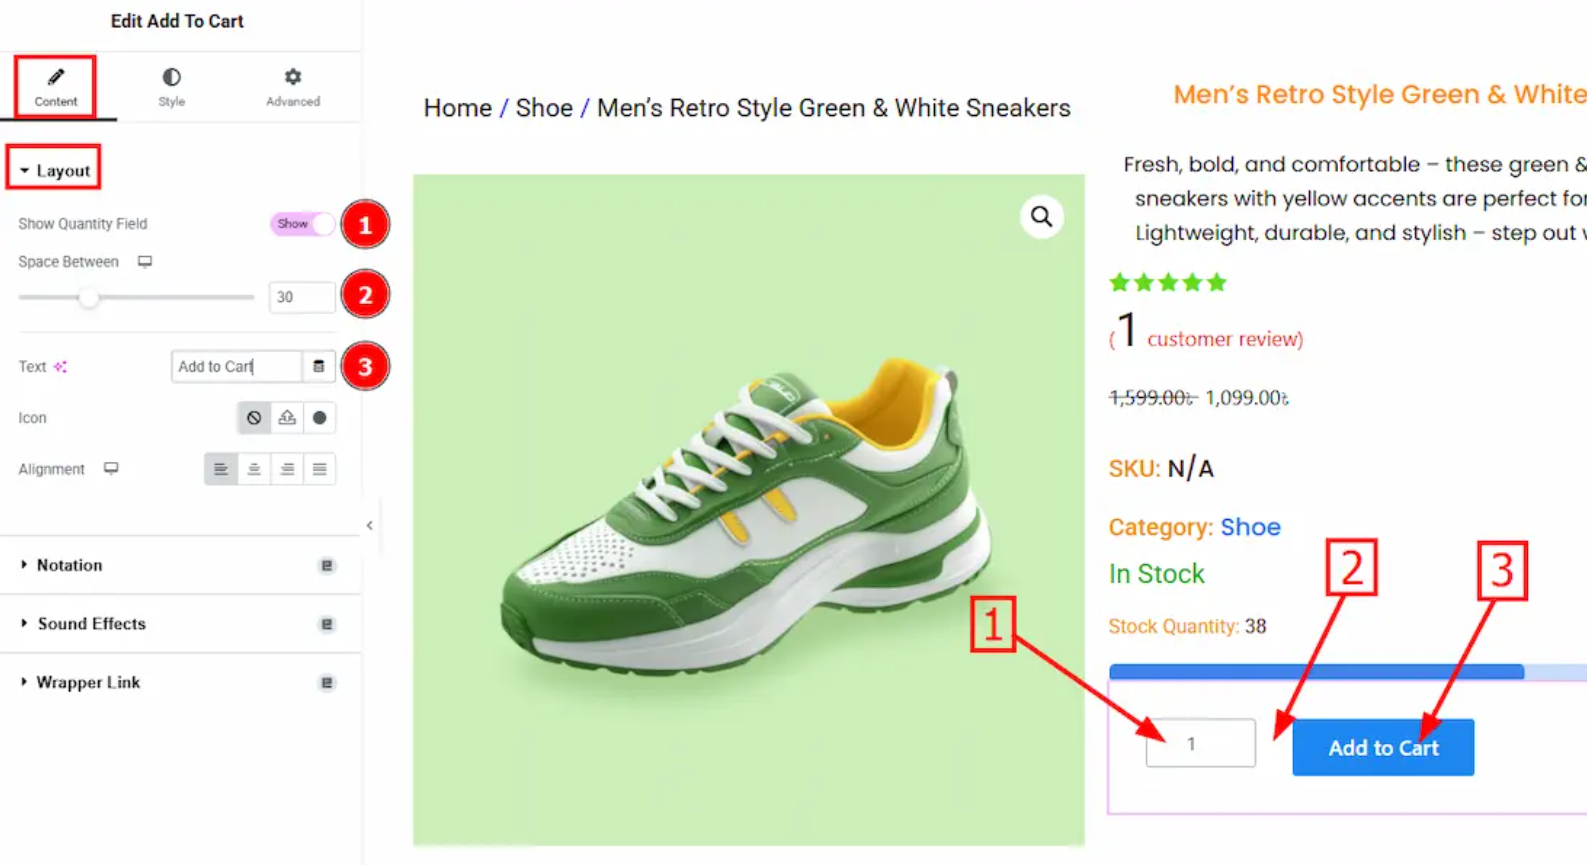
Step 4: Configure the Content Tab
In the Elementor editor, with the Add to Cart widget selected, navigate to the Content tab to adjust the main layout options:
Layout Section
- Show Quantity Field: This toggle allows you to display or hide the quantity input next to the “Add to Cart” button. Enabling this feature allows customers to select the number of items to add at once.
- Space Between: Adjust the horizontal spacing between the quantity field and the Add to Cart button. Use this to improve visual separation and balance.
- Text: Customize the button text here—for example, you can change it from “Add to Cart” to “Buy Now” or any other call-to-action.
- Icon: Optionally, add an icon to the button to enhance its appearance, such as a shopping cart or plus sign.
- Icon Position: Choose whether the icon appears to the left or right of the button text.
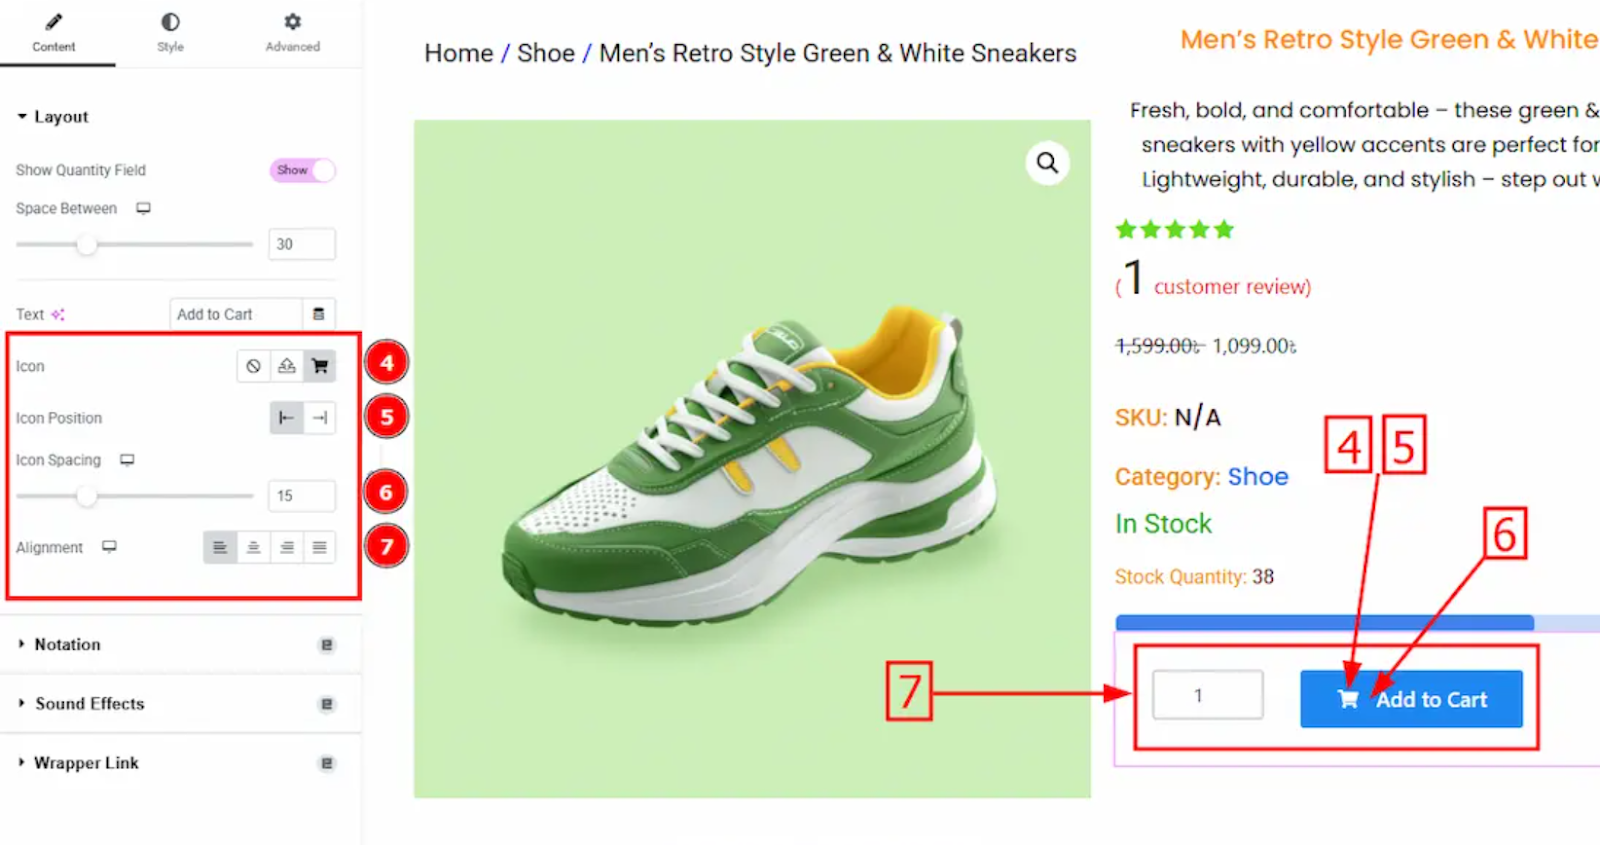
- Icon Spacing: Adjust the space between the icon and the text to ensure readability and style.
- Alignment: Set the alignment of the Add to Cart button and quantity field within their respective containers. Options include left, right, center, or justified to fill the container width.
These content tab settings control the widget’s basic structure and user interface.
Step 5: Style the Add to Cart Button
Switch to the Style tab in Elementor to customize the button’s visual appearance. This tab contains two main sections: Add to Cart and Quantity Field.
Add to Cart Section
The Add to Cart styling section has two tabs: Normal and Hover.
Normal Tab
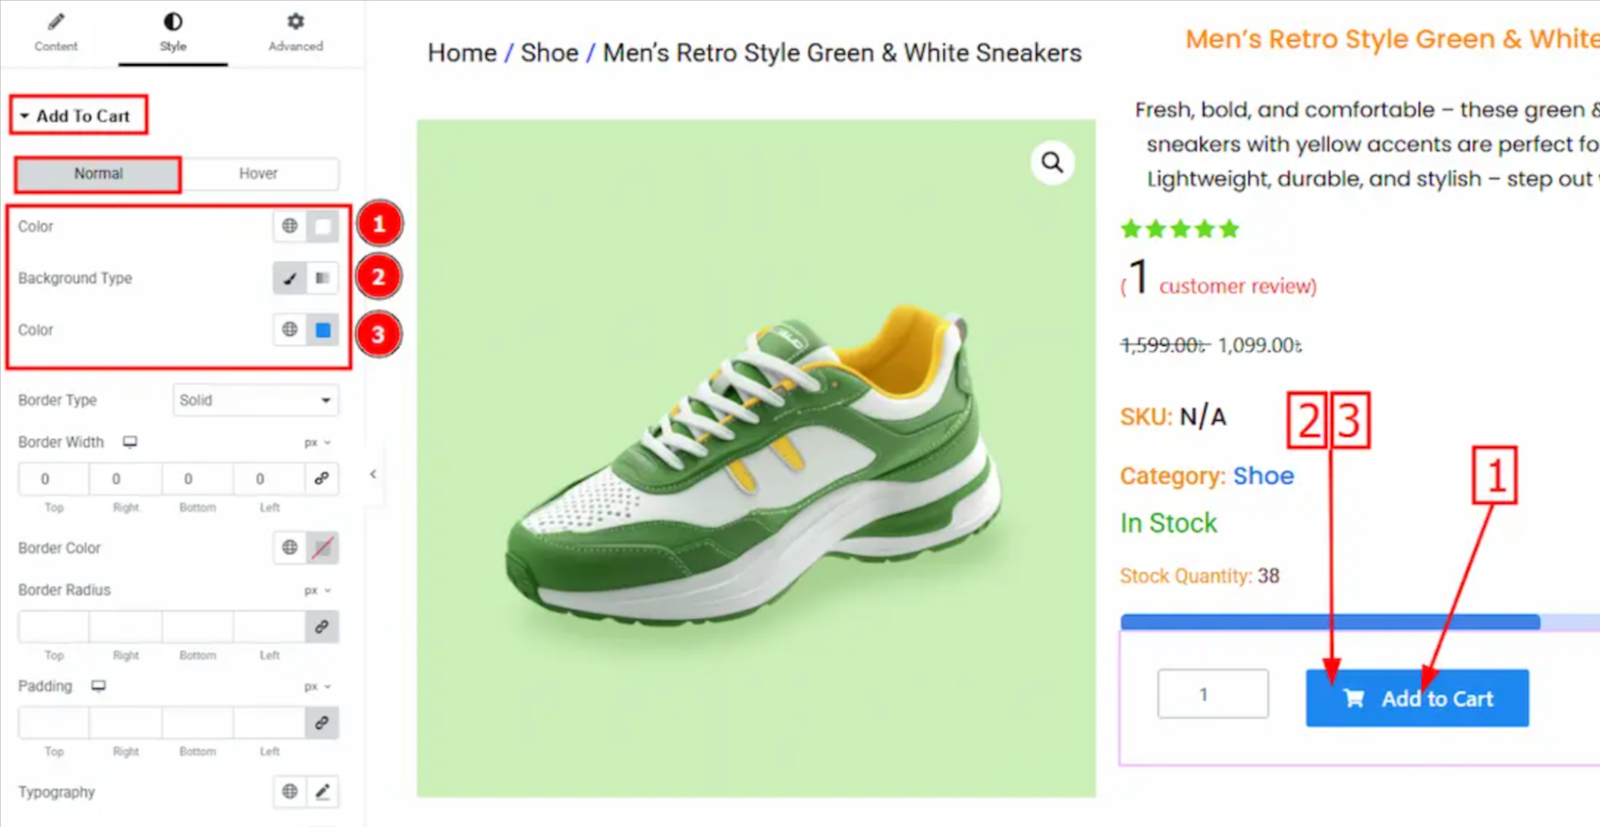
- Color: Set the text color of the button in its default state.
- Background Type: Choose between Classic (solid color or image) or Gradient backgrounds.
- For gradients, you can adjust colors, location stops, angles, and types (radial or linear) for responsive design.
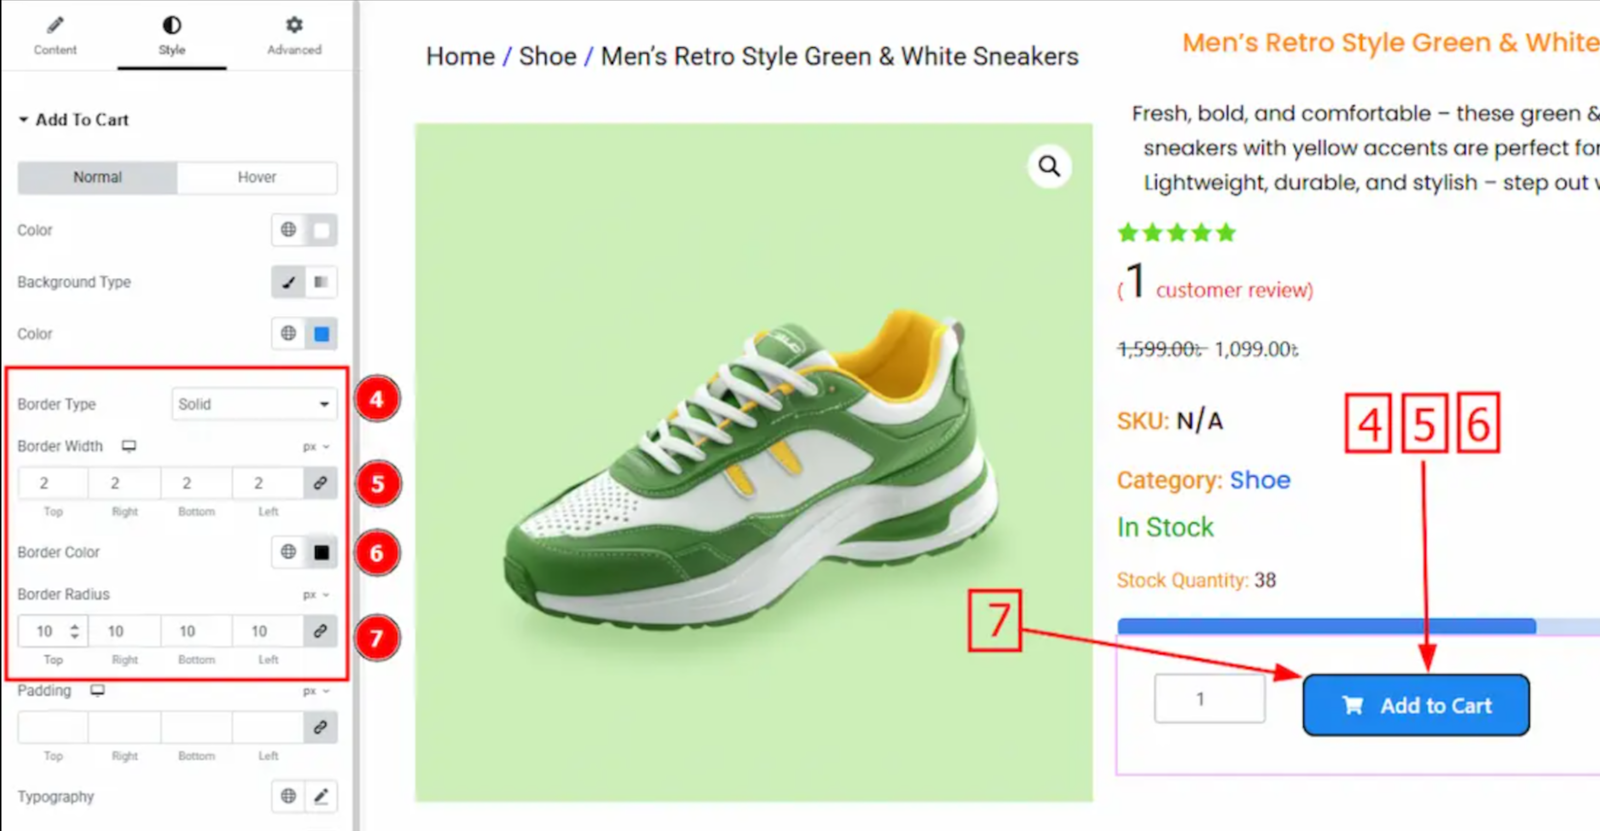
- Border Type: Select the border style: solid, double, dotted, dashed, or groove.
- Border Width: Control the thickness of the button’s border.
- Border Color: Set the border’s color.
- Border Radius: Control the roundness of the button’s corners.
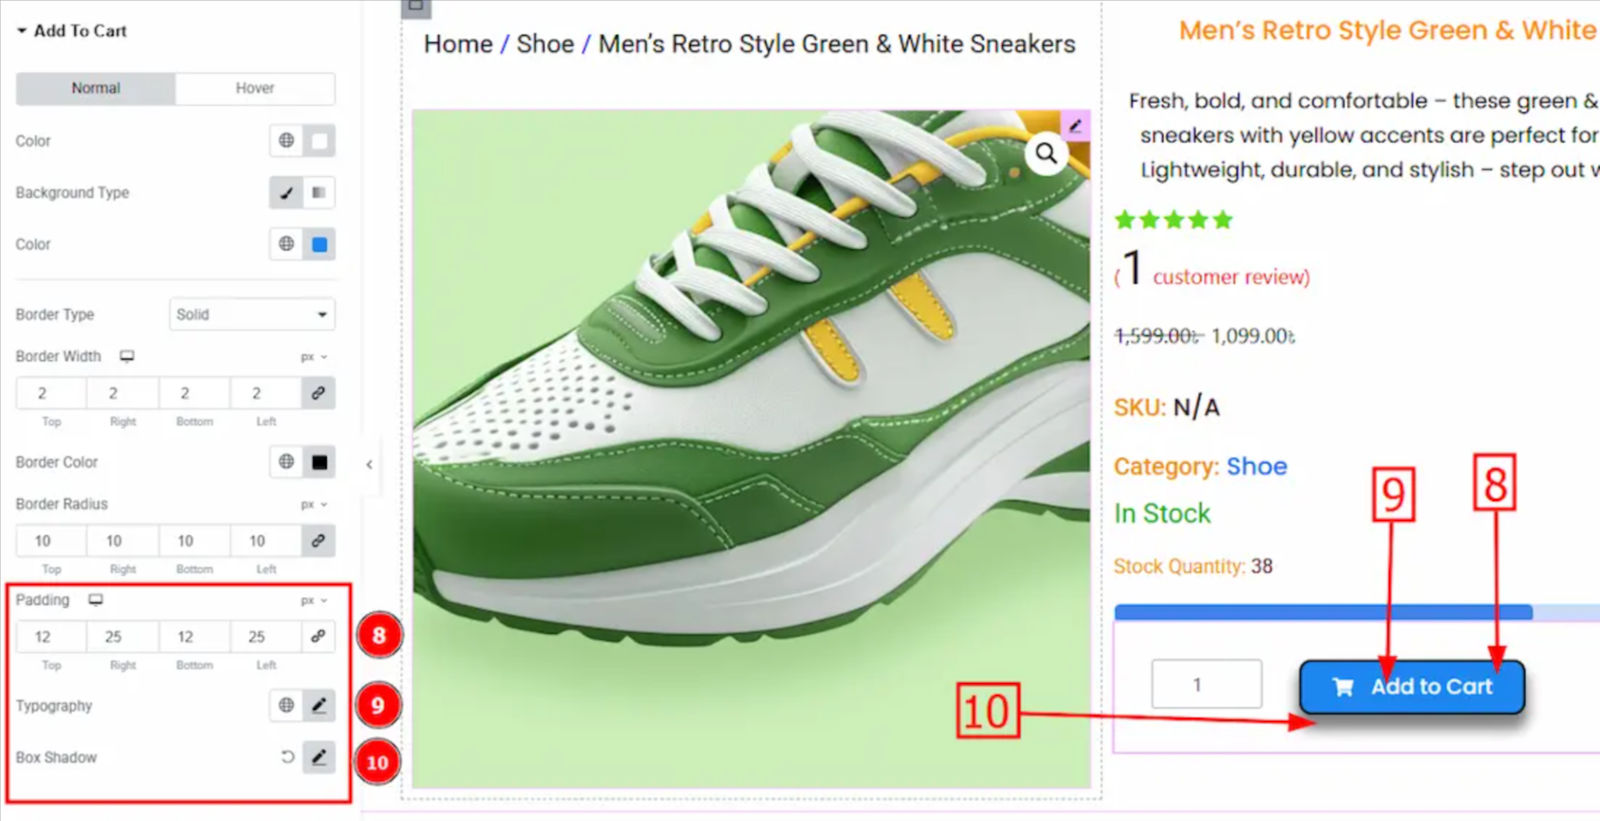
- Padding: Adjust the space inside the button to increase click area and balance.
- Typography: Customize font family, size, weight, letter spacing, line height, and other text properties.
- Box Shadow: Add shadows around the button for depth, specifying horizontal and vertical offsets, blur, spread, and color.
Hover Tab
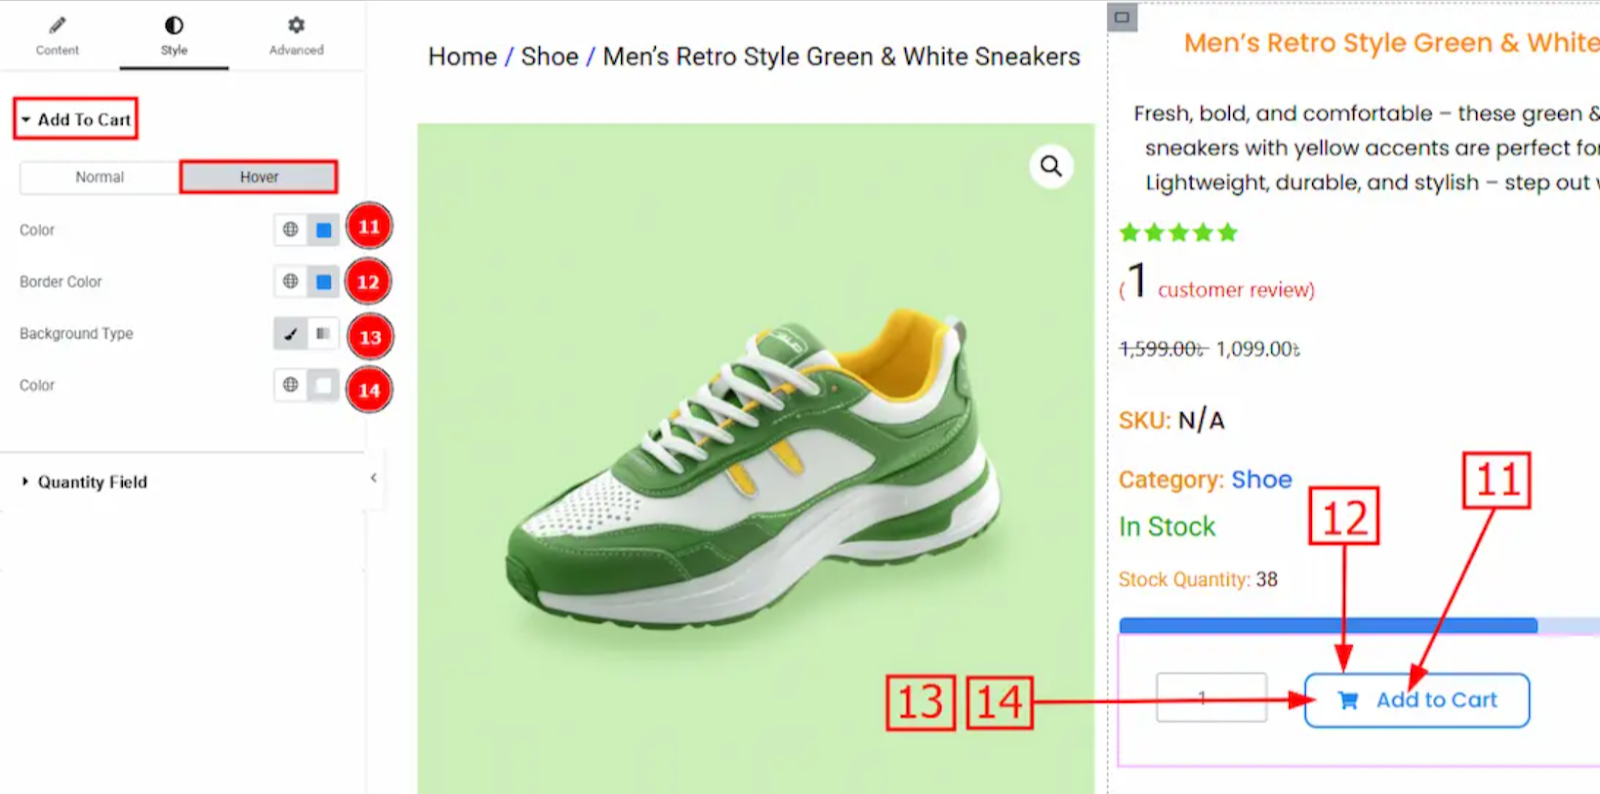
- Text and Icon Color: Change the text and icon color when a user hovers over the button.
- Border Color: Customize the border color on hover.
- Background Type: Similar to Normal, choose a classic or gradient background for the hover state.
- Background Color: Select background colors that activate on hover.
Styling these states enhances the user experience by providing visual feedback on interactions.
Step 6: Style the Quantity Field
Still, under the Style tab, scroll down to the Quantity Field section to customize the appearance of the quantity input box.
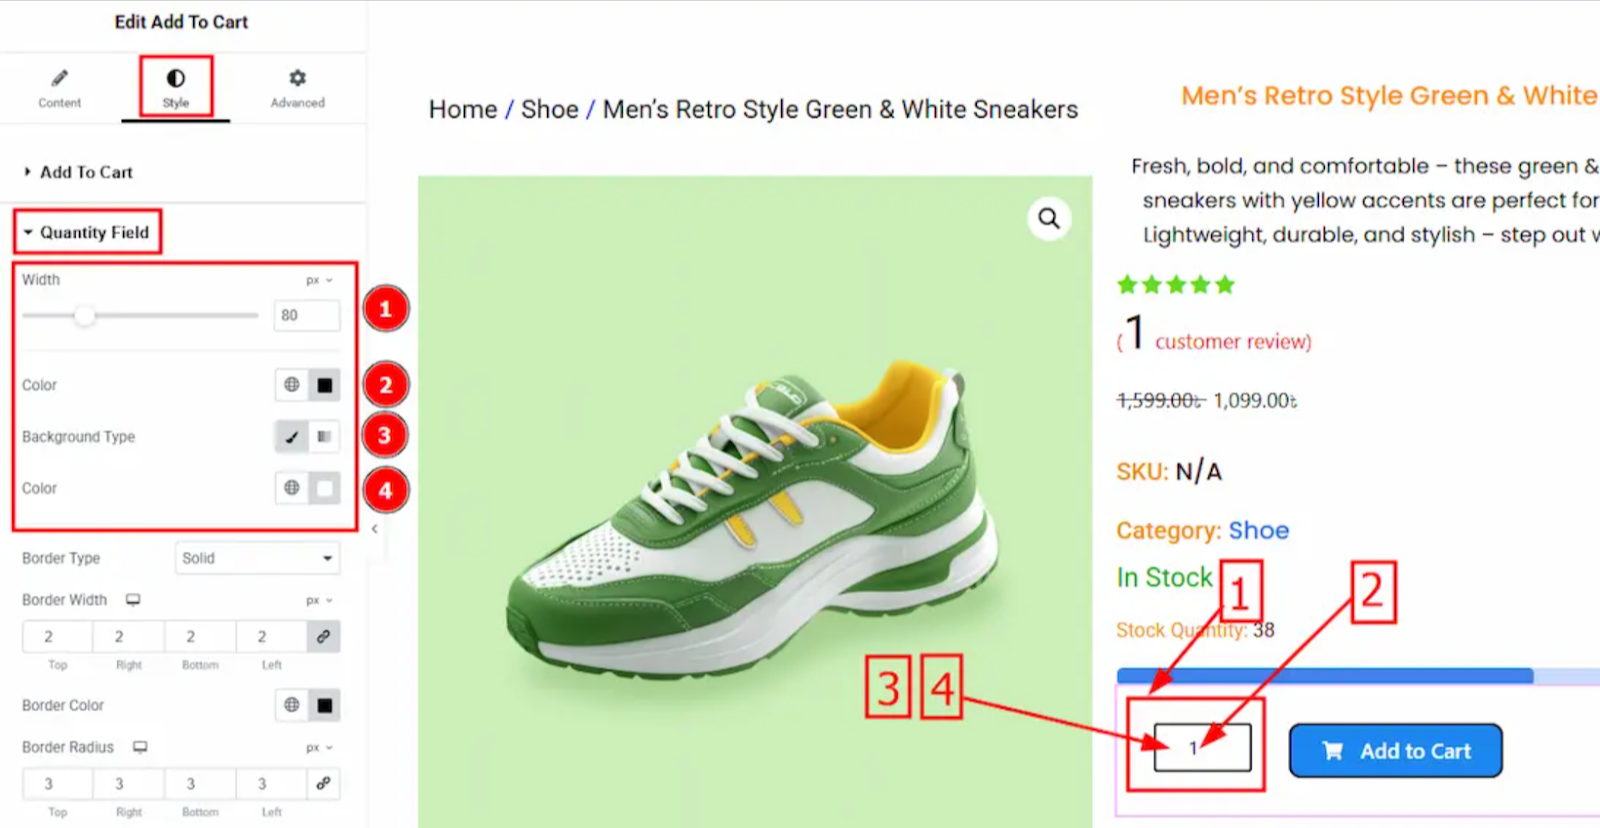
- Width: Adjust the width of the quantity field to fit your design.
- Color: Set the color of the numbers inside the quantity field.
- Background Type: Choose between classic solid colors or gradients for the background.
- Background Color: Select the background color(s) for the quantity input area.
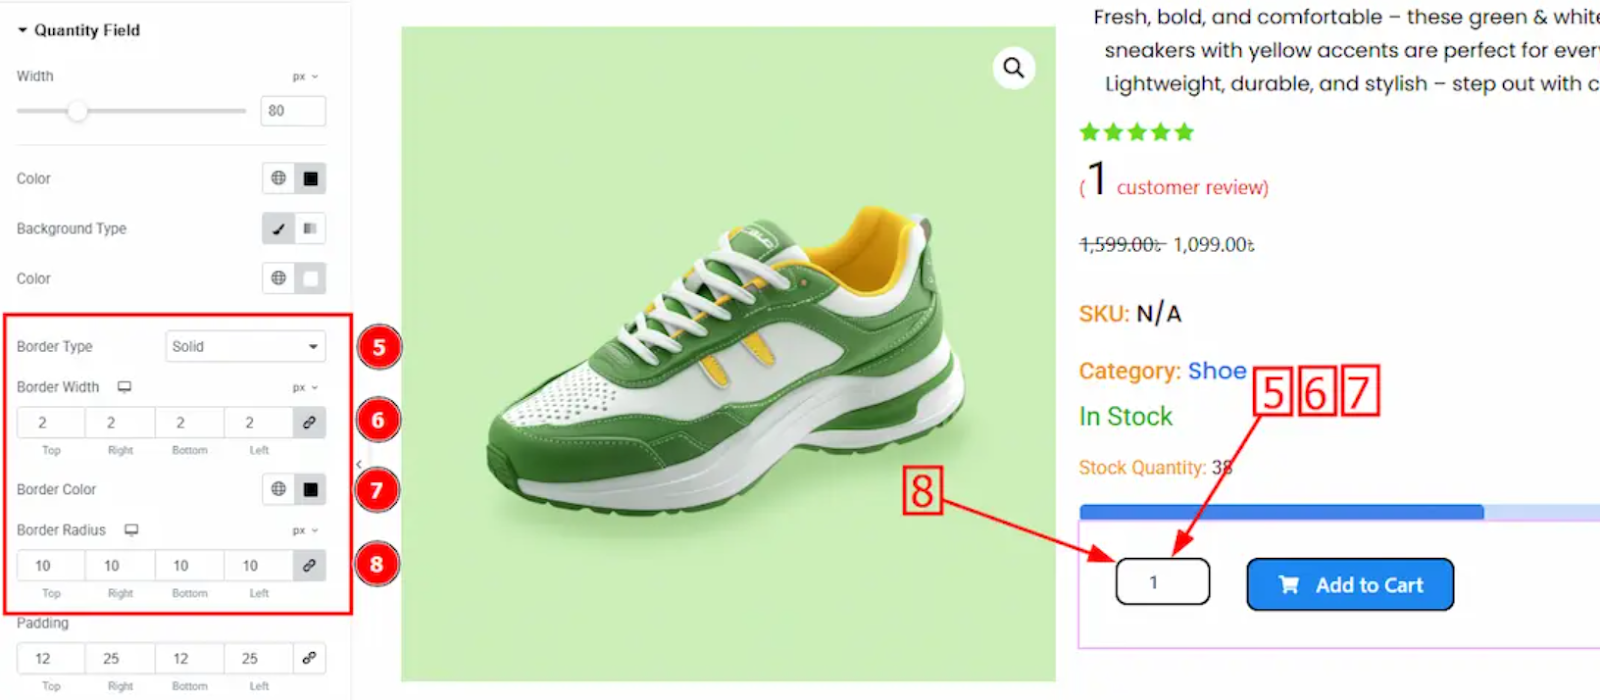
- Border Type: Choose the style of the quantity field’s border (solid, dotted, dashed, etc.).
- Border Width: Control how thick the border appears.
- Border Color: Set the border’s color.
- Border Radius: Adjust corner roundness to match the button or site style.

- Padding: Add internal spacing around the input numbers for comfort and clarity.
- Margin: Adjust external spacing around the quantity field to control distance from other elements.
- Typography: Customize the font style, size, weight, and spacing of the numbers.
- Box Shadow: Add shadows to the quantity field for subtle depth effects.
Congratulations! By following these steps, you have fully enabled, inserted, and customized the Add to Cart widget on your WooCommerce product pages using Ultimate Store Kit and Elementor.
How to Fix the Add to Cart Button on Mobile Devices
Mobile users comprise a significant portion of online shoppers, so ensuring the “Add to Cart” button works seamlessly on mobile devices is crucial.
However, mobile-specific issues can cause the button to appear missing, misaligned, or unclickable if not properly optimized.
Common Mobile-Specific Issues
- Responsive Layout Issues: Occasionally, the Add to Cart button or quantity field fails to adjust automatically to smaller screen sizes, resulting in elements overlapping, shrinking excessively, or disappearing altogether.
- Button Size and Touch Targets: Small buttons are challenging to tap on mobile devices, which can frustrate users and lead to lost sales. Ensuring the button meets minimum touch target sizes improves usability.
- Visibility Issues: Certain mobile-specific CSS or page builder settings may inadvertently hide the button or related elements on smaller screens.
How to Customize Mobile View in Elementor
Elementor offers built-in responsive editing tools that enable you to preview and customize the appearance of your Add to Cart button on various devices.
- In Elementor’s editor, click on the Responsive Mode icon (monitor/mobile/tablet) at the bottom of the sidebar.
- Switch to the Mobile view to see exactly how the button displays on smartphones.
- Adjust widget settings, such as alignment, spacing, padding, and margins, specifically for mobile devices without affecting desktop or tablet views.
- Use the Typography options to increase font size or button text on mobile for better legibility and easier tapping.
Using Ultimate Store Kit’s Responsive Options
Ultimate Store Kit extends Elementor’s responsive capabilities with dedicated controls for WooCommerce widgets like the Add to Cart button:
- Alignment: Set the button and quantity field alignment individually for desktop, tablet, and mobile devices, ensuring they appear balanced and accessible on every screen.
- Spacing and Padding: Control the space inside and around the button and quantity field independently across device breakpoints. This ensures there’s enough padding for comfortable tapping and proper separation from other elements.
- Visibility Controls: You can selectively hide or show the Add to Cart widget or quantity field on specific devices, allowing for a simplified mobile layout without compromising essential functionality.
By carefully customizing these responsive settings, you can ensure that your WooCommerce ‘Add to Cart’ button remains fully visible, clickable, and user-friendly on all screen sizes.
FAQs – WooCommerce Add to Cart Button Issues
Why is the Add to Cart button missing in WooCommerce?
The Add to Cart button can be missing due to theme conflicts, plugin issues, misconfigured product settings, or improper use of page builders. Often, outdated themes or incompatible plugins disrupt WooCommerce templates, causing the button not to display.
How do I resolve an unclickable ‘Add to Cart’ button?
An unclickable button usually indicates JavaScript or AJAX errors on your site. You can fix this by checking for plugin conflicts, clearing cache, and ensuring your theme and plugins are updated. Using developer tools (F12) to inspect errors helps identify the root cause of the issue.
Can a plugin conflict cause my button to disappear?
Yes. Plugin conflicts are one of the most common reasons for the Add to Cart button disappearing or malfunctioning. Conflicting JavaScript or overlapping functionalities between WooCommerce add-ons or page builder plugins can cause such issues.
Does Ultimate Store Kit require Elementor Pro to work?
No. Ultimate Store Kit works fully with the free version of Elementor and does not require Elementor Pro. It provides advanced WooCommerce widgets, including the Add to Cart widget, accessible to all Elementor users.
Will this method work for variable products?
Yes. The Add to Cart widget in Ultimate Store Kit supports variable products, allowing customers to select variations before adding items to the cart, ensuring full compatibility with WooCommerce’s product types.
Conclusion
A properly functioning Add to Cart button is crucial for the success of any WooCommerce store, directly impacting sales and customer satisfaction. Without it, potential buyers can’t complete their purchases, resulting in lost revenue and diminished trust.
With Ultimate Store Kit, you can easily fix Add to Cart button issues without writing a single line of code. Its intuitive widgets empower you to quickly and effectively customize and enhance your product pages.
Beyond the “Add to Cart” button, Ultimate Store Kit offers a wide range of no-code widgets designed to enhance the overall shopping experience and boost conversions.
Ready to power up your WooCommerce store? Explore Ultimate Store Kit for more no-code widgets that convert.